PixieBrix Docs
CommunityTemplates
  • Welcome to PixieBrix!
  • Quick Start
    • Productivity Enthusiasts
    • Mod Developer
    • Team Member
    • Enterprise Admin
  • Activating Mods
    • Linking Your PixieBrix Account
    • Using the Marketplace
      • Finding Mods
      • Activating From the Marketplace
    • Activating Your Assigned Mods
    • Updating Mods
    • Troubleshooting
  • Developing Mods
    • Building Your First Mod
    • Developer Concepts
      • Types of Mods
        • Context Menu Item
        • Button
          • Troubleshooting Buttons
        • Sidebar Panel
        • Trigger
          • Working with Custom Events
        • Quick Bar Action
        • What Are URL Match Patterns?
      • Text Template Guide
        • Basic Text Templates
        • Transforming Data with Filters
        • Writing Conditional Statements
        • Template Examples
      • Using Bricks
        • Brick Input Data Types
        • Bricks for Scraping Data
          • Retrieving Attributes from Elements
        • Bricks for Interacting with the DOM
        • Bricks for AI
          • Passing Custom Data to an LLM
      • Data Context
        • Types of Variables
        • Using Mod Variables
        • Using Page State (Advanced)
        • Referencing Variables
      • User Input
        • Show a Modal or Sidebar Form
        • Prompt for Input
      • Working With APIs
        • API Providers
        • Encoding URL Parts
        • Selecting and Transforming API Results
      • Working with Markdown
      • Control Flow
        • Conditional Field on Bricks
        • Control Flow Bricks
          • When to Use Control Flow Bricks
          • Control Flow Brick Output
          • Raising Exceptions/Errors
          • FAQs
      • Transforming Data
        • Using JQ in PixieBrix
        • Using JavaScript in PixieBrix
      • Building Interfaces
        • Understanding the Preview Panel
        • Styling Elements
        • Adding Advanced Elements
        • Custom Themes/CSS
      • Advanced: Brick Runtime
    • Customizing Existing Mods
    • Sharing Mods
      • Packaging a Mod
      • Exposing Activation-Time Mod Options
      • Sharing a Mod With Your Team
      • Updating Published Mods
    • Troubleshooting
    • Mod Development Best Practices
    • Advanced: Workshop
  • Platform Overview
    • Page Editor
      • Open the Page Editor
      • Page Editor Components
        • Mod Listing Panel
        • Brick Actions Panel
        • Brick Configuration Panel
        • Data Panel
    • Admin Console
      • Campaigns
    • Extension Console
  • Managing Teams
    • Creating a Team
    • Inviting Members
    • Access Control
      • Roles
      • Groups
    • Managing Team Integrations
    • Assigning Mods
    • Billing
    • Advanced: Isolating Development, Test, and Production Environments
  • Deploying Mods
    • Deployment Keys
  • Integrations
    • Configuring Integrations
    • Integration Scenarios
    • Embed Web Apps via IFrames
    • Integrate with Desktop Apps via Custom URL Schemes
    • Airtable
    • Atlassian
    • Automation Anywhere
      • Configure Automation Anywhere Integration in PixieBrix
      • Embedding the Automation Co-Pilot
      • Running AA Bots via Control Room
      • Creating AARI Requests
      • Enhancing AARI Table Fields
      • Enhancing AARI Forms
      • AARI Extensions Enterprise IT Setup Guide
        • Point PixieBrix Extension to Staging AuthConfig App
      • Create a Control Room Certificate on Windows
    • Google Drive
      • Creating Google Drive Integration
      • Google Drive Bricks
      • Migrating from Google Sheet to Google Drive Integration
      • Reactivating Your Google Sheet Mods
      • Troubleshooting Google Integration Errors
      • Sheety: Sharing Google Sheets without Google Workspace
      • [LEGACY] Configure Google Sheets Integration
      • [LEGACY] Adding a Google Sheet to Mod Input
    • Guru
    • Hunter.io
    • HTTP Basic Authentication
    • Microsoft
      • Connect to Custom Azure Applications/APIs
      • Add a Power BI chart to the Sidebar
      • Microsoft Power Automate
      • Microsoft Office
        • Microsoft OneDrive / Files
        • Microsoft Excel
        • Microsoft Sharepoint
        • Microsoft Teams
        • FAQs & Troubleshooting
    • Notion
      • Public (OAuth2)
      • Internal (API Token)
    • OAuth2 Client Credentials
    • Ollama
    • OpenAI/ChatGPT
    • Pipedrive
    • Retool
      • Embed a Retool App
      • Trigger Retool Workflows
    • Robocorp Control Room Integration
    • Salesforce
    • SerpAPI
    • ServiceNow
    • Slack
    • Streamlit
    • Trello
      • Configure Trello integration
      • Find board and list IDs in Trello
    • UiPath
      • Running unattended bots via UiPath Cloud Orchestrator
      • Embed a UiPath App
      • Running local bots via UiPath Assistant
    • Val Town
    • Zapier
    • Zendesk
    • Advanced: Custom Integrations
  • Storing Data with Team Databases
  • Enterprise IT Setup
    • Authentication
      • Enabling Login with Microsoft
      • Enabling Login with Google
      • Setting Up SAML/SSO
    • Browser Extension Installation and Configuration
      • Browser Extension Installation Policy
        • Google Workspace Policy
        • Windows Group Policy/ADMX
        • Windows Registry
        • Citrix Profile Configuration
        • Advanced: Create a Windows Installer EXE
      • Browser Extension Configuration Policy
        • Extension Authentication Configuration
        • Microsoft Edge Mini Menu Configuration
        • Microphone and Audio Capture Configuration
        • Extension Logo Configuration
        • Managed Storage Schema
      • Browser Extension Security
    • Network/Email Firewall Configuration
    • Custom Branding and Themes
    • Security and Compliance
    • Performance
    • Version Control and Backups
    • Web Application Platform Configuration
    • Enterprise Troubleshooting
  • Developer API
    • Service Accounts
    • Making an API Request
    • Team Management APIs
    • Package Management APIs
    • Deployment APIs
    • Database APIs
    • Health Check APIs
    • OpenAPI Specification
    • Deprecated Resources
  • How To
    • Installing the PixieBrix Chrome Browser Extension
    • Changing the Quick Bar Shortcut
    • Pinning the Chrome Extension
    • Updating the Browser Extension
    • Installing a PixieBrix Pre-Release Build
    • Editing Pages with iFrames
    • Adding bricks to mods
    • Opening the PixieBrix Sidebar
    • Troubleshooting
      • Troubleshooting Bad API Requests
      • Troubleshooting Network Errors
      • Troubleshooting IndexedDB Errors
      • Troubleshooting Browser Extension Performance and Crashes
      • Troubleshooting extension corruption errors
  • Release Notes
    • 🏗️Release 2.3.0
    • ✅Release 2.2.10
    • 📜Release Notes Archive
      • ✅Release 2.2.9
      • ✅Release 2.2.8
      • ✅Release 2.2.7
      • ✅Release 2.2.6
      • ✅Release 2.2.5
      • ✅Release 2.2.4
      • ✅Release 2.2.3
      • ✅Release 2.2.2
      • ✅Release 2.2.1
      • ✅Release 2.2.0
      • ✅Release 2.1.7
      • ❌Release 2.1.6
      • ✅Release 2.1.5
      • ✅Release 2.1.4 (Hotfix)
      • ✅Release 2.1.3
      • ✅Release 2.1.2
      • ✅Release 2.1.1
      • ✅Release 2.1.0
      • ✅Release 2.0.7
      • ✅Release 2.0.6
      • ✅Release 2.0.5
      • ✅Release 2.0.4
      • ✅Release 2.0.3
      • ✅Release 2.0.2
      • ✅Release 2.0.1 (Hotfix)
      • ✅Release 2.0.0
      • PixieBrix Browser Extension 2.0.0 Migration Guide
      • ✅Release 1.8.14
      • ✅Release 1.8.13
      • ✅Release 1.8.12
      • ✅Release 1.8.11
      • ✅Release 1.8.10
      • ✅Release 1.8.9
      • ✅Release 1.8.8
      • ✅Release 1.8.7
      • ✅Release 1.8.6
      • ✅Release 1.8.5
      • ✅Release 1.8.4
      • ✅Release 1.8.3
      • ✅Release 1.8.2
      • ✅Release 1.8.1
      • ✅Release 1.8.0
      • ✅Release 1.7.41
      • ✅Release 1.7.40
      • ✅Release 1.7.39
      • ✅Release 1.7.38
      • 🚫Release 1.7.37
      • ✅Release 1.7.36
      • ✅Release 1.7.35
      • ✅Release 1.7.34
      • ✅Release 1.7.33
      • ✅Release 1.7.32
      • 🚫Release 1.7.31
      • ✅Release 1.7.30
      • ✅Release 1.7.29
      • ✅Release 1.7.28
      • ✅Release 1.7.27
      • ✅Release 1.7.26
      • ✅Release 1.7.25
      • ✅Release 1.7.24
      • ✅Release 1.7.23
      • ✅Release 1.7.22
      • ✅Release 1.7.21
      • ✅Release 1.7.20
      • ✅Release 1.7.19
      • ✅Release 1.7.18
      • ✅Release 1.7.17
      • ✅Release 1.7.16
      • ✅Release 1.7.15
      • ✅Release 1.7.14
      • ✅Release 1.7.13
      • ✅Release 1.7.12
      • ✅Release 1.7.11
      • ✅Release 1.7.10
      • ✅Release 1.7.9
      • ✅Release 1.7.8
      • ✅Release 1.7.7
      • ✅Release 1.7.6
      • 🚫Release 1.7.5
      • ✅Release 1.7.4
      • ✅Release 1.7.3
      • ✅Release 1.7.2
      • ✅Release 1.7.1
      • ✅Release 1.7.0
      • ✅Release 1.6.4
      • ✅Release 1.6.3
      • ✅Release 1.6.2
      • ✅Release 1.6.1
      • ✅Release 1.6.0
      • ✅Release 1.5.11
      • ✅Release 1.5.10
      • ✅Release 1.5.9
      • ✅Release 1.5.8
      • ✅Release 1.5.7
      • ✅Release 1.5.6
      • ✅Release 1.5.5
      • ✅Release 1.5.4
      • ✅Release 1.5.3
      • ✅Release 1.5.2
      • ✅Release 1.5.1
      • ✅Release 1.5.0
      • ✅Release 1.4.12
      • ✅Release 1.4.11
      • ✅Release 1.4.10
      • ✅Release 1.4.9
      • ✅Release 1.4.8
      • ✅Release 1.4.7
      • ✅Release 1.4.6
      • 🚫Release 1.4.5
      • ✅Release 1.4.4
      • 🚫Release 1.4.3
      • 🚫Release 1.4.2
      • ✅Release 1.4.1
      • ✅Release 1.4.0
      • 🚫Release 1.3.2
      • ✅Release 1.3.1
      • ✅Release 1.3.0
      • ✅Release 1.2.11
      • ✅Release 1.2.10
      • ✅Release 1.2.9
      • ✅Release 1.2.8
      • ✅Release 1.2.7
      • ✅Release 1.2.5
      • ✅Release 1.2.4
      • ✅Release 1.2.3
      • ✅Release 1.2.2
      • ✅Release 1.2.1
      • ✅Release 1.2.0
      • ✅Release 1.1.12
      • ✅Release 1.1.11
      • ✅Release 1.1.10
      • ✅Release 1.1.9
      • ✅Release 1.1.8
      • ✅Release: 1.1.7
      • ✅Release: 1.1.6
      • ✅Release: 1.1.5
      • ✅Release: 1.1.4
      • ✅Release: 1.1.3
      • ✅Release: 1.1.2
      • ✅Release: 1.1.1
      • ✅Release: 1.1.0
      • ✅Release: 1.0.3
      • ✅Release: 1.0.2
      • ✅Release: 1.0.1
      • ✅Release: 1.0.0
      • ✅Release: 0.2.2
      • ✅Release: 0.2.1
  • Tutorials
    • Developer Tutorials
      • Beginner
        • Search Yelp Reviews from OpenTable
        • Right-click Currency Conversion
        • Web Highlighter Tutorial
        • Trello Status Sidebar
        • Right-click Google Scholar Search
        • Google Dorking
        • Tweet a Link
        • Ask AI To Generate a LinkedIn Connection Request
        • How to Customize the AI Rate and Fix Mod
        • Right-click Translate Language
        • Basic Translation Tutorial
        • AI Bot Sidebar
        • Search and Highlight Words on a Page
      • Intermediate
        • Create a status nudge button in Github
Powered by GitBook
On this page
  • Scrape Page Metadata
  • Scrape data from elements on the page
  • Scrape data from tables
  • ✨ Beta ✨ Scrape data from the page using AI

Was this helpful?

  1. Developing Mods
  2. Developer Concepts
  3. Using Bricks

Bricks for Scraping Data

PreviousBrick Input Data TypesNextRetrieving Attributes from Elements

Last updated 8 months ago

Was this helpful?

When building automations with PixieBrix, you'll often want to scrape information from a webpage. This could be as simple as pulling the current page's title or URL, or as complex as scraping a consistent field scraped from multiple pages, like the price of an Airbnb listing, a Salesforce case number, or something else entirely.

Scrape Page Metadata

If you want some metadata about the current page, you can always access that out of the box wherever you trigger a mod.

For instance, you can see in our newly added Quick Bar Action brick we have a Preview panel on the right side with an object called @input. Click the caret icon (‣) before that, and you'll see everything you have access to.

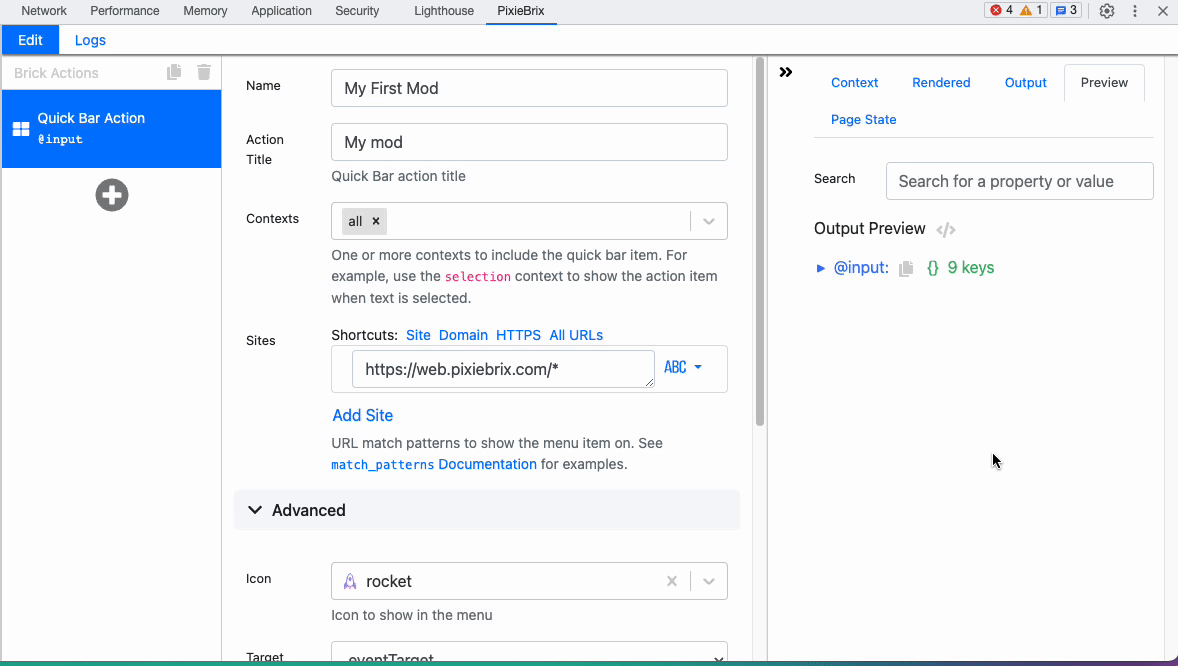
Click the copy icon next to a field, and it will copy the path to your clipboard, allowing you to reference it later in other bricks!

Scrape data from elements on the page

If you want to scrape information from elements that are on the page, you'll need to use our Extract from Page brick.

With this brick, you'll be able to read data associated with any specific elements on the page, you just need to pass it through the right jQuery selectors, and PixieBrix can even help you with that!

Scrape data from tables

✨ Beta ✨ Scrape data from the page using AI

If you're unsure how to pick selectors, we've got another brick you can use. With the Extract from Page using AI brick, you can pass a section of a page to ChatGPT and ask it to find the right property for you rather than figure it out yourself.

Here are a few things to keep in mind before trying this out.

1) You can't pass on the whole body of a page or extremely large containers. It's too much data for ChatGPT to handle in one request. Try selecting the smallest element you can.

2) Click Add Item in the Properties field and then type the property you're searching for and see if AI can find it for you, like this!

🚨Pro tip: PixieBrix can often guess the right selector, but sometimes it can't. You might need to use the Elements tab of your Chrome Dev tools to comb through an element and find the best class that works consistently across multiple pages. For more information, or .

If you want to extract data from a table on a page, use the brick. Provide a selector that contains the table and the output with contain the records from the table.

To send each item to another source, add the brick after the Table Reader brick and specify the array of records from the Table Reader output.

If you have many items in your records, you may need to add a inside the loop to prevent rate limiting from the API receiving the data.

If you're interested in learning more, .

read this article
watch this video
Table Reader
For-Each Loop
Wait/Sleep brick
read the docs for the Extract from Page with AI brick