PixieBrix Docs
CommunityTemplates
  • Welcome to PixieBrix!
  • Quick Start
    • Productivity Enthusiasts
    • Mod Developer
    • Team Member
    • Enterprise Admin
  • Activating Mods
    • Linking Your PixieBrix Account
    • Using the Marketplace
      • Finding Mods
      • Activating From the Marketplace
    • Activating Your Assigned Mods
    • Updating Mods
    • Troubleshooting
  • Developing Mods
    • Building Your First Mod
    • Developer Concepts
      • Types of Mods
        • Context Menu Item
        • Button
          • Troubleshooting Buttons
        • Sidebar Panel
        • Trigger
          • Working with Custom Events
        • Quick Bar Action
        • What Are URL Match Patterns?
      • Text Template Guide
        • Basic Text Templates
        • Transforming Data with Filters
        • Writing Conditional Statements
        • Template Examples
      • Using Bricks
        • Brick Input Data Types
        • Bricks for Scraping Data
          • Retrieving Attributes from Elements
        • Bricks for Interacting with the DOM
        • Bricks for AI
          • Passing Custom Data to an LLM
      • Data Context
        • Types of Variables
        • Using Mod Variables
        • Using Page State (Advanced)
        • Referencing Variables
      • User Input
        • Show a Modal or Sidebar Form
        • Prompt for Input
      • Working With APIs
        • API Providers
        • Encoding URL Parts
        • Selecting and Transforming API Results
      • Working with Markdown
      • Control Flow
        • Conditional Field on Bricks
        • Control Flow Bricks
          • When to Use Control Flow Bricks
          • Control Flow Brick Output
          • Raising Exceptions/Errors
          • FAQs
      • Transforming Data
        • Using JQ in PixieBrix
        • Using JavaScript in PixieBrix
      • Building Interfaces
        • Understanding the Preview Panel
        • Styling Elements
        • Adding Advanced Elements
        • Custom Themes/CSS
      • Advanced: Brick Runtime
    • Customizing Existing Mods
    • Sharing Mods
      • Packaging a Mod
      • Exposing Activation-Time Mod Options
      • Sharing a Mod With Your Team
      • Updating Published Mods
    • Troubleshooting
    • Mod Development Best Practices
    • Advanced: Workshop
  • Platform Overview
    • Page Editor
      • Open the Page Editor
      • Page Editor Components
        • Mod Listing Panel
        • Brick Actions Panel
        • Brick Configuration Panel
        • Data Panel
    • Admin Console
      • Campaigns
    • Extension Console
  • Managing Teams
    • Creating a Team
    • Inviting Members
    • Access Control
      • Roles
      • Groups
    • Managing Team Integrations
    • Assigning Mods
    • Billing
    • Advanced: Isolating Development, Test, and Production Environments
  • Deploying Mods
    • Deployment Keys
  • Integrations
    • Configuring Integrations
    • Integration Scenarios
    • Embed Web Apps via IFrames
    • Integrate with Desktop Apps via Custom URL Schemes
    • Airtable
    • Atlassian
    • Automation Anywhere
      • Configure Automation Anywhere Integration in PixieBrix
      • Embedding the Automation Co-Pilot
      • Running AA Bots via Control Room
      • Creating AARI Requests
      • Enhancing AARI Table Fields
      • Enhancing AARI Forms
      • AARI Extensions Enterprise IT Setup Guide
        • Point PixieBrix Extension to Staging AuthConfig App
      • Create a Control Room Certificate on Windows
    • Google Drive
      • Creating Google Drive Integration
      • Google Drive Bricks
      • Migrating from Google Sheet to Google Drive Integration
      • Reactivating Your Google Sheet Mods
      • Troubleshooting Google Integration Errors
      • Sheety: Sharing Google Sheets without Google Workspace
      • [LEGACY] Configure Google Sheets Integration
      • [LEGACY] Adding a Google Sheet to Mod Input
    • Guru
    • Hunter.io
    • HTTP Basic Authentication
    • Microsoft
      • Connect to Custom Azure Applications/APIs
      • Add a Power BI chart to the Sidebar
      • Microsoft Power Automate
      • Microsoft Office
        • Microsoft OneDrive / Files
        • Microsoft Excel
        • Microsoft Sharepoint
        • Microsoft Teams
        • FAQs & Troubleshooting
    • Notion
      • Public (OAuth2)
      • Internal (API Token)
    • OAuth2 Client Credentials
    • Ollama
    • OpenAI/ChatGPT
    • Pipedrive
    • Retool
      • Embed a Retool App
      • Trigger Retool Workflows
    • Robocorp Control Room Integration
    • Salesforce
    • SerpAPI
    • ServiceNow
    • Slack
    • Streamlit
    • Trello
      • Configure Trello integration
      • Find board and list IDs in Trello
    • UiPath
      • Running unattended bots via UiPath Cloud Orchestrator
      • Embed a UiPath App
      • Running local bots via UiPath Assistant
    • Val Town
    • Zapier
    • Zendesk
    • Advanced: Custom Integrations
  • Storing Data with Team Databases
  • Enterprise IT Setup
    • Authentication
      • Enabling Login with Microsoft
      • Enabling Login with Google
      • Setting Up SAML/SSO
    • Browser Extension Installation and Configuration
      • Browser Extension Installation Policy
        • Google Workspace Policy
        • Windows Group Policy/ADMX
        • Windows Registry
        • Citrix Profile Configuration
        • Advanced: Create a Windows Installer EXE
      • Browser Extension Configuration Policy
        • Extension Authentication Configuration
        • Microsoft Edge Mini Menu Configuration
        • Microphone and Audio Capture Configuration
        • Extension Logo Configuration
        • Managed Storage Schema
      • Browser Extension Security
    • Network/Email Firewall Configuration
    • Custom Branding and Themes
    • Security and Compliance
    • Performance
    • Version Control and Backups
    • Web Application Platform Configuration
    • Enterprise Troubleshooting
  • Developer API
    • Service Accounts
    • Making an API Request
    • Team Management APIs
    • Package Management APIs
    • Deployment APIs
    • Database APIs
    • Health Check APIs
    • OpenAPI Specification
    • Deprecated Resources
  • How To
    • Installing the PixieBrix Chrome Browser Extension
    • Changing the Quick Bar Shortcut
    • Pinning the Chrome Extension
    • Updating the Browser Extension
    • Installing a PixieBrix Pre-Release Build
    • Editing Pages with iFrames
    • Adding bricks to mods
    • Opening the PixieBrix Sidebar
    • Troubleshooting
      • Troubleshooting Bad API Requests
      • Troubleshooting Network Errors
      • Troubleshooting IndexedDB Errors
      • Troubleshooting Browser Extension Performance and Crashes
      • Troubleshooting extension corruption errors
  • Release Notes
    • 🏗️Release 2.3.0
    • ✅Release 2.2.10
    • 📜Release Notes Archive
      • ✅Release 2.2.9
      • ✅Release 2.2.8
      • ✅Release 2.2.7
      • ✅Release 2.2.6
      • ✅Release 2.2.5
      • ✅Release 2.2.4
      • ✅Release 2.2.3
      • ✅Release 2.2.2
      • ✅Release 2.2.1
      • ✅Release 2.2.0
      • ✅Release 2.1.7
      • ❌Release 2.1.6
      • ✅Release 2.1.5
      • ✅Release 2.1.4 (Hotfix)
      • ✅Release 2.1.3
      • ✅Release 2.1.2
      • ✅Release 2.1.1
      • ✅Release 2.1.0
      • ✅Release 2.0.7
      • ✅Release 2.0.6
      • ✅Release 2.0.5
      • ✅Release 2.0.4
      • ✅Release 2.0.3
      • ✅Release 2.0.2
      • ✅Release 2.0.1 (Hotfix)
      • ✅Release 2.0.0
      • PixieBrix Browser Extension 2.0.0 Migration Guide
      • ✅Release 1.8.14
      • ✅Release 1.8.13
      • ✅Release 1.8.12
      • ✅Release 1.8.11
      • ✅Release 1.8.10
      • ✅Release 1.8.9
      • ✅Release 1.8.8
      • ✅Release 1.8.7
      • ✅Release 1.8.6
      • ✅Release 1.8.5
      • ✅Release 1.8.4
      • ✅Release 1.8.3
      • ✅Release 1.8.2
      • ✅Release 1.8.1
      • ✅Release 1.8.0
      • ✅Release 1.7.41
      • ✅Release 1.7.40
      • ✅Release 1.7.39
      • ✅Release 1.7.38
      • 🚫Release 1.7.37
      • ✅Release 1.7.36
      • ✅Release 1.7.35
      • ✅Release 1.7.34
      • ✅Release 1.7.33
      • ✅Release 1.7.32
      • 🚫Release 1.7.31
      • ✅Release 1.7.30
      • ✅Release 1.7.29
      • ✅Release 1.7.28
      • ✅Release 1.7.27
      • ✅Release 1.7.26
      • ✅Release 1.7.25
      • ✅Release 1.7.24
      • ✅Release 1.7.23
      • ✅Release 1.7.22
      • ✅Release 1.7.21
      • ✅Release 1.7.20
      • ✅Release 1.7.19
      • ✅Release 1.7.18
      • ✅Release 1.7.17
      • ✅Release 1.7.16
      • ✅Release 1.7.15
      • ✅Release 1.7.14
      • ✅Release 1.7.13
      • ✅Release 1.7.12
      • ✅Release 1.7.11
      • ✅Release 1.7.10
      • ✅Release 1.7.9
      • ✅Release 1.7.8
      • ✅Release 1.7.7
      • ✅Release 1.7.6
      • 🚫Release 1.7.5
      • ✅Release 1.7.4
      • ✅Release 1.7.3
      • ✅Release 1.7.2
      • ✅Release 1.7.1
      • ✅Release 1.7.0
      • ✅Release 1.6.4
      • ✅Release 1.6.3
      • ✅Release 1.6.2
      • ✅Release 1.6.1
      • ✅Release 1.6.0
      • ✅Release 1.5.11
      • ✅Release 1.5.10
      • ✅Release 1.5.9
      • ✅Release 1.5.8
      • ✅Release 1.5.7
      • ✅Release 1.5.6
      • ✅Release 1.5.5
      • ✅Release 1.5.4
      • ✅Release 1.5.3
      • ✅Release 1.5.2
      • ✅Release 1.5.1
      • ✅Release 1.5.0
      • ✅Release 1.4.12
      • ✅Release 1.4.11
      • ✅Release 1.4.10
      • ✅Release 1.4.9
      • ✅Release 1.4.8
      • ✅Release 1.4.7
      • ✅Release 1.4.6
      • 🚫Release 1.4.5
      • ✅Release 1.4.4
      • 🚫Release 1.4.3
      • 🚫Release 1.4.2
      • ✅Release 1.4.1
      • ✅Release 1.4.0
      • 🚫Release 1.3.2
      • ✅Release 1.3.1
      • ✅Release 1.3.0
      • ✅Release 1.2.11
      • ✅Release 1.2.10
      • ✅Release 1.2.9
      • ✅Release 1.2.8
      • ✅Release 1.2.7
      • ✅Release 1.2.5
      • ✅Release 1.2.4
      • ✅Release 1.2.3
      • ✅Release 1.2.2
      • ✅Release 1.2.1
      • ✅Release 1.2.0
      • ✅Release 1.1.12
      • ✅Release 1.1.11
      • ✅Release 1.1.10
      • ✅Release 1.1.9
      • ✅Release 1.1.8
      • ✅Release: 1.1.7
      • ✅Release: 1.1.6
      • ✅Release: 1.1.5
      • ✅Release: 1.1.4
      • ✅Release: 1.1.3
      • ✅Release: 1.1.2
      • ✅Release: 1.1.1
      • ✅Release: 1.1.0
      • ✅Release: 1.0.3
      • ✅Release: 1.0.2
      • ✅Release: 1.0.1
      • ✅Release: 1.0.0
      • ✅Release: 0.2.2
      • ✅Release: 0.2.1
  • Tutorials
    • Developer Tutorials
      • Beginner
        • Search Yelp Reviews from OpenTable
        • Right-click Currency Conversion
        • Web Highlighter Tutorial
        • Trello Status Sidebar
        • Right-click Google Scholar Search
        • Google Dorking
        • Tweet a Link
        • Ask AI To Generate a LinkedIn Connection Request
        • How to Customize the AI Rate and Fix Mod
        • Right-click Translate Language
        • Basic Translation Tutorial
        • AI Bot Sidebar
        • Search and Highlight Words on a Page
      • Intermediate
        • Create a status nudge button in Github
Powered by GitBook
On this page
  • Create a Deployment
  • Assign a Deployment to a Group(s)
  • Team Member Deployment Activation
  • Deactivating Deployments
  • De-provisioning groups from the deployment
  • Extension Console: End-User Deployment Deactivation
  • Frequently Asked Questions

Was this helpful?

Deploying Mods

PreviousAdvanced: Isolating Development, Test, and Production EnvironmentsNextDeployment Keys

Last updated 9 months ago

Was this helpful?

In PixieBrix, Deployments are the way to automatically provision Mods to Groups of users on your team.

For more information on creating/managing groups, see Access Control.

Create a Deployment

For a Mod to be available for deployment, it must be either: 1. Defined under your team’s @scope, or 2. A public Marketplace Mod See Packaging a Mod for information setting your team’s scope.

  1. From the , click Deployments in the left side nav:

  1. On the Deployments Listing page, click Create Deployment

  2. In the Create Deployment modal, give your Deployment a Name ⚠️The deployment name will be visible to team members that receive the deployment
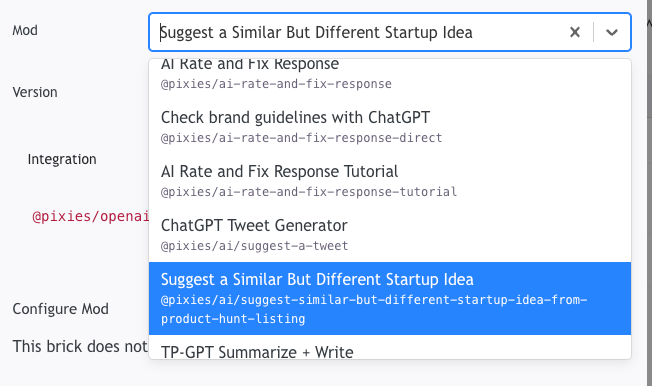
  3. Select a Mod by searching or scrolling the available options.

  4. Select the Version (the latest version will default, but you can use the dropdown to select an older version if desired).

  5. If required for the mod: provide activation options

  6. If required for the mod: select an integration configuration for each integration, such as Google Drive.

Assign a Deployment to a Group(s)

Create a Group with Members

If the Group does not already exist, Create a Group. SeeAccess Control for information on how to create and manage groups.

Assign the Group to the Deployment

  1. Click on the Deployment in the list,

  2. On the Deployment detail screen, click on the Groups tab

  3. At the top of the table, click the “Add Group"

  4. If the Group does not already have access to the mod, integration configurations, and databases used by the deployment, PixieBrix will prompt you to grant permissions to the group.

Team Member Deployment Activation

⏱️ The PixieBrix Browser Extension checks every 5 min. for new/updated Deployments. Team members can also manually open the Extension Console to activate available deployments

Refer to Productivity Enthusiasts instructions for activating deployments.

Deactivating Deployments

Deleting a Deployment will also delete its configuration and audit history. To temporarily deactivate a deployment, follow the steps below to pause or remove groups from the deployment.

There are two ways to temporarily deactivate a deployment:

  • Pause the deployment

  • De-provision groups from the deployment

Pausing a Deployment

  1. Select the Deployment you want to deactivate

  2. To temporarily pause a deployment, toggle the "Active" state on the deployment detail page

De-provisioning groups from the deployment

  1. Select the Deployment you want to deactivate

  2. Click on Groups to view the Groups the Deployment is assigned to:

  3. Click Remove next to the Groups that you want to deactivate the deployment for.

Extension Console: End-User Deployment Deactivation

Individual Team Members can de-activate a deployment from the Active Mods screen in the Extension Console

  1. Find the Deployment in the Active section

  2. Click the 3-dot menu to open the mod actions

  3. Click "Deactivate"

  4. To re-activate the Deployment, click "Activate" in the banner

Frequently Asked Questions

Under what conditions will PixieBrix automatically open the Extension Console to prompt the user to activate deployed mods?

PixieBrix checks for deployment updates in the background every 5 minutes. If any deployment updates cannot be automatically applied, PixieBrix will open the Extension Console and show the deployment activation banner.

Currently, there are three reasons that PixieBrix would not be able to activate a deployed Mod automatically:

  • The deployed Mod requires permissions that are forbidden due to the Enterprise IT administrator's configured installation policy (See Browser Extension Installation Policy).

  • The deployed Mod declares a minimum browser extension version that is not satisfied

  • The deployed Mod has an unbound OAuth2 PKCE integration, and the user does not have exactly one local configuration for that integration

On the Team page, click Deployments in the left side nav:

On the Team page, click Deployments to go to the Deployments Listing page

Deployment Pause Toggle

On the Team page, click Deployments to go to the Deployments Listing page

To re-activate a Deployment, follow the "" instructions above.

Restricted members of organizations cannot uninstall deployments. PixieBrix can be configured to send email alerts when an individual team member de-activates a Deployment. To configure this, contact

The deployment activation banner
Admin Console
Admin Console
Admin Console
[email protected]
Assign the Group to the Deployment
Admin Console