# Welcome to PixieBrix
We're excited to have you here and are committed to making your journey as smooth as possible. Here you'll find the resources to navigate PixieBrix effectively.\
\
You'll discover detailed guides, tutorials, FAQs, and more to help you understand our offerings better.
### Looking for something in particular?
:point\_left: If you're looking for something in particular, explore the sections on the left or use the search bar in the top right.
### Reach out if you need help!
Can't find what you're looking for or need an answer fast? You can [reach out to support](mailto:support@pixiebrix.com), or live chat with the team by clicking the purple chat icon in the bottom left.
# Activating Mods
You don't have to be a developer to use PixieBrix mods. Anyone can use pre-built mods that have been shared with you or publicly!
# Linking Your PixieBrix Account
{% hint style="info" %}
If your company has installed the PixieBrix Chrome Extension for you, you'll need to link your account. If you installed via the Chrome Web Store or app.pixiebrix.com, you'll have done this as part of the installation.
{% endhint %}
#### Step 1: Link the PixieBrix Account when Chrome first installs the extension
* When Chrome installs the PixieBrix extension, Chrome will open a tab with the following setup screen. Click “Create/link PixieBrix account”. This will open a new tab with a login page\
* Click "Connect with Google" or "Connect with Microsoft", as instructed by your team lead
* You will be redirected to a Google/Microsoft page asking you to accept authenticating to PixieBrix with your account. Accept the request and you'll be redirected back to PixieBrix
#### Step 1b: If you accidentally closes the tab that appears when PixieBrix is first installed
* Go to [https://app.pixiebrix.com](https://app.pixiebrix.com/)
* Click "Connect with Google" or "Connect with Microsoft", as instructed by your team lead\
* You will be redirected to a Google/Microsoft page asking you to accept authenticating to PixieBrix with your account. Accept the request and you'll be redirected back to PixieBrix
# Activating Your Assigned Mods
### 1. **Open the PixieBrix Browser Extension.**
\
*From* [*https://app.pixiebrix.com*](https://app.pixiebrix.com/) *you can open it by clicking “Open Browser Extension”.*\
\
If your account has been granted access to some bricks to automatically provision, you'll see a blue banner with the message "New team bricks are ready to activate"
### 2. **Click the “Activate” button in the banner to activate the mods.**
\
Chrome may show you a prompt to grant the browser permissions required for the extensions. Click "**Allow**"\
Refresh any pages where the mods will be used.
# Updating Mods
There are two ways you can check for updates:
### Automatic
If your team uses Mod Deployments, PixieBrix automatically checks every 5 minutes for mod deployments your team has updated or additional mods you've been assigned.
### Manual
Alternatively, you can manually check for updates by opening the PixieBrix Extension Console.
* Navigate to the Admin Console: [https://app.pixiebrix.com](https://app.pixiebrix.com/)
* Click “Open Browser Extension”
When a mod you have installed has an update available, an Update button will appear on the Mods page’s entry for that mod.
Find the entry for the mod, and click Update. PixieBrix will guide you through reactivation because the mod’s settings may have changed. Once you’ve completed reactivation, the mod will have been updated to the latest version.
# Troubleshooting
Troubleshooting Mod Activation
Having issues with activating your mods? Try these questions. If it doesn't help, feel free to reach out via live chat or [send an email to support](mailto:support@pixiebrix.com).
### You cannot find the PixieBrix extension using Google or the Chrome Web Store
Contact your PixieBrix admin for which installation instructions to follow. You may need to follow instructions for \
[Installing the PixieBrix Chrome Browser Extension](/how-to/installing-the-pixiebrix-chrome-browser-extension) or
[Linking Your PixieBrix Account](/activating-mods/linking-your-pixiebrix-account) if your company already installed it.
### You do not see the “New Team Bricks are ready to activate” banner
* Verify that you connected the correct email address by looking at the upper right corner
* If the correct email address is not showing, go to [https://app.pixiebrix.com](https://app.pixiebrix.com/), click the email address in the upper right, and click “Logout".
### The mods don't appear or seem to be work even after you've activated them
* Refresh the page and see if that fixes the problem
* Open the PixieBrix browser extension. From [https://app.pixiebrix.com](https://app.pixiebrix.com/) you can open it by clicking “Open Browser Extension”
* Verify the brick is listed on the Active Bricks page and has the status "✓ Managed". For example:
* Perform one of the following actions to resolve the issue:
* If the brick is not listed: contact your PixieBrix admin to ensure you've been granted access to the brick
* If the status shows a "Grant Permissions" button, click the "Grant Permissions" button and accept the permissions in the Chrome Permissions prompt
* If the status is "✓ Managed", click "Uninstall" and activate it again following the instructions in [Activating Your Assigned Mods](/activating-mods/activating-your-assigned-mods)
### How to reload the extension
To reload the extension:
* Open the PixieBrix browser extension. From [https://app.pixiebrix.com](https://app.pixiebrix.com/) click “Open Browser Extension"
* Click the Settings item in the sidebar
* Scroll to the bottom of the page and click the "Reload Extension" button
# Developing Mods
# Building Your First Mod
Let's build a simple mod that shows you how to create browser automations with PixieBrix.
In this simple example, we'll build a mod that sends information from a LinkedIn profile page to a Google Sheet.
You'll learn how to:
* Initiate PixieBrix mods (such as right-clicking on a page)
* Scrape information from a page (such as profile information)
* Send data to other tools (such as Google Sheets)
* Add visual effects to your screen (such as spraying confetti)
You'll be able to build this in just a few minutes! Let's get started!
### 0. Setting up your environment
To build this mod with PixieBrix, you'll need to:
* [ ] Create a PixieBrix account
* [ ] Install the PixieBrix Chrome Extension (you'll be prompted to do this when you create an account)
* [ ] Open a new tab and go to a LinkedIn profile ([you can use this one](https://www.linkedin.com/in/brittanysjoiner/)!)
* [ ] In the new tab, open the Page Editor in the PixieBrix tab of the Chrome Dev Tools
{% hint style="info" %}
Open the Page Editor by right-clicking anywhere on the page and choosing `Inspect`. By default, you'll be on a tab named `Elements`. Look for a tab that says `PixieBrix`. You'll find the Page Editor is easiest to use when you dock your Chrome Dev Tools at the bottom instead of the side. Learn more about how to do that in [Open the Page Editor](/platform-overview/page-editor/open-the-page-editor).
{% endhint %}
### 1. Trigger the mod
#### a. Click New Mod in the top left of the Page Editor, next to the PixieBrix icon, and select Context Menu.
This opens a menu allowing you to choose how to trigger a mod. You can learn more about them in [Types of Mods](/developing-mods/developer-concepts/types-of-mods), but we will use a basic **Context Menu** so the mod runs when we choose it from the Context Menu (*what appears when you right-click a page).*
#### b. Configure the starter brick
You'll notice a panel appear in the Page Editor with configuration options. Change the `Name` and `Title` fields to **Scrape LinkedIn.**
You can leave the other fields as is.
#### c. Confirm you can see the context menu.
Right-click anywhere on the page above the Page Editor, and you should see an action in the menu for **Scrape LinkedIn**.
{% hint style="info" %}
Don't see it? You might need to hover over `PixieBrix` to expand the menu if you have multiple options.
{% endhint %}
Anytime you click that, this mod you're building will execute. Next, let's add bricks for scraping information from LinkedIn.
### 2. Scrape profile information
PixieBrix mods are made up of bricks. You can learn more about [Using Bricks](/developing-mods/developer-concepts/using-bricks), but they're essentially functions that you can string together to make your automation workflow.
Since we want to get data about a profile in this mod, we'll need to use the **Extract from Page** brick to extract text from the page.
#### a. Click the + button below the Context Menu brick.
This second panel is where you will[Brick Actions Panel](/platform-overview/page-editor/page-editor-components/brick-actions-panel). You'll add, copy, delete, or re-order bricks here to execute your workflow.
#### b. Add the Extract from Page brick.
In the modal, search `extract from page` and hover on the Extract from Page brick, then click the blue **Add** button.
#### c. Define the property you want to scrape
Inside the Extract from Page brick configuration options, you'll see a property field. Change the name of the `property` to something describing what you want to extract, like `name`.
Next, click the green mouse icon on the `Selector` field and choose the element on LinkedIn that you want to scrape. In this case, we want to scrape the name, so click the name on the profile page.
You'll see that PixieBrix sets the Selector value to a class or id that describes references that selector.
{% hint style="info" %}
PixieBrix makes its best guess as to what selector should be used, but in some cases, you may need to manually specify the selector if you don't find this brick to be extracting data consistently. You can do this by going to the `Elements` tab to view an item's HTML attributes, and then reference those attributes in the `Selector` field of the Extract from Page brick.
In this case, you might want to replace the selector with `h1` if PixieBrix suggests a random string.
{% endhint %}
To scrape more information, click the blue **+ Add Property** button and specify more elements. We'll stick with just the name for now.
#### d. Run your mod and check the output in the data panel.
To confirm your selector works, run your mod by right-clicking on the page and choosing **Scrape LinkedIn** from the context menu. Look on the far right side of the Page Editor, and you'll see an Output tab with an object called `@data`. Click the caret to open the object and confirm the correct value was scraped from the page.
Now, you can reference that value in other bricks. Let's add a brick to send that value to a Google Sheet.
{% hint style="info" %}
It's a good practice to run your mod after you add a brick to check the brick's output and confirm your mod continues to work as expected. It's especially helpful for [Troubleshooting](/developing-mods/troubleshooting)so you can notice exactly when a mod starts experiencing an issue.
{% endhint %}
### 3. Add data to Google Sheet
Since we have scraped some information, now we want to do something with it. In our example, we will add a new row to a Google Sheet with that information from the page. We have a brick that does exactly that!
#### a. Add the Add Google sheet row brick.
Click the + button below the Extract from Page brick and search for `Add Google sheet row`. Hover over the brick and click the blue **Add** button.
#### b. Connect your Google account.
Click inside the Google Account field, you'll be able to select an integration if you've already created one. If you haven't already integrated your Google Drive, click the link below the Google Account field to configure your integration.
In the tab that appears, select the **+ Add Integration** action in the top right. Search for `Google Drive` and click **Configure.**
Give it a name to reference the integration later, and click **Save.** Go back to your mod and click the refresh icon in the Google Account field and you should see your newly created integration in the dropdown field. Select the integration and a pop-up will appear asking you to confirm your Google Account.
{% hint style="info" %}
Don't see the pop-up? It's probably hiding behind another window. For issues connecting Google Drive, check out our [Google Drive](/integrations/google-drive) integration docs.
{% endhint %}
#### c. Select a spreadsheet
Once you've connected your account, use the dropdown to select a spreadsheet that you want to add data to. You can search in the field for the name of a sheet.
Next, pick the name of the tab.
Once you pick the tab, you'll see the Row Values section populate to include the headers from that tab.
#### d. Set the values of rows with data from the mod.
Now, we need to define what data actually goes into the new row in the spreadsheet. You can map them to their corresponding column.
To do this, click the **Value** field for a given header and type the path of the variable you want to reference. To set the name to our value from our previous brick, click the clipboard next to the item in the **Output** from that brick, then paste it into the field.
{% hint style="info" %}
Want to include a link? Every starter brick produces output that can be accessed throughout the mod, including the current URL of the page it's triggered on. To do this, you can reference `@input.url,`which will return the current URL.
{% endhint %}
When your Google Sheet brick looks like this, you're ready to run your mod and try it out.
#### e. Run the mod and confirm a new row was added to your Google Sheet.
You should see a new row in the Google Sheet you specified that contains information from the current page you're on!
### 4. Save your mod
Click the save icon on the mod name on the first panel on the left of the Page Editor.
Clicking the **Save** icon will open a modal for [Saving a Mod](/developing-mods/sharing-mods/saving-a-mod). Create an alias if you haven't already, then confirm or modify the unique ID and description for the mod. When you're ready, click **Create** and your mod will be saved and accessible via the Page Editor and [Extension Console](/platform-overview/extension-console).
Now, you can close the Page Editor *(click the X in the top right corner).*
Go to another LinkedIn profile page ([like this one](https://www.linkedin.com/in/michaelmirandi/)), and run your mod by opening the context menu *(right-click)* and choosing the **Scrape LinkedIn** action. You'll see confetti spray across your screen, and if you look in your Google Sheet, you'll see PixieBrix added a new row with profile information.
🎉 You did it! Feel free to [share on LinkedIn](https://www.linkedin.com/sharing/share-offsite/?url=https://docs.pixiebrix.com/). *(Tag us and we'll give it some 💜!)*
# Developer Concepts
If you've read about the [Platform Overview](/platform-overview) and got a chance to [Building Your First Mod](/developing-mods/building-your-first-mod) but want to learn more, explore these Developer Concepts to learn design patterns and best practices for accomplishing what you need with PixieBrix.
* [Text Template Guide](/developing-mods/developer-concepts/text-template-guide): useful for referencing variables in text or running nunjucks templates to perform functions throughout your mod
* [Types of Mods](/developing-mods/developer-concepts/types-of-mods): essential for understanding options for triggering a mod and best practices for configuring triggers effectively
* [Using Bricks](/developing-mods/developer-concepts/using-bricks): bricks are the building blocks of PixieBrix and this section helps you understand how to best work with them
* [Variables and Data Context](/developing-mods/developer-concepts/variables-and-data-context): mods store contextual data and produce data throughout the mod run that you can access and store
* [User Input](/developing-mods/developer-concepts/user-input): learn about collecting information and verifying data with users as they run your mods
* [Working With APIs](/developing-mods/developer-concepts/working-with-apis): useful for interacting with other tools for your automation
* [Working with Markdown](/developing-mods/developer-concepts/working-with-markdown): useful for styling forms and interfaces
* [Control Flow](/developing-mods/developer-concepts/control-flow): create multiple paths of execution based on outcomes from previous bricks
* [Transforming Data](/developing-mods/developer-concepts/transforming-data): modify from bricks to get information in the format you need
* [Building Interfaces](/developing-mods/developer-concepts/building-interfaces): style modals and sidebar panels for interacting with users during automation and displaying responses
# Types of Mods
### Types of Starter Bricks
There are 5 different ways you can start a mod with PixieBrix:
* [**Button**](/developing-mods/developer-concepts/types-of-mods/button)**:** a *customizable* button to the webpage that runs an action
* [**Context Menu**](/developing-mods/developer-concepts/types-of-mods/context-menu-item)**:** a right-click menu that runs an action on the selected text or element
* [**Quick Bar Action**](/developing-mods/developer-concepts/types-of-mods/quick-bar-action)**:** a menu item in the PixieBrix Quick Bar that runs an action. Learn how to set up your Quick Bar here: **Quick Bar Setup**
* [**Sidebar Panel**](/developing-mods/developer-concepts/types-of-mods/sidebar-panel)**:** a custom persistent panel displayed in the PixieBrix Sidebar. You can open the sidebar by clicking the PixieBrix icon in the Chrome toolbar
* [**Trigger**](/developing-mods/developer-concepts/types-of-mods/trigger)**:** an automatic trigger that runs an action. Examples of triggers are page loads, elements appearing on the screen, and more.
We call these **Starter Bricks,** and the following docs dive into each.
# Context Menu Item
The Context Menu action lets you add items to your browser’s context menu. The menu item will appear when you right-click on a web page or in certain contexts.
### What does the Context Menu look like
### Create a Context Menu
**Follow these steps to create and configure a new Context Menu item:**
1. [Open the PixieBrix Page Editor](/platform-overview/page-editor/open-the-page-editor).
2. In the left panel, click **New Mod** > **Context Menu**.
3. Go to the middle panel and edit a name in the **Name** field to something that will describe your entire mod. *For example: `Scrape LinkedIn Profile`.*
### Configure a Context Menu
In the sections below the Name, enter the following information:
Field
Description
Title
If desired, edit the default context menu name. This is the name that displays in the context menu options.
Alternatively, you can click on the selected text shortcut link to insert the %s placeholder automatically. For example, if a user selects "Amazon" on a page, the browser automatically inserts "Amazon" in the context menu.
Menu context
Specify when the context menu item should display by selecting the appropriate context: Menu context • page - Excludes links, frames, images, and selected text. • all - Displays in all contexts, meaning that it always displays. • frame - Displays the menu item on frames (e.g., iframes within a page) • selection - Displays the menu item when right-clicking on selected text. • link - Displays the menu item when right-clicking on a link. • image - Displays the menu item when right-clicking on an image.
Sites
When you specify the sites you want the context menu to display, PixieBrix runs faster and more accurately. To do so, enter the URL in the Sites field. Make sure that at least one URL matches the pattern(s) you added.
You can also: • Click the Site, Domain, HTTPS, or All URLs shortcuts to insert URLs automatically. • Click Add Site to add more sites. • Click ABC > Remove to remove a site from the list.
If needed, go to the Advanced section and enter the following information.
{% hint style="danger" %}
This is optional information. In many cases, you may not need to configure any of these settings unless you're trying to do something specific.
{% endhint %}
Field
Description
Target Mode
• Select eventTarget to provide the Context Menu element clicked as the source of the action. • Select document to provide the entire HTML document as the source of the action. • Legacy. This option is deprecated. Do not select this option.
Automatic Permissions
Add the URL location(s) where the context menu items should display.
• Click the Site, Domain, HTTPS, or All URLs shortcut to insert URLs automatically. • Click Add Site to add more sites. In most cases, users display the context menu item on one site, but you can enter more than one URL to display it on multiple sites. • Click ABC Text > Remove to remove a site from the list.
6. URL match patterns determine which extensions run on a site or call an API. You can add URL match patterns in the **Advanced: Extra Permissions** section if the extension performs actions on a target tab not included in the site match patterns or calls an API without using an Integration. To do so:
* Click the **Add Allowed Origin** button in the **Sites/APIs**:
* Click the **Site**, **Domain**, **HTTPS**, or **All URLs** shortcut to insert URLs automatically.
Learn more about [What Are URL Match Patterns?](/developing-mods/developer-concepts/types-of-mods/what-are-url-match-patterns)
# Button
You can add a button to a web page as the starting point for actions or enhancements. While they may look like any other button on the page, they can do so much more. For example, you can connect LinkedIn, Slack, and Asana or automate a common task. This guide walks you through the process of creating and configuring a custom button on a webpage.
### What does a Button look like?
That's really up to you! You can select an existing button on the page to match the styles, or you can use CSS to give it custom styling options.
### Create a Button
**Follow these steps to add a button to a web page and configure the button actions.**
1. Navigate to the page where you want to add a button (e.g., )
2. Open the [PixieBrix Page Editor](/platform-overview/page-editor/open-the-page-editor).
3. In the left pane, click **New Mod** > **Button**.\

4. You'll notice elements turn purple when you hover over them. Click on an existing button. A cloned copy of the button displays on the page in real-time.
5. Go to the PixieBrix Page Editor below the page, and then edit the name in the **Name** field if desired. This is the name of the mod, not the text on the button.
### Configure a Button
In the **Configuration** section, enter the following information:
{% hint style="info" %}
This is optional information. In many cases, you may not need to configure any of these settings unless you're trying to do something specific.
{% endhint %}
Field
Description
Button Text
If desired, edit the default button text. This is the text that appears on the button.
Location
To change the location of the button on the page, click the green CSS selector arrow and select a new location. The purple highlighted border indicates the selected area. You can also provide your own CSS selectors.
Sites
If you want to increase accuracy and processing speed, you can add the sites where you want the button to display. If you add sites, however, make sure that you add at least one.
You can also: • Click the Site, Domain, HTTPS, or All URLs shortcuts to insert URLs automatically. • Click Add Site to add more sites. In most cases, users display the button on one site, but you can enter more than one URL to display it on multiple sites. • Click ABC Text > Remove to remove a site from the list.
Next, go to the **Advanced: Item Options** section, where you can change the look and feel to match other elements on the page.
{% hint style="danger" %}
This is optional information. In many cases, you may not need to configure any of these settings unless you're trying to do something specific.
{% endhint %}
PixieBrix automatically matches the button’s native style, but you can customize it to your liking. If you prefer to watch, the [Personalizing and editing buttons](https://www.loom.com/share/8a2511032552485f8c81ee04261790b8) video walks you through the process.
Field
Description
Icon
• If the button you cloned originally had an icon, you can select a different icon to change it. • If the button did not have an icon, you can choose one from the drop-down list. Make sure to add the {{{icon}}} - variable in the Template field.
Order/Position
• Select Start to place the button before the button you cloned. • Select End to place the button after the button you cloned.
Template
Use HTML code, CSS classes, and more to customize the button further. You can click on the shortcuts to automatically insert these variables:
• {{{icon}}} - Displays an icon on the button. This variable is required if you selected an icon in the Icon field above. • {{{caption}}} - Displays the button caption (name) on the button. • {{{space}} - Adds a space ( ) between the caption and icon.
Target Mode
Select one of the following options:
• eventTarget to pass the button element clicked as the root downstream to the bricks in the pipeline. • Select document to pass the whole HTML document as the root downstream to the bricks in the pipeline.
Synchronous
Toggle on to prevent users from repeatedly clicking the button while the action is in progress. Toggle off the disable this function.
Show Success Message
Toggle on to display the default success message after the button action completes. Toggle off to prevent the success message from displaying.
# Troubleshooting Buttons
If PixieBrix doesn't find the right button, you have a few options
You can try the more advanced route of trying to select a CSS selector by hand. This however requires you to be able to somehow place a button anywhere on the page, even if it’s not in your desired location. Then to change the button placement, you will have to tweak the ***Location*** (under the button’s configuration) and the ***Template*** (under Advanced)
> *Sometimes however none of this works, that’s when we suggest to simply try another starter brick as mentioned above, either a Quick Bar or a Context Menu*
### Troubleshooting Buttons
Here are some things you can try if you have problems adding buttons.
**Option 1: While placing a button, press the Shift key**
Try clicking around in different areas of the page while holding down the **Shift** key. To see this in action, watch the [Advance Button Placement and Alternatives](https://www.loom.com/share/343fa92f9cd846eaba38046220e470fe) video.
**Option 2: Use the CSS Selector manually**
You can also try using the [CSS selector](https://www.w3schools.com/cssref/css_selectors.php) manually. First, place the button anywhere on the page, even if it’s not your desired location. Then, you may tweak the CSS in the **Location** field and the code in the **Template** \*\*field.
**Option 3: Use a different extension**
If all else fails, you can use a [Context Menu](https://www.notion.so/Creating-and-Configuring-a-Context-Menu-Item-12e0fa2a29a049c38d266c6841253c16?pvs=21) or a [Quick Bar](https://www.notion.so/Creating-and-Configuring-a-Quick-Bar-Action-29e4099c921f401ab5f888a06c266ae9?pvs=21) instead of a button. The look will be different, but the functionality will be the same.
# Floating Actions
Run mods using buttons that appear as Floating Action icons on the page.
Users can initiate mods with buttons from the PixieBrix Floating Action Button. These are great for launching frequently used mods or utilities.
### How to Create a Floating Action
1. **Add a Trigger Starter brick**
Use the [**Trigger**](/developing-mods/developer-concepts/types-of-mods/trigger) starter brick with a **Page Load** trigger event to register the Floating Action when a page loads.
2. **Add the Floating Action Brick**
Click the **+** button in the Brick Action Pipeline to add the **Add Floating Action** brick.
3. **Configure the Floating Action**
In the Add Floating Action brick:
* **Title**: This appears as a tooltip when hovering over the icon.
* **Action Type**: Choose static or dynamic actions. (See explanation [below](#static-vs-dyanmic-actions).)
* **Icon**: Pick one from the dropdown or use a custom icon by pasting a URL to an SVG.
* **Priority**: Determines the display order if multiple actions exist. Higher numbers show higher in the list.
4. Add Your Action Logic
Within the Floating Action’s pipeline, add any bricks you want to run when a user clicks the action.
### Static vs Dynamic Actions
Type
When to use
Example Use
Static
For global actions that should always be available
"Start recording" button
Dynamic
For temporary or context-specific controls
"Pause" or "Stop" buttons during a recording action
{% hint style="danger" %}
Note: If any dynamic actions are registered, static actions will not be shown.
{% endhint %}
### FAQs
**What happens if I register both static and dynamic actions?**
Only dynamic actions will be shown. Static actions are hidden whenever dynamic ones are active.
**Where does the Floating Action appear?**
It appears as a button overlay in the corner of the page (usually center right) with the PixieBrix icon or your team's custom icon.
**Can I have multiple Floating Actions?**
Yes. Use the priority setting to control their order.
**Can I style the Floating Action icon?**
You can use a custom SVG icon via URL, which allows full control over the look.
# Hotkeys
Initiate mod runs with keyboard shortcuts
PixieBrix lets you trigger mods using keyboard shortcuts, known as hotkeys. This is useful for power users who want quick access to mods without clicking buttons or menus
### How to Set Up a Hotkey
1. **Add a Trigger Brick**\
Use the [**Trigger**](/developing-mods/developer-concepts/types-of-mods/trigger) starter brick and set the trigger event to **Page Load.**
2. **Add the Add Hotkey brick**\
In the Brick Action Pipeline, click the ➕ button and add the **Add Hotkey** brick.
3. **Configure the Hotkey Settings**\
In the Add Hotkey brick:
* **Title:** Human friendly text describing the action.
* **Key Name**: Type the key combination you want to use (e.g. `ctrl+shift+d`, `alt+h`, `⌘+j`, etc.). [Read more about available keys](https://www.w3.org/TR/uievents-key/).
4. **Add Bricks to the Action Pipeline**\
After the trigger, add the bricks that should run when the hotkey is pressed. This can be anything—showing a sidebar, extracting info from a page, fetching info from an API, etc.
***
### Best Practices
* **Avoid Conflicts**: Don’t use common browser/system shortcuts (like `ctrl+s`, `cmd+r`, `alt+tab`) to avoid interrupting standard behavior.
* **Use Modifier Keys**: Hotkeys with `ctrl`, `alt`, `shift`, or `⌘` are less likely to conflict and easier to remember.
* **Communicate Clearly**: If you're sharing your mod, display the hotkey in the UI or a tooltip so users know it exists. This often works nicely as the title for [Floating Actions](/developing-mods/developer-concepts/types-of-mods/button/floating-actions).
# Sidebar Panel
The Sidebar Panel is a custom panel that displays when you click the PixieBrix icon in the Chrome toolbar. You can use it to streamline common tasks and quickly access information without switching between pages or tabs.
Here are a few examples of how you can use a Sidebar Panel:
* Create modals that contain checkboxes, drop-down menus, or text fields to request information from users.
* Add buttons with actions
* Include iframe data from external resources
**Follow these steps to create and configure a Sidebar Panel.**
1. Open the [PixieBrix Page Editor](https://docs.pixiebrix.com/page-editor-guide).
2. In the left pane, click **New Mod** > **Sidebar Panel**.\

3. Type a name in the **Name** field.
4. In the **Configuration** section, enter the following information:
| Field | Description |
| --------- | -------------------------------------------------------------------------------------------------------------------------------------------------------------------------------------------------------------------------------------------------------------------------------------------------------------------------------------------------------------------------------------------------------- |
| Tab title |
The text that will appear in the tab along the top of the Sidebar Panel
|
| Sites |
Enter the URL location(s) where the Side Panel displays.
• Click the Site, Domain, HTTPS, or All URLs shortcuts to insert URLs automatically. • Click Add Site to enter a URL manually. • Click ABC Text > Remove to remove a site from the list.
PixieBrix runs faster and more accurately when you specify URLs in the action, but make sure that you add at least one URL.
|
5. In the **Panel Refresh** section, enter the following information:
{% hint style="info" %}
This is optional information. In many cases, you may not need to configure any of these settings unless you're trying to do something specific.
{% endhint %}
| Field | Description |
| ------------ | ----------------------------------------------------------------------------------------------------------------------------------------------------------------------------------------------------------------------------------------------------------------------------------------------------------------------------------------------------------------------------------------------------------------------------------------------------------------------------------------------------------- |
| Trigger |
Select the trigger event that refreshes the panel.
• Page Load/Navigation. Refreshes the sidebar on load. • Selection Change. Refreshes the sidebar when the selection changes. • State Change. Refreshes the sidebar when the page state changes. • Custom Event. Refreshes the sidebar with a custom event occurs. If you select this trigger, enter the event name in the Custom Event field below. • Manual. Refreshes the sidebar when the user manually refreshes the page.
|
| Debounce | To optimize performance, debouncing prevents trigger actions from running too quickly. You can toggle the Debounce button on or off to control how fast the browser responds. |
| Delay Millis | Enter or change the number of milliseconds to delay rerunning the trigger. (This option is available only if you enable the Debounce toggle.) |
| Leading | Toggle the Leading button to invoke debugging on the leading edge of the debouncing timeout. (This option is available only if you enable the Debounce toggle.) |
| Trailing | Toggle the Trailing button on to invoke debouncing on the trailing edge of a debouncing timeout. (This option is available only if you enable the Debounce toggle.) |
6. Next, go to the **Advanced: Match Rules** section, and enter the following information:
| Field | Description |
| ------------ | ------------------------------------------------------------------------------------------------------------------------------------------------------------------------------------------------------------------------------------------------------------------------------------------------------------------------------------------------------------------------------------------------------------------------------------------------------------------------------------------------- |
| URL Patterns |
Click the Add URL Pattern button to add rules. These rules restrict where the extension runs. Learn more about /pages/rFVVCRgosBrD72s5ayA4
• hostname. Match the URL’s hostname. • pathname. Matches the URL’s path name. • hash. Matches the URL’s hashes. • search. Matches the search part of a URL.
If you specify URLs in the action, make sure that at least one URL matches the pattern(s) you added.
|
| Selectors |
You can use selectors to restrict when the sidebar panel displays.
• To add a selector, click the Add Selector button, click the green selector arrow, and then click on an area in the web page. The purple highlighted border indicates the selected area. • To remove a selector, click the $(...) drop-down, and then select Remove.
If provided, make sure that at least one selector matches on page load. Otherwise, the extension will not run.
|
7. URL match patterns determine which extensions run on a site or call an API. You can add URL match patterns in the **Advanced: Extra Permissions** section if the extension performs actions on a target not included in the site match patterns or if it calls an API without using an Integration. To do so:
* Click the **Site**, **Domain**, **HTTPS**, or **All URLs** shortcut to insert URLs automatically.
* Click **ABC Text** > **Remove** to remove a site from the list.
Learn more about [What Are URL Match Patterns?](/developing-mods/developer-concepts/types-of-mods/what-are-url-match-patterns)
# Trigger
Using Triggers, you can perform actions automatically when an event or change happens on a page. They can be helpful in many different contexts, such as responding to data changes, launching automated processes, or alerting support of potential problems. When configured correctly, event triggers are powerful tools for automation.
**Follow these steps to create and configure a trigger.**
1. Open the [PixieBrix Page Editor](https://docs.pixiebrix.com/page-editor-guide).
2. In the left pane, click **New Mod** > **Trigger**.\

3. Type the name in the **Name** field. This should be something that describes the mod.
4. In the **Configuration** section, enter the following information:
| Field | Description |
| ------------- | ---------------------------------------------------------------------------------------------------------------------------------------------------------------------------------------------------------------------------------------------------------------------------------------------------------------------------------------------------------------------------------------------------------------------------------------------------------------------------------------------------------------------------------------- |
| Trigger event |
Select an event that occurs to trigger or launch this mod. You can choose from any of the following events:
|
| Debounce | To optimize performance, debouncing prevents trigger actions from running too quickly. You can toggle the Debounce button on or off to control how fast the browser responds. |
| Sites |
When you specify the sites that trigger the event, PixieBrix runs faster and more accurately. To do so, enter the URL in the Sites field. Make sure that at least one URL matches the pattern(s) you added. Learn more about /pages/rFVVCRgosBrD72s5ayA4
You can also: • Click the Site, Domain, HTTPS, or All URLs shortcuts to insert URLs automatically. • Click Add Site to enter a URL manually. • Click ABC > Remove to remove a site from the list.
|
| Report Mode |
Select the events/errors that report telemetry.
• Select Report All to report all runs and errors. • Select Report First to only report the first run and first error.
|
5. Optionally, you can Next, go to the **Advanced: Match Rules** section, and enter the following information:
{% hint style="info" %}
This is optional information. In many cases, you may not need to configure any of these settings unless you're trying to do something specific.
{% endhint %}
| Field | Description |
| ------------ | ------------------------------------------------------------------------------------------------------------------------------------------------------------------------------------------------------------------------------------------------------------------------------------------------------------------------------------------------------------------------------------------------------------------------------------------------------------ |
| URL Patterns |
Click the Add URL Pattern button to add. These rules restrict where the trigger runs.
• hostname. Match a URL's hostname. • pathname. Matches the pathname part of a URL. • hash. Matching pattern for URL hashes. • search. Matches the search part of a URL.
If you specify URLs, ensure that at least one URL matches the pattern(s) you added.
|
| Selectors |
You can use selectors to restrict when the trigger runs.
• To add a selector, click the Add Selector button, click the selector arrow, and then click on an area in the web page. The purple highlighted border indicates the selected area. • To remove a selector, click the $(...) drop-down, and then select Remove.
If provided, ensure that at least one selector matches on page load. Otherwise, the extension will not run.
|
6. URL match patterns determine which extensions run on a site or call an API. You can add URL match patterns in the **Advanced: Extra Permissions** section if the extension performs actions on a target tab not included in the site match patterns or if it calls an API without using an Integration. To do so:
* Click the **Site**, **Domain**, **HTTPS**, or **All URLs** shortcut to insert URLs automatically.
* Click **ABC Text** > **Remove** to remove a site from the list.
Learn more about [What Are URL Match Patterns?](/developing-mods/developer-concepts/types-of-mods/what-are-url-match-patterns)
### Using the Trigger Brick to Register Mod Entry Points
In addition to starting mods directly, the Trigger starter brick can be used to register other ways for users to initiate mods.
When paired with the Page Load event, the Trigger brick acts as a setup point for defining these alternative entry methods:
* [**Hotkeys**](/developing-mods/developer-concepts/types-of-mods/button/hotkeys): Add a Trigger brick with the Hotkey event type to let users launch a mod using a keyboard shortcut.
* [**Floating Actions**](/developing-mods/developer-concepts/types-of-mods/button/floating-actions): Use a Page Load Trigger to register a Floating Action with the Add Floating Action brick, allowing users to launch a mod by clicking an on-page icon.
This pattern is useful when you want mods to be *ready to trigger*, but not run immediately on page load.
{% hint style="info" %}
**Tip**: You can use the same Page Load Trigger to register multiple hotkeys, floating actions, or other UI components by chaining bricks in the pipeline.
{% endhint %}
# Working with Custom Events
{% hint style="info" %}
[Release 1.7.0](/release-notes/release-notes-archive/release-1.7.0) in June 2022 introduced support for Custom Events.
{% endhint %}
Custom Events can be used to define your own custom Triggers, and control when a Sidebar Panel mod refreshes.
PixieBrix uses the [DOM Event API](https://developer.mozilla.org/en-US/docs/Web/Events/Creating_and_triggering_events) standard. Therefore, custom events can be used to communicate bi-directionally with the host page.
### Emitting/Dispatching a Custom Event
To emit a custom event, use the [Emit a Custom Event](https://www.pixiebrix.com/marketplace/fcd0a884-fb83-4d82-a1c4-932287ae79f4/emit-a-custom-event/) brick. The brick takes two inputs:
* `eventName`: a unique name for the event. The name should be globally unique
* `data`: an optional data payload
PixieBrix dispatches the event on the root document of the frame.
### Running a Trigger on a Custom Event
To run a trigger on a Custom Event, choose “Custom Event” from the Trigger dropdown and configure the trigger:
* Custom Event: the name of the event. Should match the `eventName` in your use of Emit a Custom Event (see Emitting/Dispatching a Custom Event above)
* Element: an *optional* selector controlling the elements on which to listen for the event. Use when running triggers for events from the host page. The Emit a Custom Event brick emits events on the document itself.
If the event includes data, that data will be available to the Trigger mod bricks as `@input.event`
If the event includes data, that data will be available to the Trigger mod bricks as `@input.event`
### Refreshing a Sidebar Panel on Custom Event
Custom Events can also be used to control Sidebar Panel updates. To configure a Sidebar Panel to update on a custom event, choose “Custom Event” from the Panel Refresh > Trigger dropdown.
Then, configure the event to listen for:
* Custom Event: the name of the event. Should match the `eventName` in your use of Emit a Custom Event (see Emitting/Dispatching a Custom Event above)
# Intervals
The **Interval** trigger is a type of event used in the [**Trigger Starter Brick**](/developing-mods/developer-concepts/types-of-mods/trigger) that allows you to run bricks on a recurring time interval. This is useful for mods that need to continuously check for new data, poll an API, or monitor changes to content on the current page.
For example, you might:
* Periodically check an API for new notifications or messages
* Watch a DOM element on the page and trigger an action when it updates
* Run a script every few seconds to keep data in sync
### Configuration Options
Option
Description
Interval
How frequently the trigger should fire in milliseconds. For example, 10000 = every 10 seconds.
Run in Background
When true, continues running even if the tab is inactive.
Run in All Frames
When true, runs in all frames (iframes, embedded contexts).
Debounce
Optional. Helps prevent excessive triggering. Includes: • Delay (ms) – time to wait before firing • Leading – trigger at the start • Trailing – trigger at the end
***
### FAQs
**What’s the minimum interval I can set?**\
We recommend setting intervals of at least 1000 ms (1 second) to avoid performance issues.
**Will intervals still run if the user navigates away from the tab?**\
Only if **Run in Background** is set to `true`.
**What happens if multiple frames are on the page?**\
Use **Run in All Frames** to determine if the trigger should fire in each iframe or just the main window.
# Quick Bar Action
On any webpage, you can activate the PixieBrix Quick Bar using a keyboard shortcut. By default, the Quick Bar contains a set of action menu items that run in Chrome, but you can add your own actions the further customize it.
### What does the Quick Bar look like
{% hint style="info" %}
**Important:** By default, the CMD/CTRL + M keystrokes will trigger the Quick Bar. Follow these instructions to [Changing the Quick Bar Shortcut](/how-to/changing-the-quick-bar-shortcut).
{% endhint %}
### Configuring a mod to use Quick Bar
**Follow these steps to create and configure a Quick Bar Action:**
1. Open the [PixieBrix Page Editor](https://docs.pixiebrix.com/page-editor-guide).
2. In the left pane, click **New Mod** > **Quick Bar**.\

3. Type a name in the **Name** field.
4. In the **Configuration** section, enter the following information:
| Field | Description |
| ------------ | ----------------------------------------------------------------------------------------------------------------------------------------------------------------------------------------------------------------------------------------------------------------------------------------------------------------------------------------------------------------------------------------------------------------------------------------------------------------------------------------------------------------------------------------------- |
| Action Title |
Enter the name of the menu item. This is the name that displays when someone uses the shortcut.
|
| Contexts |
Select one or more focus element that triggers the Quick Bar. The default option is “all”. This means that the Quick Bar action displays whenever you use the shortcut, no matter the focus. But, if you want to narrow when the Quick Bar displays, you can choose any of the following options: • page • frame • selection • link • editable • image • video • audio
|
| Sites |
When you specify the sites you want the Quick Bar to display, PixieBrix runs faster and more accurately. To do so, enter the URL in the Sites field. Make sure that at least one URL matches the pattern(s) you added.
You can also:
• Click the Site, Domain, HTTPS, or All URLs shortcut to insert URLs automatically. • Click Add Site to enter a URL manually. • Click ABC > Remove to remove a site from the list.
|
5. In the **Advanced** section, enter the following information:
| Field | Description |
| --------------------- | --------------------------------------------------------------------------------------------------------------------------------------------------------------------------------------------------------------------------------------------------------------------------------------------------------------------------------------------------------------------------------------------------------------------------------------------------------------------------------------------------- |
| Icon |
If you want an icon to display next to the Quick Bar, select an icon from the drop-down list.
|
| Target Mode |
• Select eventTarget to provide the Quick Bar element clicked as the source of the bricks in the pipeline. • Select document to pass the whole HTML document as the source to the bricks in the pipeline.
|
| Automatic Permissions |
Automatic permissions determine which sites PixieBrix automatically loads so it can watch the selection/focused element. It also allows the use of CMD+M if a custom shortcut is not set up. To add or edit the URLs, enter the URLs you want to load.
You can also: • click the Site, Domain, HTTPS, or All URLs shortcuts to insert URLs automatically. • click Add Site to enter a URL manually. • click ABC > Remove to remove a site from the list.
|
6. In the **Advanced: Extra Permissions** section:
* Click the **Add Allowed Origin** button in the **Sites/APIs**:
* Click the **Site**, **Domain**, **HTTPS**, or **All URLs** shortcut to insert URLs automatically.
# AI Chat Copilot
{% hint style="info" %}
The AI Copilot is in Early Access for customers on an Enterprise Plan. To enable AI Copilot functionality for your account, contact your account manager or email
{% endhint %}
PixieBrix's AI Copilot provides seamless access to conversational AI within any web application and across your devices.
### Configuring the Chat Copilot
To register a chat copilot, use the `Add AI Copilot` brick. The brick has the following input properties:
* Title/Icon: the title for the copilot, displayed to the user on the copilot selection dropdown
* Integration Configuration: the integration configuration for LLM calls. Must be compatible with the OpenAI chat completions API
* System Prompt: optional prompt/instructions for the Copilot
#### Tool Call Settings
* Allow Brick Use: experimental support for calling PixieBrix bricks as tools
* Allow Browser Use: experimental support for automatically performing browser actions, e.g., form fill, etc.
* MCP Servers: an array of MCP server URLs to connect to for tools and prompts
#### Security Settings
The following security controls are used to [prevent data exfiltration via prompt injection](https://simonwillison.net/2025/Jun/16/the-lethal-trifecta/) for copilots with access to sensitive information:
* Embedded Content Allowlist: an array of [match patterns](https://developer.chrome.com/docs/extensions/develop/concepts/match-patterns) allowed for embedded content (e.g., images, etc.) in the assistant output. If not provided, defaults to banning embedded content
* Link Allowlist: an array of [match patterns](https://developer.chrome.com/docs/extensions/develop/concepts/match-patterns) allowed for links rendered in assistant output. If not provided, defaults to `https://*/*`
### Extending the AI Chat Copilot
#### Registering Custom Tools
Custom Tools/Functions enable the AI Copilot to look up information (e.g., for Retrieval Augmented Generation) and take actions.
To register a custom tool, use the `Add AI Copilot Tool` brick. The brick has following input properties:
* Name: The tool/function's name, e.g., `get_weather`
* Description: Details on when and how to use the function
* Parameters: JSON schema of type `object` specifying the tool's input parameters
* Handle: The handler to run. The validated arguments are provided to the handlers as `@args`
#### Registering Custom Prompts
Custom Prompts provide a powerful way ["to standardize and share common LLM interactions."](https://modelcontextprotocol.io/docs/concepts/prompts)
To define a Custom Prompt, use `Add AI Copilot Prompt` brick. The brick has the following input properties:
* Name: Unique identifier for the prompt. Displayed to the user
* Description: Human-readable description
* Arguments (Advanced): array of arguments to the prompt, in the [Model Context Protocol structure](https://modelcontextprotocol.io/docs/concepts/prompts#prompt-structure) (not JSON Schema). The AI Copilot will prompt the user to provide the arguments
* Handle: The handler to generate the prompt messages. The prompt arguments are provided to the handler as `@args`. Use the `Copilot Messages` brick to easily create a messages array.
#### Starting a Conversation
To start a conversation from another starter brick and/or mod, use the `Start Copilot Conversation` brick. The brick has the following input properties:
* Title (Optional): an optional title for the conversation
* Messages: the initial messages for the conversation
If the Copilot is not currently open/displayed, PixieBrix will automatically open the Copilot.
#### Registering Custom Message Actions
Custom Message Actions enable users to take actions on Assistant Messages. There are some actions built-in to the AI Copilot:
* Copy to Clipboard
* Regenerate Message
Examples of custom actions:
* Provide Feedback (positive/negative)
* Insert at Cursor
* Share Message
To register a custom Message Action, use the `Add AI Copilot Message Action` brick. The brick has the following input properties:
* Title: The message action's title to display in the Copilot interface
* Icon: The action's icon to display in the Copilot interface
* Handle: the action to run. The message is provided to the handler as `@message`
#### Registering Conversation Context Providers
Conversation Context Providers provide additional context to the AI Copilot without being stored in the in the conversation history/context.
Examples of conversation context providers:
* Chat with Page: provide compressed web page context to the Copilot
To register a Conversation Context Provider, `Add AI Copilot Conversation Context` brick. The brick has the following input properties:
* Title: User-facing title of the action
* Icon: The provider's icon to display in the Copilot interface
* Handle: The handler to generate the context messages. Use the `Copilot Messages` brick to easily create a messages array.
Messages provided by a conversation context provider, enhance the context in the following way:
* System: system messages are appended to the AI Copilot's System message
* User/Assistant: user/assistant messages a included between the conversation history and the user-provided message
### Running Bricks as Tools
The AI Copilot has two built-in tools to support automatically running bricks:
* `bricks_search` : search all bricks available to the user
* `bricks_run` : run a brick by registry id and arguments
#### Brick Tool Limitations
* Bricks are run in the top-level frame. To handle pages with frames, define a custom brick with frame handling in the workshop: [Advanced: Workshop](/developing-mods/advanced-workshop)
* Bricks with integration configurations cannot be run as tools. To run a brick with an integration as as a tool, register it as a custom tool: [#registering-custom-tools](#registering-custom-tools "mention"). (You will be prompted to choose an integration configuration when activating/deploying the containing mod)
### White Labelling and Component Customization
{% hint style="info" %}
White Labelling is only available on an Enterprise plan. To White Label the AI Copilot, contact your account manager or email
{% endhint %}
The following AI Copilot components can be white labelled/customized:
* Messages Container
* User Message
* Assistant Message
* Tool Call
* Message Action
* Custom Prompt
* Conversation Context Provider
# Customer Support Copilot
{% hint style="info" %}
The Customer Support Copilot is in Early Access. To request access, contact [support@pixiebrix.com ](mailto:support@pixiebrix.com)or your account executive.
{% endhint %}
PixieBrix's Customer Support Copilot provides a Heads-Up Display (HUD) and Chat Interface to breeze through your toughest support cases.
### Configuring a Customer Support Copilot
* Name: the name of the Customer Support Copilot
* Description: a description for the Customer Support Copilot
* System Prompt: additional instructions to pass to the AI. For example, context about your company, product lines, etc.
* Brand Guidelines: brand guidelines to follow when generating responses. For example, "Always be professional and empathetic".
#### Intents
Intents, also known as "call drivers", are the reason for contacting the brand. For example, "Upgrade Plan", "Password Reset", etc.
Intent Resources:
* Ticket Properties: properties/attributes to automatically extract from the ticket. For example: the name of the product the customer is inquiring about
* Article Links: links to internal/external articles
* Application Links: links to applications, e.g., product telemetry or error telemetry
* Response Templates: text response templates to insert into the conversation
* Chat Prompts: prompts to start a conversation in the [AI Chat Copilot](/developing-mods/developer-concepts/types-of-mods/ai-chat-copilot)
### Extending the Customer Support Copilot
#### Registering Custom Ticket Providers
Ticket Providers provide tickets (also known as cases) and conversations to the Customer Support Copilot. To make a ticket available to the Customer Support Copilot, use the `Upsert Customer Support Ticket Context` brick:
* Id: the unique identifier for the ticket
* Name: A user-facing name/title for the ticket, e.g., '#123: Password Reset Request'
* URL: The URL to open the ticket in the support system, e.g., a Zendesk URL. If not provided, defaults to the current URL.
* Requester: The display name of the user who requested the ticket, e.g., email or username
* Comments: the array of comments/internal notes:
* Author: The author display name, e.g., email or username
* Created At: The ISO 8601 timestamp when the comment was created
* Body: The body/content of the comment
* Public (Optional): true if the comment is visible to the requester/customer, or false for internal notes. Defaults to Public if not provided
#### Registering Custom Search Providers
The Customer Support Copilot uses search providers to automatically search for links related to the ticket. To register a custom search providers, use the `Add Support Copilot Search Provider` brick:
* Name: the name of the search provider
* Parameters: the JSON Schema for the search provider parameters.
* Handle: The handler to run producing an array of search results (see type below). The validated arguments are provided to the handlers as `@args`
```typescript
type SearchResult = {
/** User-facing title of the search result */
title: string;
/** External URL of the search result */
url: string;
/** Optional preview snippet */
snippet?: string;
}
```
#### Registering a User Resolver
A User Resolver searches a query (e.g., id, name, email) for users in your system/application.
The Support Copilot uses the registered User Resolver to resolve:
* Text you search in the User HUD
* Text you select/search on the page
{% hint style="warning" %}
The User Resolver(s) should resolve to entities in your system/application, not associated entities (e.g., the associated entity in your Product Analytics tool)
{% endhint %}
To register a User Resolver, use the `Add User Resolver` brick:
* Name: a unique name for the User Resolver, e.g., "My Service"
* Handler: the handler that returns a list of Users for the query
```typescript
type Args = {
/** The user query */
query: string;
}
type User = {
/** The user identifier, e.g., UUID, email, etc. */
id: string;
/** Email address */
email: string;
/** Full name */
name?: string;
}
```
**API Integration Reference**
* [Clerk](https://clerk.com/docs/reference/backend-api/tag/users/get/users)
* [Firebase](https://firebase.google.com/docs/auth/admin/manage-users#retrieve_user_data)
#### Registering User Property Providers
The Customer Support Copilot calls User Property Providers to provide information about a user in your system/application. For example, current plan, date joined, etc.
To register a User Property Provider, use the `Add User Property Provider` brick:
* Name: a unique the name for provider. Displayed in the User HUD UI. For example, the data source, e.g., Salesforce, PostHog
* Handle: The handler to run producing an object/dictionary of properties
#### Registering User Actions
To register a User Action, use the `Add User Action` brick:
* Name: a name/title for the action
* Icon: an icon for the action
* Variant: the UI variant of the action. One of: primary, secondary, info, success, warning, danger, link
* Handle: The action handler
# Customizing Support Flow
To customize the content that appears in your Support Flow sidebar, you'll make changes in the [PixieBrix Admin Console](https://app.pixiebrix.com/).
### Add Ticket Intents
Intents are the categories your support tickets are bucketed by. Common examples are "Product Help", "Feature Requests", and "Bug Reports".
Support Flow uses these defined intents to categorize each ticket and suggest related resources and tools.
Follow these instructions to create your custom Intents for Support Flow:
{% embed url="" %}
### Add Article Links
Article Links appear in the Support Flow sidebar to help your support team quickly access documentation, SOPs, playbooks, or other links that are helpful when working through support tickets.
These articles are tied to Intents, so you can customize which articles appear based on the type of ticket.
Follow these instructions to add your article links to Support Flow:
{% hint style="info" %}
You'll need to [create an Intent](#add-ticket-intents) to associate your article link with.
{% endhint %}
{% embed url="" %}
### Add Chat Prompts
Chat Prompts are custom instructions that run with a single click, using the context of the current ticket. You can create a prompt with anything you’d usually ask AI to do. For instance, “summarize this issue and draft a response”, or “search the web for possible solutions to this issue”.
Follow these instructions to add chat prompts to Support Flow:
{% hint style="info" %}
You'll need to [create an Intent](#add-ticket-intents) to associate your chat prompt with.
{% endhint %}
{% embed url="" %}
Want to reference tools like `create_jira_ticket` in your Chat Prompt? Reach out to your mod developer or onboarding specialist to ask about making custom tools accessible in your prompts.
# What Are URL Match Patterns?
PixieBrix uses URL match patterns to determine whether or not a mod should run on a web page. For each mod, you can define the URL match patterns using a combination of any of the following:
* **Wildcards.** Use wildcards to match any character or sequence of characters.
* **Regular expressions.** Use regular expressions to allow for more advanced filtering.
* **Fixed text strings.** Use \*\*\*\*fixed string matches for exact matches.
### Important Things to Know
* If PixieBrix does not have access to a site, you will be prompted to grant access.
* URL match pattern rules are optional, but if you add them, ensure that at least one URL matches the patterns you add.
### Setting URL Match Patterns
You'll see the URL match pattern in the Starter Brick for each mod. The Starter Brick is the first brick in a mod, and must be one of the following:
* Trigger
* Sidebar
* Context Menu
* Quick Bar
* Button
In the Starter Brick [Configuration Panel](/platform-overview/page-editor/page-editor-components/brick-configuration-panel), you'll set the **Sites** value to specify where a mod can run.
### Related Topics
* [Mozilla URL Pattern API](https://developer.mozilla.org/en-US/docs/Web/API/URL_Pattern_API)
* [Chrome Developer Match patterns](https://developer.chrome.com/docs/extensions/mv2/match_patterns/)
# Text Template Guide
Text Templates are a way to dynamically create text on the fly when a brick runs. Here’s an example of a simple text template:
```django
Hello, {{ @profile.email }}!
```
In PixieBrix, you can use the Text Template entry mode to dynamically construct inputs for any field. Here’s the same template being used to create a greeting for the [Window Alert brick](https://www.pixiebrix.com/marketplace/b249e2e3-7fa1-4e7a-a0ba-70cfa1a18707/window-alert/):thumbsup:
Using the text template entry mode to create a greeting for the Window Alert brick dynamically.
To provide a text template in the Page Editor, ensure the field entry mode is Text Mode, as indicated by the **ABC** icon.
Now let's learn about [Basic Text Templates](/developing-mods/developer-concepts/text-template-guide/basic-text-templates).
# Basic Text Templates
### Basic Text Templates
```django
I have one {{ @pet.type }} named {{ @pet.name }}
```
The content inside the mustache brackets `{{` `}}` is called an expression. PixieBrix will fill the expressions with the available values when the brick is run. For example:
The simplest text templates insert dynamic content:
```html
I have one cat named Tiger
```
# Transforming Data with Filters
You can transform an expression by providing one or more filters in the template expression. Filters are provided using the `|` pipe operator.
For example, to upper case the pet’s name:
```
I have one {{ @pet.type }} named {{ @pet.name | upper }}
```
Will produce the following:
```html
I have one cat named TIGER
```
{% hint style="info" %}
A complete [list of supported filters is available here](https://mozilla.github.io/nunjucks/templating.html#builtin-filters).
{% endhint %}
Some filters accept arguments. To pass arguments to a filter, include the arguments list in parentheses: `filter(arg1, arg2, ...)`
Popular transformation filters are:
* `title`: convert text to Title Case
* `truncate`: truncate the text with ellipses. For example: `@description | truncate(10)` to truncate text to 10 characters.
* `join`: concatenate values using a separator. For example: `@names | join(",")`
{% hint style="info" %}
Under the hood, PixieBrix uses the popular [Nunjucks templating language](https://mozilla.github.io/nunjucks/), developed by the non-profit that makes the Firefox web browser!
{% endhint %}
# Writing Conditional Statements
Text templates can conditionally produce text for input to a brick.
### Condition Expression
If there are only 1 or 2 simple cases, you can write the condition inline as an expression:
```jinja
{{ "Meow" if @animal == "cat" else "Woof!" }}
```
### Using Text Templates for Brick Conditions
There are two ways to conditionally run a brick:
* Single Brick: use the Advanced > Condition configuration field
* Multiple Bricks: use the [If-Else brick](https://www.pixiebrix.com/marketplace/22b9a496-a13b-493b-bee6-8c97080d8cd2/if-else/)
The condition can be a variable, or a text expression evaluating to `true`, `t`, `yes`, `y`, `on`, or `1`.
For example:
```jinja
{{ true if @count > 0 }}
```
```jinja
{{ true if not @myVariable }}
```
### Comparison and Logic Expressions
PixieBrix text templates support comparison and logical operators in expressions:
* `==` , `!=`: equals and not equals
* `>`, `<`, `>=`, `<=`: numeric comparison
* `and` , `or`: logic
* `not`: negation
Here’s an example showing comparison and logic in an expression:
{% hint style="warning" %}
To provide multiple conditions using `and` or `or`, provide them within the same template expression
{% endhint %}
```jinja
{{ true if @run > 0 and @animal == "cat" }}
```
### Condition Tag Blocks
If there are multiple cases, or one or more cases are multi-line, you can use condition blocks to provide the cases:
```jinja
{% if @animal == "cat" %}
Meow!
{% elif @animal == "dog" %}
Woof!
{% else %}
???
{% endif %}
```
As you can see, blocks are designated using `{%` and `%}` instead of the `{{` mustache braces. The tags are `if`, `elif`, and `endif`.
{% hint style="warning" %}
Note that alternative cases use the `elif` tag with no space. I.e., as opposed to `else if` which is used in many programming languages\
\
✅ `elif` \
❌ `else if`
{% endhint %}
You can learn more about the `if` [tag in the Nunjucks Template Language documentation](https://mozilla.github.io/nunjucks/templating.html#if).
# Template Examples
### Using variable paths that contain spaces in their names
Let’s assume a brick produces an output called `@userPreferences` and you want to reference the `favorite color` in a text template.
In the Page Editor Data Panel, the Output Data Tab might show:
Example Output Tab of the Data Panel showing data with names that include spaces.
To use the favorite color in a text template expression, **you must use square brackets and quotation marks**:
```
Your favorite color is {{ @userPreference.data["favorite color"] }}
```
### Text substitution using the replace filter
To replace all occurrences of a word or phrase, use the `replace` filter. For example, to replace all occurrences of `bricks` with `brix`:
```
{{ @description | replace("bricks", "brix") }}
```
### Chaining multiple filters in an expression
You can chain multiple filters using the `|` pipe operator. For example:
```
{{ "Lorem ipsum dolor sit amet" | truncate(15) | title }}
```
Will produce the following text output:
```
Lorem Ipsum...
```
### Looping over elements of an array
You can use the [for tag](https://mozilla.github.io/nunjucks/templating.html#for) to loop over elements of an array. This is handy for creating bulleted lists in inputs that support Markdown, such as the [Render Markdown brick](https://www.pixiebrix.com/marketplace/520b2dc6-11a9-4a9c-9753-58e3f2ed4513/render-markdown/)
```
{% for @item in @items %}
- {{ @item }}
{% endfor %}
```
# Using Bricks
Bricks are the building blocks of your PixieBrix automations. Most of your development will involve working with bricks, so these docs help you understand everything you need to know about brick concepts, as well as specific bricks that will help you accomplish common tasks.
# Brick Input Data Types
Most bricks have input fields for configuring the brick.
Each field accepts various input types, depending on the field.
Here are all the available field types:
* **Select:** a dropdown of pre-defined options to select from
* **Text:** text fields that accept any text, and support templates. See the [Text Template Guide](https://www.notion.so/Text-Template-Guide-3504fb6479674b84b67f7dd0c6845191?pvs=21)
* **Variable:** a variable from a preceding brick, or a `@mod` or `@options` variable reference\
ℹ️ *If you are in the text entry mode and type `@`, the field will automatically switch to variable entry mode*
* **Toggle:** pass true/false by toggling on or off
* **Array**: provide zero of more values to the field
* **Object Properties (K:V)**: passing key:value pairs of data
* **Exclude:** don’t pass a value for the field
{% hint style="info" %}
Pro-tip: when the field is currently in exclude mode you can click on the field and start typing.
{% endhint %}
# Bricks for Scraping Data
When building automations with PixieBrix, you'll often want to scrape information from a webpage. This could be as simple as pulling the current page's title or URL, or as complex as scraping a consistent field scraped from multiple pages, like the price of an Airbnb listing, a Salesforce case number, or something else entirely.
### **Scrape Page Metadata**
If you want some metadata about the current page, you can always access that out of the box wherever you trigger a mod.
For instance, you can see in our newly added Quick Bar Action brick we have a **Preview** panel on the right side with an object called *@input*. Click the caret icon (**‣**) before that, and you'll see everything you have access to.
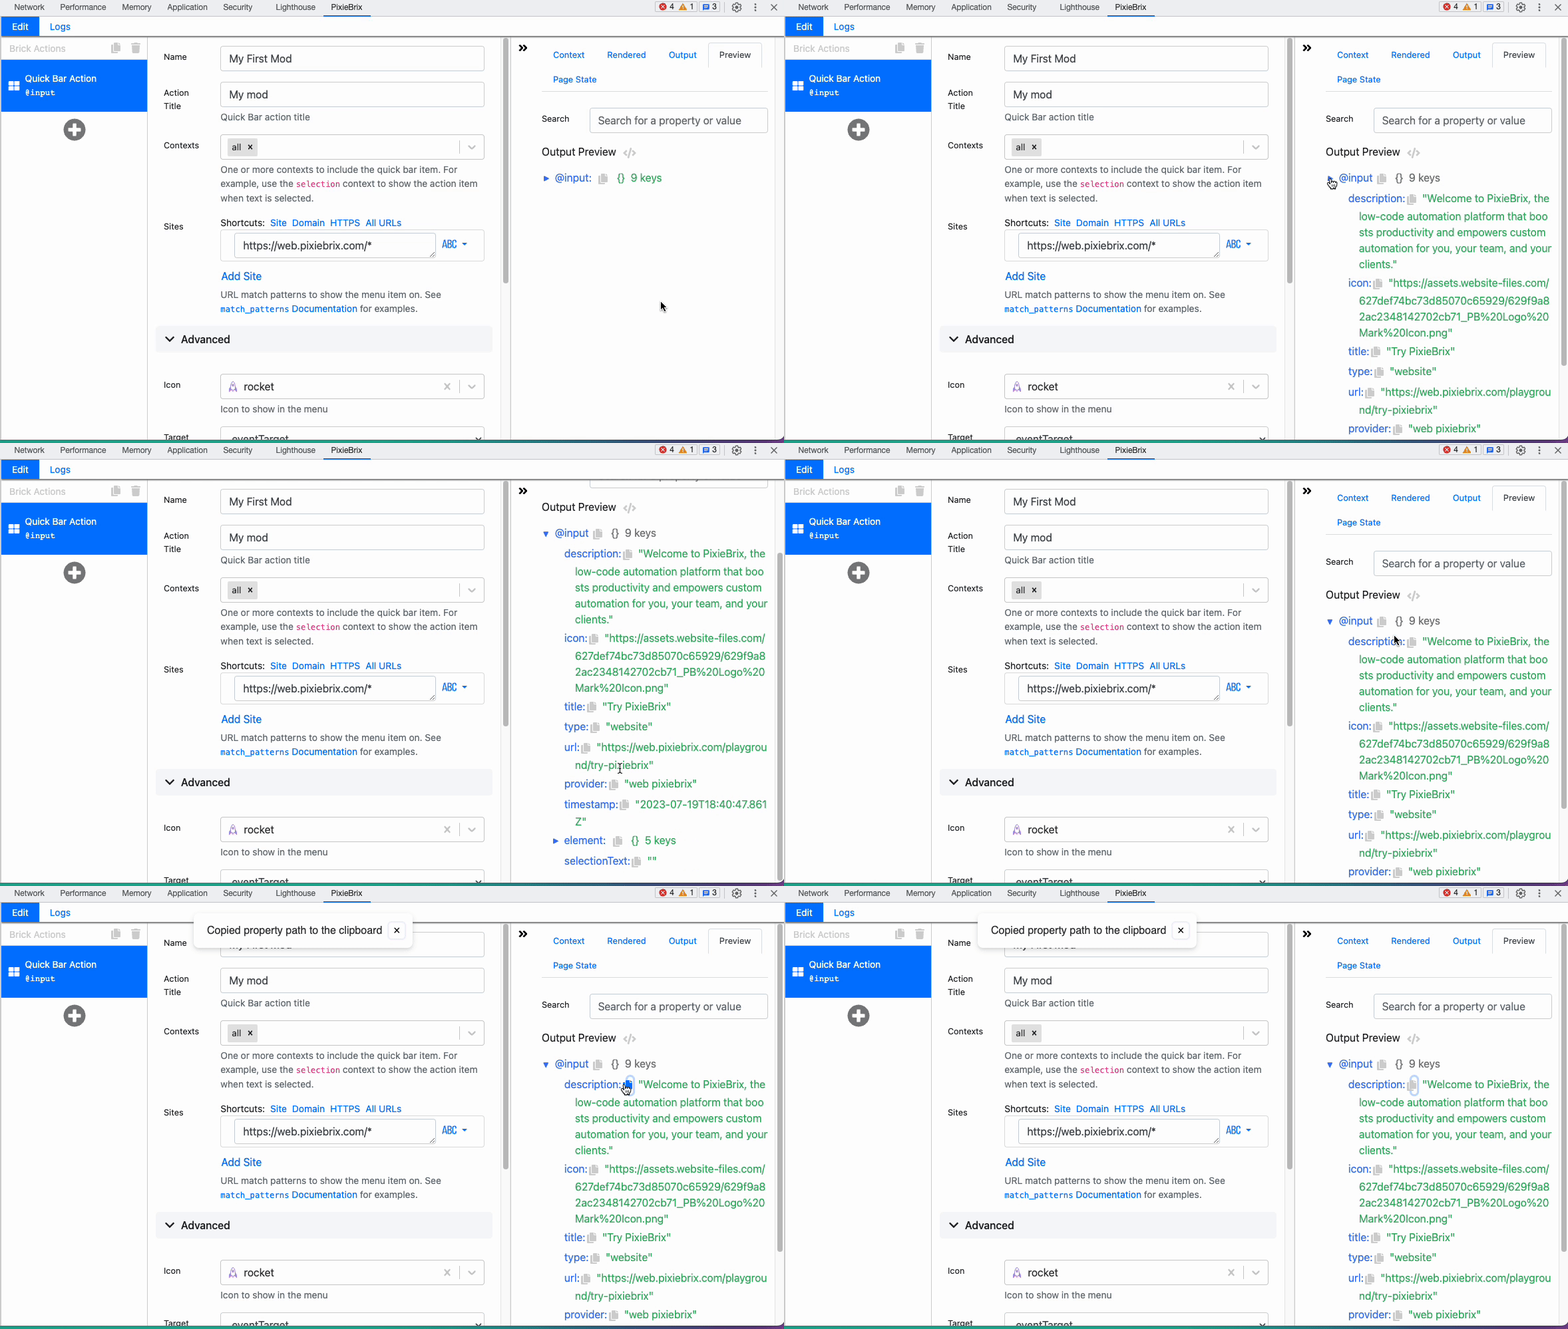
Click the copy icon next to a field, and it will copy the path to your clipboard, allowing you to reference it later in other bricks!
### **Scrape data from elements on the page**
If you want to scrape information from elements that are on the page, you'll need to use our Extract from Page brick.
With this brick, you'll be able to read data associated with any specific elements on the page, you just need to pass it through the right jQuery selectors, and PixieBrix can even help you with that!
🚨**Pro tip**: PixieBrix can often guess the right selector, but sometimes it can't. You might need to use the Elements tab of your Chrome Dev tools to comb through an element and find the best class that works consistently across multiple pages. For more information, [read this article](https://stackoverflow.com/questions/51631947/how-to-use-chrome-dev-tools-to-find-elements-based-on-css-class-or-id) or [watch this video](https://www.youtube.com/watch?v=rjWUzxMjCAU).
### Scrape data from tables
If you want to extract data from a table on a page, use the [Table Reader](https://www.pixiebrix.com/marketplace/ff13a900-a144-4a91-8f10-e614da0c9754/table-reader/) brick. Provide a selector that contains the table and the output with contain the records from the table.
To send each item to another source, add the [For-Each Loop](https://www.pixiebrix.com/marketplace/b5073367-71c7-4be1-8b21-64654b206592/for-each-loop/) brick after the Table Reader brick and specify the array of records from the Table Reader output.
{% hint style="info" %}
If you have many items in your records, you may need to add a [Wait/Sleep brick](https://www.pixiebrix.com/marketplace/efab2b4c-c3e2-4087-9baf-e5ae077e8c3c/waitsleep/) inside the loop to prevent rate limiting from the API receiving the data.
{% endhint %}
### ✨ **Beta ✨ Scrape data from the page using AI**
If you're unsure how to pick selectors, we've got another brick you can use. With the Extract from Page using AI brick, you can pass a section of a page to ChatGPT and ask it to find the right property for you rather than figure it out yourself.
Here are a few things to keep in mind before trying this out.
1\) You can't pass on the whole body of a page or extremely large containers. It's too much data for ChatGPT to handle in one request. Try selecting the smallest element you can.
2\) Click **Add Item** in the Properties field and then type the property you're searching for and see if AI can find it for you, like this!

If you're interested in learning more, [read the docs for the Extract from Page with AI brick](https://www.pixiebrix.com/marketplace/ca981a70-cf70-46d5-80b0-2abb309af80c/).
# Retrieving Attributes from Elements
When scraping elements on a page, in some cases you may want to scrape something other than text from an element, such as the value of a specific attribute like an ahref, aria-label, or id.
Start with the Extract from Page brick, and if that doesn't work for your element, explore the Traverse Elements route.
{% hint style="info" %}
Before adding either of these bricks, you'll need a starter brick for triggering your mod. Learn more about starter bricks in [Types of Mods](/developing-mods/developer-concepts/types-of-mods).
{% endhint %}
*Prefer to watch? The below video covers the content on this page:*
{% embed url="" %}
### Using Extract from Page brick
#### 1. Add the Extract from Page brick.
Click the **+** button in the [Brick Actions panel](/platform-overview/page-editor/page-editor-components/brick-actions-panel) below your starter brick. Search for the Extract from Page brick, and hover over the brick to click the blue **Add** button.
#### 2. Specify the selector of the element you want to scrape.
In the Selector field, use jQuery or CSS selectors to specify the element you'd like to target. If you don't know the selector, you can use the green mouse to click the element on the screen and PixieBrix will apply selectors.
#### 3. Use the Extract field to specify what you'd like to scrape.
Below the Selector field, you'll find a dropdown for **Extract**. If PixieBrix has successfully identified an element based on the Selector provided, you'll be able to choose from Text, Element, or specific attributes from the elements.
{% hint style="info" %}
Select `Element` if you want to extract nested properties.
{% endhint %}
#### 4. Run the mod to access the value in the output.
Run your mod and go to the Output tab of the [Data Panel](/platform-overview/page-editor/page-editor-components/data-panel) while the Extract from Page brick is selected.
You should see a data object with your targeted attribute. Click the copy icon to copy the path and reference the value in another brick.
### Using Traverse Elements + HTML Element Reader bricks
{% hint style="info" %}
You'd likely only use this approach if you are unable to find the attribute via Extract from Page, or if you're unable to find the specific element via CSS or jQuery selectors.
{% endhint %}
#### 1. Use the Traverse Elements brick to specify the element you'd like to access.
Click the + button in the [Brick Actions panel](/platform-overview/page-editor/page-editor-components/brick-actions-panel) to search for the Traverse Elements brick. Hover over the brick and click the blue **Add** button.
In the selector field, you can manually type the CSS or jQuery selectors for the element, or click the green mouse button to select an area on the screen.
{% hint style="info" %}
If you are having trouble finding the element, you may need to use the traversal property to find related elements to an element that you can successfully find.
{% endhint %}
#### 2. Access the output
Run the mod to generate an output for the Traverse Elements brick. Check the output in the [Data Panel](/platform-overview/page-editor/page-editor-components/data-panel) on the far right panel, and open the `@transformed` object, then the `elements` array and copy the path of the element reference. *By default, the pathname will be @transformed.elements\[0].*
#### 3. Use the HTML Element Reader brick to target the specified element.
Click the + button in the [Brick Actions panel](/platform-overview/page-editor/page-editor-components/brick-actions-panel) below the **Traverse Elements** brick and search for the **HTML element reader** brick**.** Hover over the brick, and click the blue **Add** button.
Go to the **> Advanced Options** and update the **Target Root Mode** field to `Element`.
Once you select Element, the **Target Element** field appears just below. Paste the path to the selected element from the Traverse Brick that you copied from Step 2.
#### 4. View object with element's attributes in the HTML element reader brick output.
Run the mod once more and view the output from the HTML element reader brick. You should have access to all attributes of that element.
Copy the path of the desired attribute, and you can reference the attribute value in another brick.
### Referencing the attribute value
{% hint style="info" %}
If you wanted to reference the `href` attribute and open that link in another tab, you could add an **Open a tab** brick and pass the `@element.attrs.href` value. In this case, you'd need to set the domain name before the path, so you would use [Text Templating](/developing-mods/developer-concepts/text-template-guide) to preset the domain and then append the path, like this:
[`https://www.linkedin.com/{{@element.attrs.href}}`](https://www.linkedin.com/{{@element.attrs.href}})
{% endhint %}
# Bricks for Interacting with the DOM
Many automations involve interacting with elements on the page, such as filling out a form or clicking on a field. You'll use these common bricks to interact with elements on a page.
### Set Input Value
Now that we've collected data in a few different ways (scraping the page to get text in a box and transforming a URL into a shortened link) let's do something with it. In many cases, you're going to want to turn that text into data you can add to a page, such as setting content for a tweet or LinkedIn message, filling out a form in Salesforce, or performing a search query on a site.
To do this, you'll use the **Set Input Value** brick. You can learn more in the [Set Input Value brick docs](https://www.pixiebrix.com/marketplace/51c95696-f0ad-4cc8-acab-e9b351e4e9ca/?utm_source=pixiebrix\&utm_medium=page_editor\&utm_campaign=docs\&utm_content=view_docs_link).
### Simulate DOM event
Here’s another action you’ll find useful as you build your PixieBrix mods! If you're not a developer, the words "DOM" might not mean anything to you, but in plain English, the **Simulate DOM Event** brick allows PixieBrix to interact with items on a page and trigger actions, like clicking elements on a page.
It can be useful for submitting forms or posting content, like tweets or LinkedIn posts, but it’s also a great way to navigate between pages that don’t have clear links between them.
Learn more in the [Simulate DOM Event docs](https://www.pixiebrix.com/marketplace/ceca912f-bb40-4686-a8e6-e5508620018c/).
# Bricks for AI
With so many use cases for Artificial Intelligence (AI) and Large Language Models (LLMs) these days, you'll likely want to incorporate AI in your mod. We have a couple bricks you can use to do that.
### Chat with ChatGPT
To interact with OpenAI in PixieBrix, you can use the **Create Chat Response with ChatGPT** brick.
The most important settings are:
* **OpenAI Configuration**: use our built-in one, or [add your own OpenAI integration](/integrations/openai-chatgpt)
* **Model**: select from a model, including gpt-4.0
* **Messages**: define system and user prompts
Below that are additional settings you can change, but you can typically use the defaults unless you need to change something.
Learn more by reading the [Create Chat Responses with ChatGPT brick docs](https://www.pixiebrix.com/marketplace/a3f44286-89c1-4a14-b6bb-4512cbfde425/?utm_source=pixiebrix\&utm_medium=page_editor\&utm_campaign=docs\&utm_content=view_docs_link).
### Few Shot Prompting with ChatGPT
If you're trying to do something very specific and want to train your brick, use the Few Shot Prompt brick to provide examples of expected output from your provided inputs.
Learn more in the [Few Shot Prompt brick docs](https://www.pixiebrix.com/marketplace/1e212b34-84e9-4903-a983-a5842a6dce22/).
### Chat with PaLM
We also have a few bricks for working with PaLM, Google's LLM.
* [Create Chat Response with PaLM](https://www.pixiebrix.com/marketplace/eea3eb03-8fed-40ba-8683-7b63bda5d115/)
* [Create Text Response with PaLM](https://www.pixiebrix.com/marketplace/79905671-2ca8-4ac3-9c84-c4ee3d23287f/)
* [Parse/Repair PaLM JSON Response](https://www.pixiebrix.com/marketplace/4c34922f-58fc-49f1-b779-2cdcfe9ae41f/)
### Custom AI models
If you'd like to work with a model that we don't already have a brick for, you can use the HTTP Request brick to integrate with any model that has an API.
Learn more about [creating integrations](/integrations) and [working with APIs](/developing-mods/developer-concepts/working-with-apis) in PixieBrix.
# Passing Custom Data to an LLM
In some cases, you might want to ask ChatGPT to review a specific set of data before giving its response. This is useful if you want ChatGPT to search through your database or a spreadsheet before picking a relevant response.
You could even access a list of Slack Channels in a Google Spreadsheet and then ask ChatGPT to recommend Slack Channels based on an introduction. In this video, you’ll see how you can do this.
{% embed url="" %}
# Variables and Data Context
The beauty of PixieBrix is that you can reference outputs from bricks throughout a mod. One brick can get information (such as rows from a Google Sheet) and other bricks can display or use that dynamic information.
Read through the following docs to learn more about how to assign and reference data in a mod.
# Types of Variables
{% hint style="info" %}
This documentation is about setting variables on the current frame, tab, or browser session.
If you need to store data that are accessible to multiple team members, or across browser profiles, see PixieBrix’s [Team Databases](/storing-data-with-team-databases) feature
{% endhint %}
### Variable Type Summary
Variables in PixieBrix work similarly to variable in other Low-Code Application Platforms and programming languages.
There are two special variable types made available by PixieBrix for providing configuration and starter brick run context: Mod Options and Starter Brick Input Variables.
Variable Type
Referencing the Variable
Scope/Lifetime
When Set/Configured
Local Variable
Varies: the variable name is configured via the "Output Variable" for a brick
Available to all bricks after the brick at the same, or deeper nested level
### Advanced: Shared Page State
{% hint style="info" %}
Page State has been superseded by Mod Variables for working with mod-scoped data. Mod Variables are easy to reference via `@mod` , and enable PixieBrix to apply automatic performance optimizations
{% endhint %}
Page State is in-memory storage used to: 1) persist information across starter brick runs, 2) share data between mod components and/or mods. For detailed information on using Page State, see [Advanced: Using Page State](/developing-mods/developer-concepts/variables-and-data-context/advanced-using-page-state)
There are two primary built-in bricks for working with Page State:
* Get shared page state
* Set shared page state
Page State can be assigned to 3 available namespaces:
* Private: visible only to bricks within a single Mod Component
* Mod: visible to all bricks in a single Mod
* Public: visible to all Mods
# Referencing Variables in Brick Configuration
### Variable References
Variables are referenced using `@` in front of the variable name. For example, a local variable `myVariable` is referenced as `@myVariable`.
### Using Autosuggest
In the Page Editor, when you type `@` into a field, the Page Editor will display the variable autocomplete popover:
The variable popover automatically filters/expands based on the variable name under the cursor. For example, for to filter for `@form`
Filtering available variables based on text
Alternatively, you can click the carat to expand into an object and see specific fields that exist within that object.
# Using Mod Variables
### Overview
Mod Variables are shared across Mod Components within a Mod. For detailed information on Mod Variables, see [Using Mod Variables](/developing-mods/developer-concepts/variables-and-data-context/using-mod-variables)
Example use cases/scenarios for Mod Variables are:
* Fetching information from an API and displaying it in a Sidebar
* Ensuring a Starter Brick runs only once per page
* Fetching configuration/settings from an API
**Triggers:** Sidebar Panels and Triggers can be configured to run on changes to Mod Variables. Set the trigger type to "Mod Variable / State Change"
**Lifetime:** By default, Mod Variable values are scoped to the current frame instance. Reloading/Navigating the frame with clear the Mod Variable values. The lifetime of the Mod Variable can be configured via the [Using Mod Variables](/developing-mods/developer-concepts/variables-and-data-context/using-mod-variables#mod-variable-synchronization-policy)
### Setting/Assigning to a Mod Variable
To assign a value to a Mod Variable, use the Assign Mod Variable Brick in the “Store/Retrieve” Category:
Adding the Assign Mod Variable Brick
In the Brick Configuration, provide a Variable Name and the Value. The Value can be of any type, and you can provide a variable.
Assigning a Value to a Mod Variable
### Reading a Mod Variable
To Read a Mod Variable, use the `@mod` variable in a variable or template expression.
PixieBrix fills in the variable with the current value at the time the brick is run.
If the Mod Variable has not been assigned yet, it’s value will be `null`:
Using a Mod Variable in a Text Template
#### **Advanced: Reading a Snapshot of Multiple Mod Variables**
In certain situations, you need to use multiple associated mod variables across multiple bricks. If you access the mod variables via the `@mod` reference, the values may change between bricks, if another starter brick run has assigned to the mod variable.
To read a single snapshot of all mod variables, use the "Get Shared Page State" brick to assign the mod variables to a local variable. See [Advanced: Using Page State](/developing-mods/developer-concepts/variables-and-data-context/advanced-using-page-state) for more information.
### Viewing Mod Variables in Data Panel
To view the current Mod Variables in the Data Panel, view the "Mod Variables" tab in the Data Panel:
The "Mod Variables" Data Panel Tab
To view the Mod Variables at the time the brick was run, use the "Input" tab in the Data Panel, with View toggled to "Variables"
Viewing the variables at the time a brick was run
### Async Mod Variables
{% hint style="info" %}
Async Mod Variables are most useful when you need to handle fetching, success, and error states. For example, when fetching data via API to show in a panel.
{% endhint %}
Async Mod Variables keep track of a value and metadata about generating that value. Async Mod Variables have the following shape when initialized:
* `isLoading`: true if the the brick is bricks are running for the first time
* `isFetching`: true if the the bricks are currently running
* `isSuccess` : true if the last brick run successfully returned a value
* `isError`: true if the bricks threw an error, or false otherwise
* `error` : the error from the most recent run, or undefined if the most recent run was successful
* `data` : the data/result from the most recent run, or undefined if the most recent run was not successful
* `currentData` : the data/result from the latest run, or undefined if the bricks are currently running
Using the Async Mod Variables includes additional metadata as part of your variable. You can reference each of these properties to track the status of the action, such as `@mod.myVariableName.isLoading`
Example Async Mod Variable Shape
#### Run with Async Mod Variable
The `Run with Async Mod Variable` brick runs one or more bricks asynchronously, and tracks the value using an Async Mod Variable.
Using the Run with Async Mod Variable brick to fetch data from an API and transform the result
#### Run with Cache
The `Run with Cache` brick is similar to the `Run with Async Mod Variable` brick, but only re-runs the bricks if the value is stale, or the force-fetch option is true. Run with Cache has the following configuration options:
* `Mod Variable Name`: the mod variable name to track the Async Mod Variable state
* `Time To Live (TTL)`: the expiry for the value when generating a value
* `Force Fetch`: true to force generate the value, even if the previous value is not expired
Common Cache Use Cases:
* Fetching settings from a Team Database, or Remote API
### Bricks that Listen for Mod Variable Changes
{% hint style="warning" %}
**Watch Out:** if a Mod Variable trigger modifies a mod variable, the trigger will be re-run in response to the change. The infinite recursion can slow down the page, or cause the page to crash.
{% endhint %}
Other bricks in PixieBrix can take advantage of Mod Variables:
* Sidebar Starter Brick: can re-render on changes to Mod Variables
* Display Temporary Information: can be set to re-render on changes to Mod Variable
* Trigger Starter Brick: can listen for changes to Mod Variables
### Mod Variable Synchronization Policy
PixieBrix supports automatically synchronizing mod variables across frames/tabs. The following synchronization modes are supported:
* None: mod variable is scoped to the frame. A full navigation/redirect of the frame will cause the mod variable value to be reset
* Tab: mod variable is synchronized across all frames on the tab. The value persists across navigation/redirects
* Session: mod variable is synchronized across all frames/tabs for the browser profile session. The value persists until you close/restart the browser profile
To set a synchronization policy, navigate to the Mod > Mod Variables sub-tab in the Page Editor. Select the synchronization policy from the Synchronization dropdown.
Assigning the Synchronization Policy for a Mod Variable
The Mod Variables sub-tab displays declared and inferred Mod Variables. To set the synchronization policy, you must first declare the mod variable. You can declare a inferred Mod Variable by clicking the `+` button.
### Example Use Cases
#### Use Case: Showing API Data in a Sidebar
A popular PixieBrix use case is to fetch information from an API and display it in a Sidebar Panel. We recommend the following structure for the use case to support automatic + manual fetching:
1. Trigger: with trigger Custom Event, e.g., `fetch-tasks`
2. Sidebar Panel with trigger "Mod Variable / State change"
3. Trigger: Page Load or Interval, with Emit Custom Event brick to automatically emit `fetch-tasks`
Example trigger to fetch tasks and assign to Mod Variable `@mod.tasks`:
Run with Asynchronous Mod Variable to automatically track the loading, error, and success state
The Sidebar Panel can reference the asynchronous variable state, e.g., to show a loading indicator or error message:
Referencing Async Mod Variable in Text Templates to show loading, error, and success state
#### Use Case: Running a Mod Only Once
To run an mod at most once, use a Mod Variable brick to track if the mod has already been run.
Add a “Cancel Current Action” brick and specify the condition as `@mod.modHasRun`
Conditionally cancelling a Starter Brick run based on a Mod Variable Value
Using a mod variable. PixieBrix shows a variable warning because there’s no brick that has set the mod variable yet.
Then, add a “Assign Mod Variable” brick that sets the value of the Mod Variable to true when the mod runs:
# Advanced: Using Page State
{% hint style="info" %}
Page State has been superseded by Mod Variables for working with mod-scoped data. Mod Variables are easy to reference via `@mod` , and enable PixieBrix to apply automatic performance optimizations
{% endhint %}
Page State is in-memory storage that’s available during a page session. There are three Page State namespaces to isolate information:
* Private — visible only for bricks in the mod component
* Mod — visible to all mod components in the mod
* Public — visible to all mods
There are two bricks to write/read directly from Page State:
* [Set shared page state](https://www.pixiebrix.com/marketplace/cb54eca2-d3b2-456c-9b6a-a35c031420c6/)
* [Get shared page state](https://www.pixiebrix.com/marketplace/7073cbed-6ee5-4252-92a3-b93f4dfffc5f/)
Additionally, there are other bricks that can connect to the Page State
* Trigger Starter Brick: can listen for changes to Page State
* Sidebar Starter Brick: can re-render on changes to Page State
* Custom Form: can be synchronized to Mod Variables/Page State
* Display Temporary Information: can re-render on changes to Page State
* With Async Async Page State: runs one or more bricks asynchronously and keeps track of the result in a Mod Variable
### Getting Page State
The “Get Shared Page State” brick retrieves all data for the chosen namespace and assigns it to a Local Variable.
Using “Get Shared Page State” can be useful to take a snapshot of multiple Mod Variables at a single point in time.
### Setting Page State
The “Set Shared Page State” brick provides full control over how to update Page State, including Mod Variables stored in the mod namespace.
#### Merge Strategy
The Merge Strategy input of the “Set shared page state” brick controls how the values provided impact existing values:
* Shallow (default): properties provided overwrite existing properties. Other properties are preserved
* Replace: replace the page state with the new values
* Deep: merge properties, including nested objects. For arrays, items are merged pairwise. If two values are different types, the value is replaced
#### Example: Replace State
Before:
```yaml
hasRun: false
message: "Some text"
```
Update
After
```yaml
# The message field is removed, because the whole state is replaced
hasRun: true
```
#### Example: Shallow Merge
Before
```yaml
hasRun: false
message: "Some text"
```
Update
After
```yaml
hasRun: true
# The `message` key is not modified
message: "Some text"
```
#### Example: Deep Merge
{% hint style="info" %}
In “deep” merge mode, arrays items are merged together pair-wise. (They are not appended)
{% endhint %}
Before: State
```yaml
hasRun: false
exampleObject:
key1: "Text value"
```
Before: `@data`
```yaml
exampleObject:
key2: "Key from @data object"
```
Update
After
```yaml
hasRun: false
exampleObject:
key1: "Text value"
# key2 is deep merged into exampleObject
key2: "Key from @data object"
```
# User Input
Sometimes, you'll want to collect a response from the user as they run a mod. This could be to confirm information that was scraped before sending to another tool, or it could be a way to quickly gather information from them and incorporate that into the workflow.
Here is a list of the bricks you might use to collect input:
* Show a modal or sidebar form
* Prompt for input
* Custom form *(used inside Render Document brick)*
# Show a Modal or Sidebar Form
Forms are exactly what they sound like, items that you can configure with varying field types to capture information. You could do many things with that information, such as sending it to another app (*with an HTTP request*), inject it onto the page (*setting input values*), or even save it to a [PixieBrix database](/storing-data-with-team-databases) to reference again later.
### Add the Form brick to your mod
Use the [Show a modal or sidebar form brick](https://www.pixiebrix.com/marketplace/78fe8f15-dd68-40d1-bc5f-e5b992820bf1/?utm_source=pixiebrix\&utm_medium=page_editor\&utm_campaign=docs\&utm_content=view_docs_link), or use the Custom Form brick if you're adding a form within a sidebar.
### Define information about the form
At the top of the brick you'll be able to specify the title of the form, and a description if desired.
### Create and configure a field
Below, you can configure information about specific fields and add or remove existing fields.
{% hint style="info" %}
Pro tip: Use output from previous bricks to define Default values. For instance, if you're trying to collect a link, you could default a field to `@input.url` and the current URL would appear. A user can still override that and change the data when completing the form, so this is helpful for presetting information that requires human verification.
{% endhint %}
### Configure submission information
Below a field you'll see a few additional options that apply to the entire form. You can specify if the form can be canceled, text for the submit button, and specify the location of the modal.
{% hint style="info" %}
Custom Forms in sidebars have additional properties, such as being able to Autosave and save the data to a [team database](/storing-data-with-team-databases) or [page state](/developing-mods/developer-concepts/variables-and-data-context/advanced-using-page-state).
{% endhint %}
### Viewing your form
When you run your mod, a nice form appears in the sidebar or modal, depending on where you configured it.
# Prompt for Input
If you only need to collect one field for input, you might consider using the Prompt for Input brick.
### Add the Prompt for Input brick
Search for Prompt for input and add this brick to your mod.
### Configure the message
This brick is very simple. You'll configure a message to appear as a window alert, and there will be an open text field below for the user to provide input.
### Preview the input prompt
Trigger the mod to view the prompt.
{% hint style="info" %}
You might use a Prompt for Input instead of a form if you only need to collect one field and want to require as few clicks as possible. When the Prompt for Input window opens, the cursor will be set to the field so you won't have to click or tab to set text and submit.
{% endhint %}
# Working With APIs
In some cases, you might want to fetch or post data to a tool that isn't already [Integrated with PixieBrix](/integrations).
To do so, use the `HTTP Request` brick to craft a request to the API of your choice.
The brick exposes a `service` parameter where you can optionally pass a reference to private or shared integration to perform the authentication. If you use a shared integration, the call will be routed through PixieBrix's API proxy, so that the team credentials are not transmitted to the browser. Learn more about [Configuring Integrations](/integrations/configuring-integrations).
# API Providers
If you don't already have a custom API to work with, explore the details on this page to learn more.
## API Providers
* [Free public APIs](https://github.com/public-apis/public-apis)
* [RapidAPI](https://rapidapi.com/hub) (including many freemium APIs)
### RapidAPI
RapidAPI has a hub [of thousands of APIs](https://rapidapi.com/products/marketplace/) you can call without having to create a separate account with each provider
#### Subscribe to the API
If the API is paid/fremium, subscribe to the API in the hub.
#### Create an Integration for the API
Create a [private or shared (teams) integration](/integrations) for the API.
* key: your RapidAPI key
* host: the host of the API you want to hit. Available on the API's marketplace listing
# Encoding URL Parts
If you use the `params` section of the config, `@pixiebrix/get` brick will automatically URL encode the values you provide.
Many RESTful APIs however vary the URL path for resources. In these cases, you must manually encode the value to avoid problems with spaces and special characters
Currently, the best way to do this is using the nunjucks template engine support. For the variable, use the `urlencode` filter followed by a `safe` filter. The `safe` filter prevents additional escaping. For more information on these nunjucks filters, see [the nunjucks filter documentation](https://mozilla.github.io/nunjucks/templating.html#urlencode)
```yaml
- id: "@pixiebrix/get"
template: nunjucks
config:
service: "@rapidapi"
url: https://omgvamp-hearthstone-v1.p.rapidapi.com/cards/{{ value | urlencode | safe }}
```
# Selecting and Transforming API Results
If the API response does not include data in the format you need, you can transform the results with JQ. To do so, read about [Transforming Data](/developing-mods/developer-concepts/transforming-data).
# Working with Markdown
Markdown is a popular lightweight markup language for creating formatted text.
### Markdown Support
The following bricks/fields support Markdown:
* Form Builder
* Form Descriptions
* Field Descriptions
* Document Builder
* Text Element
* Render Markdown
### Markdown Resources
* [Markdown Guide](https://www.markdownguide.org/)
# Control Flow
Sometimes you'll want to build a mod that can handle dynamic paths and functions differently based on various outcomes from other bricks.
There are various methods you can use to incorporate business logic into your mods, from specifying conditions for bricks to run to even creating multiple paths based on a condition.
# Conditional Field on Bricks
This advanced brick option decides whether that brick should run, or should not based on a condition.
The condition to run the brick is that the value must be true (or truthy) If the value is false (or falsy) this brick will not execute.
{% hint style="info" %}
💡 Here are some additional resources to understand what falsy or truthy mean in the context of JavaScript:
* Truthy
* Falsy
{% endhint %}
This condition can be any variable or expression or value, as long as they are truthy or falsy they will make it so that the brick will run, or not.
#### 🧙♂️ **Pro-tip:**
When building mods, it happens often that you want to debug your work. Sometimes there’s a brick that you don’t want to run, but at the same time you don’t want to fully delete it from the mod.
How can you prevent it from being triggered? If you want to “pause” a brick from running without deleting it you can set the **Condition** to **`0`** or **`false`**.
Here are some examples of **Condition** you can set:
Setting these values to the Condition will run the brick:
* `1`
* `true`
* `“this is a string”`
However, setting it to one of the below options will not run the brick:
* `0`
* `false`
* `{{ false if @input.url }}`
You can provide a condition as one of the following:
* **Text**: either a hard-coded value or a text template
{% hint style="info" %}
Using a text template, the shortest way to write an expression is using their conditional expression syntax: `{{ true if ** }}`.\
\
*Learn more in the* [Text Template Guide](/developing-mods/developer-concepts/text-template-guide)
{% endhint %}
* **Number**: non-zero numbers are considered truthy
* **Toggle**: toggling the brick on/off using a toggle
* **Variable**: a variable from a preceding brick
For complicated business logic, you can use the [jq - JSON processor brick](https://www.pixiebrix.com/marketplace/f8fbc031-2ae5-4cda-aa47-0ec3befd4c8a/jq-json-processor/), and pass the output to the condition using the variable entry mode.
# Control Flow Bricks
[Release 1.7.0](/release-notes/release-notes-archive/release-1.7.0) (June 2022) introduced support for [Control Flow bricks](https://www.pixiebrix.com/marketplace/search/?tags=control-flow) that “control” the order and sequence in which the bricks nested inside them run.
### Types of Control Flow Bricks
There are 4 primary control flow bricks: If-Else, For-Each, Try-Except, and Retry:
* **If-Else**: if a condition is met, run one the “if” branch of bricks, otherwise run the “else” branch of bricks
* **Try-Except**: run a “try” branch of bricks, recovering by running the “catch” branch of bricks if there’s an error or the user cancelled the run
* **Retry**: run a body of bricks, and re-run the body if there’s an error
* **For-Each**: for each element in a list/array, run a body of bricks, providing a different element to the body for each run
The Document Builder also uses control flow for the Button element handler, and the Brick element. The information on this page also applies to bricks you add to those elements.
{% hint style="info" %}
📖 When a Control Flow brick has multiple sub-sequences of bricks, we will call them “branches”. When a Control Flow brick contains a single sequence of bricks, we will call it the “body”.
{% endhint %}
In the Mod Overview, the Control Flow brick appears as a brick with a top/bottom section and one or more branches of bricks:
The If-Else brick. If the condition is true, PixieBrix will show confetti. If the condition is false, PixieBrix will show an alert.
# When to Use Control Flow Bricks
The following table describes scenarios where you might use each type of control flow brick:
| Scenario | Control Flow Brick | |
| -------------------------------------------------------------------------------------------------------- | ------------------------------------------ | ------------------------------------------------------------------------------------------------------------------------------------------------------------- |
| You need to run multiple bricks if a condition is met | If-Else | |
| You need to run one brick(s) if a condition is met, and a different brick(s) if the condition is not met | If-Else | |
| You are calling an API that sometimes fails | Retry | |
| You want to wait for a condition to be met. For example: an API results to change | Retry | In the Retry body, add a "Cancel Current Action" that runs if the condition has not been met yet (See Exceptions/Errors below) |
| You want to wait for an element to appear on the page | N/A - use the Wait for a DOM element brick | Trick question! The Wait for a DOM element brick has better performance because it can use native browser APIs to detect new elements |
| You want to show a custom error message/instructions to the user if a brick fails | Try-Except | Leave the catch branch blank |
| You want to ignore an error code when calling an API | Try-Except | Leave the catch branch blank |
| You want to perform an action for each item in a list of items returned from an API | For-Each |
By default an element key is made available to the body
You can customize the name of the key provided to the body
|
| You want to preform an action for each element currently on the page that matches a selector | For-Each Element | Current the Page Editor does not support selecting multiple elements. You must manually tweak the automatically generated selector to match multiple elements |
# Control Flow Brick Output
There are two behaviors to know about how output works in Control Flow bricks:
1. The Control Flow brick outputs the value of the final brick it ran that has an Output Key
2. The Output/Output Key of a brick within a Control Flow brick is only available to the subsequent bricks within the same branch/body. It is not available outside of the Control Flow brick or inside the other branches
If you need the Control Flow brick to output a brick other than the final brick, currently the best way to do so is using the [jq - JSON Processor](https://www.pixiebrix.com/marketplace/f8fbc031-2ae5-4cda-aa47-0ec3befd4c8a/jq-json-processor/) brick.
Provide the following inputs:
Input
Value
filter
.
data
@key of the data you want the Control Flow brick to ouput
# Raising Exceptions/Errors
There are two bricks for exceptional control flow:
* [Raise a Business Error](https://www.pixiebrix.com/marketplace/a1267ea0-01d6-4fe5-8716-04a05d2ec32e/raise-business-error/): logged as an error in error telemetry
* [Cancel Current Action](https://www.pixiebrix.com/marketplace/50828a07-67da-4d91-ac01-d19eb3b7b4d6/cancel-current-action/): not reported as an error. For example, the user cancelled a form
When a Raise Business Error or Cancel Current Action brick is run, the mod will stop running and the bricks following the brick will not be run.
If an error is raised in a Control Flow brick, the Control Flow brick will also error. However, when using the Try-Except and Retry bricks, the `try`-branch and retry `body` will handle the exception, and the mod will continue running.
# FAQs
### Why aren’t the outputs of bricks nested within a Control Flow Brick available outside the Control Flow brick?
PixieBrix Control Flow bricks are implemented similar to [closures](https://en.wikipedia.org/wiki/Closure_\(computer_programming\)) in popular programming languages like Javascript.
By “freezing” the environment passed into a branch/body of a Control Flow brick and preventing it from modifying the available Output Keys outside of the brick, the behavior of bricks are more predictable (to PixieBrix’s debugger and humans!). Predictability allows use cases like button handlers and rendering sub-panel elements in parallel
# Transforming Data
Many times you'll need to write functions or filters for taking an output from one brick and transforming it, filtering it, or performing an action on it.
To accomplish this in PixieBrix, you can use [JavaScript](/developing-mods/developer-concepts/transforming-data/using-javascript-in-pixiebrix) or [JQ Filters](/developing-mods/developer-concepts/transforming-data/using-jq-in-pixiebrix).
# Using JavaScript in PixieBrix
You might use JavaScript in PixieBrix to transform data for your custom needs.
To do this, you'll use the `Run JavaScript Function` brick.
### Writing Functions
To write a function, first add the `Run JavaScript Function` brick to your mod.
Inside the [Brick Configuration Panel](/platform-overview/page-editor/page-editor-components/brick-configuration-panel), you can define a function, and pass arguments.
{% hint style="info" %}
Currently, the JavaScript brick only supports the native web API methods in Chrome. To check if a method will work, reference [Mozilla's Web APIs docs](https://developer.mozilla.org/en-US/docs/Web/API).
{% endhint %}
### Supplying Arguments
Most functions will require arguments to process data.
Specify the arguments in the Arguments field below the function. Click **Add Property** to create an item. You can reference variables and outputs from other bricks, arrays of data, strings, other objects, numbers, or boolean values.
### Referencing Arguments
You can reference defined arguments to the function in multiple ways (choose one):
Use `args`, like `function(args)` and set a const below the function like this: \
`const { arg1, arg2 } = args`;
If you'd like, you can also reference them directly via the params, like `function({arg1, arg2})` or you can avoid setting a `const` and reference arguments as `args.arg1` and `args.arg2`
### Converting JQ Filters to JavaScript with ChatGPT
If you've been using JQ in existing mods, you'll find ChatGPT is helpful in suggesting a JavaScript function for your JQ filter.
*JQ filters are used to transform input JSON data based on the user-defined script. JQ users create a filter to be performed on data. Whereas with JavaScript, you'll create a function and pass it arguments of data. If you're migrating from JQ bricks to JavaScript bricks, your data object will become your argument object, and you'll replace your filter with a function.*
Here's an example of how you could use ChatGPT to help you create a function from a JQ filter.
**Original JQ filter**
```jq
map({const: .Prompt, title: .Title})
```
**Prompt**
You can use a prompt like this:
```
i have this jq filter: map({const: .Prompt, title: .Title})
write a javascript function for it
```
**Output from ChatGPT**
```javascript
function jqFilterEquivalent(data) {
return data.map(item => ({
const: item.Prompt,
title: item.Title
}));
}
```
You might have to tweak it slightly, but ChatGPT is pretty good at giving you the JavaScript version.
{% hint style="info" %}
[Activate this mod](https://app.pixiebrix.com/activate?id=@pixie-britt/developers/convert-jq-to-javascript) and use the Quick Bar to post a JQ filter and the sidebar will return its JavaScript equivalent!
{% endhint %}
### Troubleshooting/FAQs
#### My function isn't working. How can I tell if the error is in my JavaScript?
If you're experiencing any issues with your function, try running the function in a [JavaScript playground](https://jsfiddle.net/) to confirm there are no issues with the function.
#### Can I call multiple functions in one brick?
You can nest functions within the function, but you cannot have multiple top level functions in the same brick.
For example, this works: ✅
```javascript
function ({x, y}) {
function getSquared(z) {
return z ** 2;
}
return getSquared(x) + getSquared(y);
}
```
This does not: 🛑
```javascript
function getSquared(z) {
return z ** 2;
}
function ({x, y}) {
return getSquared(x) + getSquared(y);
}
```
#### I see Error running user-defined JavaScript Error in the brick run
Head to `Logs` tab, just above **Brick Actions** to see the specific error. The Page Editor don't expose this in the brick itself, but you'll be able to see details expanding the row with the error.
# Using JQ in PixieBrix
{% hint style="info" %}
New User? JavaScript is easier to learn and is now the preferred way to transform data in PixieBrix: [Using JavaScript in PixieBrix](/developing-mods/developer-concepts/transforming-data/using-javascript-in-pixiebrix)
{% endhint %}
## What is jq?
jq is a powerful expression language for filtering and transforming structured JSON data. It's available for the command line and [a variety of programming languages](https://github.com/stedolan/jq/wiki/FAQ#language-bindings), including Java, Python, and Javascript.
## Helpful Resources
* [jqplay: A playground for jq 1.6](https://jqplay.org/)
* [jq Manual](https://stedolan.github.io/jq/manual/): has runnable examples of each operator
* [jq Homepage](https://stedolan.github.io/jq/)
* [jq tag on StackOverflow](https://stackoverflow.com/questions/tagged/jq)
## Brick Arguments
The jq brick takes two input arguments:
* `data`: an object, array, or single value which is passed to jq
* `filter`: the jq "filter", which controls how to filter/transform the data
#### Brick Argument Examples
**Scenario #1: passing a variable for data**
You can pass a variable or template directly to data:
```yaml
id: "@pixiebrix/jq"
config:
# @apiResult = {items: []}
data: "@apiResult"
filter: ".items"
```
**Scenario #2: passing multiple variables to data**
You can also pass multiple variables by passing a dictionary to data, including using template syntax:
```yaml
id: "@pixiebrix/jq"
config:
data:
# @apiResult = {items: [{text: "foo"}]}
result: "@apiResult"
# @input = {query: "foo"}
query: "{{ @input.query }}!"
filter: ".query as $query | [.result.items[] | select(.text == $query)]"
```
## Common Pitfalls
* jq only has access to the data you passed in via the `data` argument. You should not use `@variable` syntax in the jq `filter`
* jq uses a `.` to refer to its input (the data you passed to the brick)
* jq can return multiple results. However, PixieBrix expects a single result from jq. Therefore, you must wrap an expression that returns multiple results in Array construction `[]` operator
## Filter Examples
**Creating a new object from the input**
▶️ [View on jqplay](https://jqplay.org/s/fDr44s8zoA)
```
{foo: 42, bar: .}
```
**Parsing and summing values**
▶️ [View on jqplay](https://jqplay.org/s/DGSZvfgt6a)
```
.transactions | map(.amount | capture("(?\\\\d+) USD") | .val | tonumber) | add
```
**Filtering an array**
▶️ [View on jqplay](https://jqplay.org/s/L2GTYwQNqO)
Assign the query to a variable so you can use it in the `select` clause.
NOTE: jq's `select` operator returns multiple results. Wrap the expression in an Array Construction `[]` operator to return the results as a single array
```
.query as $query | [.items[] | select(.text == $query)]
```
**Looking up a value in a pre-defined map (Workshop Example)**
▶️ [View on jqplay](https://jqplay.org/s/w9fCJwgroD)
Pass the pre-defined map as an input to the jq brick. Then, assign the map to a variable (e.g., `$m`) so you can lookup up the value later in the filter:
```yaml
data:
# ["A", "B", "C"]
items: "@items"
mapping:
A: Alpha
B: Bravo
C: Charlie
filter: ".mapping as $m | .items | map($m[.])"
```
You can use jq's `//` defaulting operator to handle elements that aren't in the map. E.g.,
```yaml
filter: '.mapping as $m | .items | map($m[.] // "Unknown")'
```
**Writing multi-line expressions (Workshop Example)**
You can make long jq filters in the Workshop more readable by splitting them over multiple lines. To split a filter over multiple lines, use the `>-` YAML operator that replaces newlines with spaces, and strips off the last new line ([Read more about multi-line YAML strings](https://yaml-multiline.info/))
For example, to clean up the filter in the "Looking up a value in a pre-defined map" example above:
```yaml
filter: >-
.mapping as $m |
.items |
map($m[.])
```
Multi-line expressions are also helpful for constructing objects with many properties. (Note that JQ requires parentheses around the object's values):
```yaml
filter: >-
{
fooCheck: (.foo > 42),
barCheck: (.bar | length > 0),
}
```
# Building Interfaces
Often you'll want to display content that is produced when your mod runs. There are a handful of ways to do that!
### **Bricks for rendering content**
* [Display Temporary Information](https://www.pixiebrix.com/marketplace/cb38e1ef-24ca-48e7-a70f-01e5f1f72524/) / [Show Sidebar](https://www.pixiebrix.com/marketplace/321ae8eb-655e-41fa-8f6a-1c37d49b18e7/)
* [Show a modal or sidebar form](https://www.pixiebrix.com/marketplace/78fe8f15-dd68-40d1-bc5f-e5b992820bf1/) (Learn more in [User Input](/developing-mods/developer-concepts/user-input))
* [Window Alert](https://www.pixiebrix.com/marketplace/b249e2e3-7fa1-4e7a-a0ba-70cfa1a18707/)
* [Show a notes modal](https://www.pixiebrix.com/marketplace/0561e102-2c92-4198-97bf-d6d3d7296b2e/)
You also might be interested in these, although they'll typically only be used in one of the bricks above.
* [Render Document](https://www.pixiebrix.com/marketplace/49b356c6-5461-46b7-8089-0f84d03c3744/)
* [HTML Renderer](https://www.pixiebrix.com/marketplace/51a74b41-72cc-4fdc-b5a1-f55f9f209ba4/)
* [Render Markdown](https://www.pixiebrix.com/marketplace/520b2dc6-11a9-4a9c-9753-58e3f2ed4513/)
If you're interested in learning more about how each of these works, click the names above to read the docs and dive into more detail about how they're used and what you can customize.
### Using the Display Temporary Information brick
When building mods, you'll usually find yourself using the **Display Temporary Information** brick. This is the GOAT (Greatest of All Time) rendering brick and is the one most commonly used because it runs an action and opens a Sidebar to display the results of that action (without leaving it permanently in your Sidebar).
You can customize what's displayed in the sidebar content, including setting user input with forms, displaying text, and adding buttons that trigger events.
Something like this!
When configuring the Display Temporary Information brick, you'll choose the title at the top, choose the format to display it in and determine when it refreshes. For instance, you might choose the `statechange` refreshTrigger if you want to update the content whenever a form is filled out or if something else changes on the page, updating the state. To learn more about working with state changes, read the [Page State docs](/developing-mods/developer-concepts/variables-and-data-context/advanced-using-page-state).
Keep reading to learn more about interacting with and customizing Display Temporary Information or Render Document bricks.
# Understanding the Preview Panel
You'll use the Preview Panel of the [Render Document](https://www.pixiebrix.com/marketplace/49b356c6-5461-46b7-8089-0f84d03c3744/) brick to style the sidebar or modal for your mod.
Here's what the Panel looks like. It's on the far right side!

{% hint style="info" %}
*Don't see it? You might need to click the **<<** arrays to open it up!*
{% endhint %}
The Preview Panel shows you how your modal or sidebar will look, and this is where you configure the elements you want to add.
### **What are elements?**
If you're familiar with CSS, you might recognize some of these concepts. If you're unfamiliar with CSS, look at the series of divs called Containers, Rows, and Columns. Think of them as boxes into which we fit our content. We use boxes because they're helpful for organizing and aligning nicely together.
Click the three dots on any of the squares to see what elements you can add. Useful elements, like buttons, text, headings, etc., must be inside a column or a list. So, if you click the three dots on the top right of an element, you might see:

Columns are how you organize the content on the page. Think of them as wrappers for each element you want to add.
### **Types of elements**
Inside a column, click the three dots, and you'll see a different menu of options appear: 
These elements are used inside **Columns** and are useful for styling your sidebar panel or modal to look how you'd like. Each element has different settings, depending on the type of element.
For instance, if you select a **Header** element, you'll be able to set the text and choose the header size.

You'll often want to use the **Text** element, which accepts Markdown formatting, so you can customize the format to look however you'd like!

You can add other elements, like Bricks, Buttons, and Forms, but we'll cover those in a later lesson.
### **You don't have to add elements!**
By default, the Render Document brick already has a header and a text element. If you want to display some quick text, you don't have to add any new elements; **just** edit the text values by clicking on the text in the Preview Panel, then adjust the text in the configuration to the left, like this!

You can update the text with static values or **dynamic text** (*variables,* items that start with *@*) to reference output from other bricks, like the response from an API request, a user's input, or a ChatGPT response!
# Styling Elements
### Styling Options
Here are just a few things you can do to style elements in your Sidebar:
* Adjust alignment
* Bold or emphasize text
* Change the color or background of text
* Apply a border
* Add margin or padding to adjust space between other elements

🎯 You can do even more to customize the elements with Bootstrap utility classes. [Bootstrap](https://getbootstrap.com/) is a popular CSS Framework for styling websites. For example, applying certain classes like `d-none` to an element will hide it. If you want something custom with an element, search online (or ask the [PixieBrix community](https://slack.pixiebrix.com/) for help) to find classes you can type in the open text box below the margin and padding sections.
### **Hiding elements**
In some situations, you may also want to hide an element under certain conditions. For instance, you may not want to show a text box if you don't get a useful response from ChatGPT. You can use template language to pass conditional logic in the *Hidden* field to determine whether an element should be shown.
Next, we'll discuss some [advanced elements](/developing-mods/developer-concepts/building-interfaces/adding-advanced-elements) you might want to add to your Sidebar besides texts, images, and headers.
# Adding Advanced Elements
You can do a lot with text, markdown, and images to style your Sidebar or modal, but you might want to do a bit more to make things look nicer and more interactive.
### **Buttons**
Adding buttons to your panel allows you to launch specific actions and workflows when your users interact with your panel. This can be useful for collecting information, saving data, scraping info from a page, or any other action. Anything you use PixieBrix for, you can make it happen by clicking a button in a Sidebar or modal.

You can configure style settings for your button in the middle panel and add actions underneath the pipeline on the left side. In the pipeline, add bricks you want to trigger when the button clicks. We'll go through an example of doing this in our mod in the next lesson, but first, let’s look at another type of advanced brick you might use.
### **Forms**
Forms are a common way to collect information from a user and send it to another source (either a spreadsheet, a PixieBrix database, or somewhere else via an API). In this case, you'll use the **Form** element, which embeds a form, similar to the **Show a modal or sidebar form** brick.
Even if you're just displaying data to a user, you still might use a form to create a search or a dropdown field to let the user select what is displayed.
When you add a form element via the three dots, you'll see a new brick appear in the pipeline called **Custom Form**. Click that brick to see all your options for configuring a form.
You might notice you have a few more configuration options than you saw in the **Show a modal or sidebar form** brick from a previous chapter. You can choose to Auto Save and display a custom success message when the form is submitted. You can also choose if you want to save the responses to a PixieBrix database or the Page State. To learn more about [Databases](https://docs.pixiebrix.com/enterprise/admin-guide/team-databases) and [Page State](https://docs.pixiebrix.com/page-state), read the respective documentation.

Below the form configuration, you'll recognize the specific field configuration options.
### **Lists**
If you have an array of data (multiple items rather than just one), such as multiple rows from a spreadsheet or many objects in a response from an API, you can use the **List** element, which allows you to create an element for each item in an array. For example, if you look up a row in Google Sheets and get 5 matches, you might want to show them in a card format with the row's ID in the card's header and then the other details below. Lists allow you to create an element for each item in this array with the specific details from that item.
### **Bricks**
In some cases, you might still need to do something in your sidebar panel that you haven't been able to do yet. Maybe you need to manipulate data with a JQ filter, or you need to render some custom HTML, or you want to show some information in a table. Add a **brick** element, and then you'll be able to add any brick you'd like to the pipeline, just like with the Custom Form or the Button element.
# Custom Themes/CSS
Applying custom themes and CSS to your forms and interfaces
### Applying Custom CSS Stylesheets
The PixieBrix Form and Document builder supports applying one or more hosted CSS Stylesheets to the document under the Advanced: Theme configuration group.
{% hint style="info" %}
PixieBrix only supports CSS stylesheets hosted from `https:` URLs. If you need assistance hosting your stylesheet, contact .
{% endhint %}
Configuring a custom CSS Stylesheet
#### Adding CSS class names to elements
To add a CSS class name to an element in a document, add the class name to the Layout/Style field. Do not include the `.` prefix when setting the class name:
Setting the CSS class name on an element
In your CSS file, you can apply a style to the element using [the CSS class selector](https://developer.mozilla.org/en-US/docs/Web/CSS/Class_selectors):
```css
.customComponentClassName {
background-color: purple;
}
```
#### Disabling the default PixieBrix Theme and Styles
To disable PixieBrix's default theme, toggle on "Disable Parent Styling". PixieBrix uses the [Bootstrap 4 component system](https://getbootstrap.com/docs/4.6/components/alerts/).
See [#how-do-i-create-a-custom-color-scheme](#how-do-i-create-a-custom-color-scheme "mention") for instructions on creating a new base theme
### Developing with Local Stylesheets
To use a CSS file hosted locally, you must serve it using HTTPS. The easiest way to serve a local file with HTTPS is with a free [ngrok](https://ngrok.com/docs/http/#serve-directory-files) account. ngrok [supports serving directory files without running a local server](https://ngrok.com/docs/http/#serve-directory-files):
{% hint style="warning" %}
When serving a local CSS file with ngrok, any changes made might not appear immediately. See [#i-updated-my-stylesheet-content-but-the-changes-arent-showing](#i-updated-my-stylesheet-content-but-the-changes-arent-showing "mention")
{% endhint %}
**Windows**
```bash
ngrok http "file://C:\Users\david\Directory Name"
```
**Mac/Linux**
To serve a specific directory:
```bash
ngrok http "file:///path/to/directory"
```
To serve your current working directory:
```bash
ngrok http file://`pwd`
```
### Example Layouts
[Flexbox layouts are the modern](https://css-tricks.com/snippets/css/a-guide-to-flexbox/) way to create row and column layouts on the web. PixieBrix's Bootstrap component system [includes utility classes for working with flexbox.](https://getbootstrap.com/docs/4.0/utilities/flex/) However, there are some situations that require additional CSS.
#### Using flexbox to create horizontal form layout
PixieBrix's embedded forms by default are in a vertical orientation. To have field appear side by side, use flexbox to override the style of the form row class:
```css
.rjsf {
.form-group > div {
display: flex;
/* Optional, include a gap between the fields */
gap: 1em;
.row {
display: block;
}
}
}
```
#### Using flexbox to create a scrollable container
To create a scrollable area, create a panel with two container elements attached to the root:
A panel with two containers attached to the root
In the Layout/Style field for each, assign each container a classname, e.g., `scrollContainer` and `footerContainer`.
In the CSS theme, apply a apply a column flex to the root, using `display: flex` and `flex-direction: column`.
For the scrollable container, use the property `flex-grow: 1` to direct the container to grow to fill the available space.
To apply a scrollbar, assign an `overflow: auto` or `overflow: scroll` property.
```css
/* Set document root style */
div:has(> .scrollContainer) {
display: flex;
flex-direction: column;
/* Account for the fixed header/tab-strip at the top of the sidebar */
height: calc(100vh - 95px);
.scrollContainer {
flex-grow: 1;
overflow: auto;
}
.footerContainer {
flex-grow: 0;
}
}
```
#### Automatically scroll list elements
To automatically scroll list items, you can use a CSS trick: rendering the items in reverse order, and apply a `column-reverse` flex layout.
**Reverse the elements using the Javascript Brick**
Reverse the elements using the Javascript brick:
```javascript
function (args) {
const { elements = [] } = args;
return elements.toReversed();
}
```
**Add a container element with an empty spacer row and list of rows**
The element tree should look like:
* Container: with classnames: `d-flex flex-column-reverse overflow-auto`
* Row: an empty row used as a spacer, with classname: `flex-grow-1`
* List: a list of rows, being passed the reversed element array
Layout for a auto-scrolling list of rows
### Frequently Asked Questions
#### How do I create a custom color scheme?
PixieBrix uses [the Bootstrap 4 component system](https://getbootstrap.com/docs/4.6/components/alerts/). The easiest way to create a custom color scheme is to use a theme builder and export the minified CSS. We recommend the following online tools:
* [Bootstrap Build](https://bootstrap.build/app)
#### I updated my stylesheet content, but the changes aren't showing
Your browser might be caching the stylesheet. To force your browser to re-fetch the stylesheet, include a so-called ["cache-busting" query parameter](https://www.keycdn.com/support/what-is-cache-busting#3-query-strings) in the stylesheet URL. When you change/increment that value during development, your browser will re-fetch the stylesheet.
The query parameter name does not matter. For example, using `?v=`:
```
https://example.com/styles.css?v=1
```
#### How do I version my stylesheet with my mod?
If you are using Amazon S3 to host your stylesheet, [enable versioning on your S3 bucket](https://docs.aws.amazon.com/AmazonS3/latest/userguide/manage-versioning-examples.html). Then, find the URL for the version:
Viewing file versions on S3
The URL will include a `versionId` parameter. For example:
```
https://pixiebrix-public-stylesheets.s3.us-east-2.amazonaws.com/pixiebrix/writing-assist.css?versionId=ymEMzndbV1iLrrtR.fDAPJu6mzlAro21
```
#### How do I remove the padding from embedded Form elements in the Document Builder?
The easiest way to remove the padding is to override it in CSS:
```css
/* Forms are rendered in a ShadowDOM. Target the form wrapper div. */
div:has(.rjsf) {
/* Override the p-3 utility class on the embedded form */
padding: 0 !important;
}
```
#### How do I change the PixieBrix logo in the sidebar?
Custom Branding is supported on Enterprise Plans. See [Custom Branding and Themes](/enterprise-it-setup/custom-branding-and-themes) for information on how to change the logo for your team.
# Mod Product Telemetry
Capturing mod product engagement and error telemetry
### Pre-Configured Telemetry Options
For [deployed mods](https://docs.pixiebrix.com/deploying-mods), PixieBrix automatically captures the following telemetry:
* Starter Brick runs
* Starter Brick error telemetry
The captured telemetry is available in Deployment Detail screen under Engagement and Errors, respectively.
#### Starter Brick Telemetry Mode
Trigger Starter Bricks include a Telemetry Mode option that controls which events and errors are reported:
* Report All Events and Errors
* Report First Event and Error (default): best for automatic triggers that run on specific sites/in specific situations
* Report First Error: best for automated triggers that run on all sites
* Never Report Events or Errors
The "First" options correspond to the first run/event for a page visit.
Trigger Starter Brick Telemetry Mode
#### Run with Async Mod Variable Telemetry Mode
The "Run with Async Mod Variable" runs one or more bricks and stores the result or error to a mod variable.
The brick itself does not error. Therefore, the brick has a Telemetry Mode field for optionally reporting errors to mod error telemetry:
Run with Async Mod Variable Telemetry Mode
For privacy, the default Starter Brick event telemetry only includes the name of the starter brick, time, and user. To capture more information or to create a
### Creating Custom Telemetry Events
To capture custom product telemetry with attributes to a team database for reporting, use the Record Product Telemetry to DB brick.
#### Record Product Telemetry to DB Brick
PixieBrix makes a `@pixies/telemetry/record` brick available for recording product telemetry to a team database. The brick runs asynchronously, so it does not block mod execution.
The brick takes the following inputs:
* **Telemetry Database**: the database to use to store telemetry events. Per best practice, use a database defined via a [Mod Option](https://docs.pixiebrix.com/developing-mods/sharing-mods/exposing-activation-time-mod-options) so you can use a different Telemetry Database for each environment (development vs. testing vs production)
* **Event Name**: an event name. Use a consistent naming pattern across your events
* **Data**: extra data/attributes to include with the event. Use this data to capture business metrics (e.g., time saved, costs avoided, etc.) and/or extra data for filtering (e.g., case id)
The brick automatically captures the following data/attributes:
* URL: the URL where the event occurred
* Email: the user's email address
* Timestamp: the ISO8601 timestamp when the event occurred
Recording Customer Events to a Team Database
> Note: this brick is different than the [Send Telemetry](https://www.pixiebrix.com/marketplace/309ae2db-1ce5-429f-a952-d0359b241a7c/) brick which is used for sending telemetry to a service managed by the PixieBrix team.
#### Custom Telemetry Best Practices
* Use a consistent naming pattern for event names and data attributes across your events
* For capturing general attributes across events, define a custom telemetry brick for your team: [#advanced-defining-a-custom-telemetry-brick](#advanced-defining-a-custom-telemetry-brick "mention")
* Use event data/attributes to capture business metrics, e.g., time saved, words translated
* Include a Mod Option for the Telemetry Database to keep development, testing, and production events separated
* Don't capture fields that may contain personal information
Record telemetry events for user-invoked actions:
* Button Clicks
* API calls invoked by the user (e.g., translation, search)
Do NOT record events for actions that happen in excess, e.g.
* Page Load Triggers
* Text Selection Changes
Doing so risks hitting limits outlined in PixieBrix's [data retention policy](https://docs.pixiebrix.com/developer-api/database-apis#data-retention-policy) and/or [throttle limits](https://docs.pixiebrix.com/developer-api/making-an-api-request#throttling).
#### Advanced: Defining a Custom Telemetry Brick
To capture different data/attributes, use the [Advanced: Workshop](/developing-mods/advanced-workshop) to define a custom brick.
For example, here is the definition of the `@pixies/telemetry/record` brick. Note the use of the Run Bricks with `async: true` so that the mod continues to run while the telemetry is transmitted:
```yaml
apiVersion: v3
kind: component
metadata:
id: "@pixies/telemetry/record"
version: 1.0.0
name: Record Product Telemetry to DB
description: Record Product telemetry to a PixieBrix team database
inputSchema:
$schema: "https://json-schema.org/draft/2019-09/schema#"
type: object
properties:
pixiebrix:
$ref: "https://app.pixiebrix.com/schemas/services/@pixiebrix/api"
databaseId:
$ref: "https://app.pixiebrix.com/schemas/database#"
title: Telemetry Database
eventName:
title: Event Name
description: "The name of the event"
type: string
data:
title: Data
type: object
description: Extra data to include with the event
required:
- pixiebrix
- databaseId
- eventName
- data
uiSchema:
"ui:order":
- databaseId
- eventName
- data
- "*"
pipeline:
- id: '@pixiebrix/run'
# Run asynchronously to not block mod
async: true
config:
body: !pipeline
- id: '@pixiebrix/timestamp'
config: {}
outputKey: instant
- id: '@pixiebrix/document-context'
config: {}
outputKey: context
- id: '@pixiebrix/session'
config: {}
outputKey: session
- id: '@pixiebrix/data/put'
outputKey: record
config:
mergeStrategy: replace
service: !var '@input.pixiebrix'
key: !nunjucks '{{ @session.email }}-{{ @instant.timestamp }}'
databaseId: !var "@input.databaseId"
value:
url: !var '@context.url'
email: !var '@session.email'
timestamp: !var '@instant.timestamp'
event: !var "@input.eventName"
data: !var "@input.data"
```
#### Common Bricks for Event Context
The following bricks are the most commonly for including standard information with telemetry. See the [#advanced-defining-a-custom-telemetry-brick](#advanced-defining-a-custom-telemetry-brick "mention") section for an example of using the bricks to define a custom brick.
| Brick Name | Brick ID | Description |
| ------------------------ | --------------------------------- | ---------------------------------------------------------------------------------- |
| Generate a Timestamp | `@pixiebrix/timestamp` | The current Unix timestamp and ISO8601 timestamp |
| Context Reader | `@pixiebrix/document-context` | Information about the current page, e.g., URL |
| PixieBrix Profile Reader | `@pixiebrix/profile` | Information about the user, e.g., email, group membership, organization membership |
| Session Reader | `@pixiebrix/session` | Information about the page session, e.g., last navigation |
| Run Metadata | `@pixiebrix/reflect/run-metadata` | Information about the current starter brick run, e.g., mod id, deployment id |
### Capturing OpenTelemetry Logs and Metrics
OpenTelemetry [is a open standard for logs and metrics](https://opentelemetry.io/).
To report data to an OpenTelemetry collector/backend, use the HTTP Request Brick, and provide the corresponding. For example:
* `name` : event name
* `timestamp` : timestamp in epoch milliseconds
* `attributes`: a dictionary of attributes for the event
As a best practice, use the [Advanced: Workshop](/developing-mods/advanced-workshop) to define a custom brick for your team that automatically includes relevant attributes (e.g., user email, etc.)
# Advanced: Brick Runtime
The Brick Runtime controls how PixieBrix executes bricks, including: passing information between bricks, error handling, and logging.
Whenever we introduce a non-backward compatible change to the runtime, we increment the brick runtime `apiVersion` field, e.g., `v1`, `v2`, `v3`.
We maintain support for bricks written with old versions of the runtime. Bricks built with different versions of the runtime can be used together.
### Specifying the runtime in YAML Brick Definitions
When using YAML-based configuration, the runtime is controlled via the `apiVersion` directive:
```yaml
apiVersion: v3
```
For backward compatibility, apiVersion defaults to `v1`.
### Runtime v3: Release 1.5.0
Runtime v3 introduces the following backward-incompatible changes:
* Support for field-level templates/expressions: `!var`, `!nunjucks`, `!mustache`
* A `!pipeline` and `!defer` expression boundaries (for use in the Document Builder)
* Drops support for the brick-level `templateEngine` directive (the directive is ignored)
* Templates are no longer auto-escaped (because HTML is sanitized prior to rendering). To escape a template:
* Nunjucks: use the [escape filter](https://mozilla.github.io/nunjucks/templating.html#escape-aliased-as-e)
* Support for the Handlebars template engine has been dropped
Page Editor changes:
* Nunjucks replaces Mustache as the default template engine
* Each field has a toggle to control how to pass data to
#### Migrating from v2 to v3
{% hint style="info" %}
If you’d like assistance migrating your mods from v2 to v3, we’d love to help! Contact us at
{% endhint %}
* **Page Editor:** When you open a mod written with v2 in the Page Editor, the Page Editor will attempt to convert it automatically to a v3 mod. When you save the mod, the Page Editor will save the mod as a v3 mod.
* **Workshop:**
* Update the API version directive for the brick: `apiVersion: v3`
* Update each template and variable expression to use `!var`, `!mustache`, or `!nunjucks`
#### Migrating from v1 to v3
* To migrate an mod from v1 to v3, you must use the workshop
### Runtime v2: Release 1.4.0
Runtime v2 introduces the following backward-incompatible changes:
* Bricks must reference data by `@input`or `@outputKey`. Data no longer flows implicitly from one brick to the next
Enhancements:
* Mods now support a `definitions` section that can contain inline starter brick and reader definitions
# Advanced: Mod Performance Tuning
Best practices for performance tuning mods
### Key Concepts
#### Secure Sandbox
PixieBrix executes text templates and Javascript code in a secure sandbox embedded in the browser extension's [offscreen document](https://developer.chrome.com/blog/Offscreen-Documents-in-Manifest-v3):
Content Script → Offscreen Document → Sandboxed Iframe → Offscreen Document → Content Script
Messaging the sandbox introduces CPU and memory overhead to serialize/deserialize data across the messenger boundaries.
### Best Practices and Tips
#### Prefer variable expressions over text templates
Variable expressions, e.g., `@foo.bar` or `@mod.myModVar?.someProperty`, do not require a call to the sandbox because they do not require code execution.
#### Merge sequential Run JavaScript Function bricks into a single brick
Each call to `Run JavaScript Function` requires a call to the sandbox. If you have multiple Run JavaScript Function bricks in a sequence, consider rewriting using a single brick that returns an object with properties.
#### Avoid passing extraneous data to the Run JavaScript Function brick
Where possible, use variable expressions to select data to pass to the Run JavaScript Function brick:
Selecting data to pass to the Run JavaScript Function brick
#### Remove unused brick output variables
When evaluating text templates, PixieBrix passes all available variables. Therefore, to reduce data transferred to the sandbox, remove unused Output Variables:
Remove an Output Variable for brick by clearing the variable name
#### Use nesting when operating on large data that's not required by subsequent bricks
When evaluating text templates, PixieBrix passes all available variables. If you read a large value, that value is seen by subsequent bricks at the same scope-level.
To performantly operate on a large value in the middle of mod component, nest it using the `Run Bricks` brick (or other control flow brick, e.g., `Try-Catch`). The subsequent bricks will only see the data returned from the control flow brick.
Nesting an operation on large data in the Run Bricks brick
As an alternative to using nested control flow, you can overwrite the value of the variable by assigning a brick output to the same variable name.
#### Use the "Get shared page state" brick to efficiently select subsets of mod variables
When evaluating a text template with a `@mod` reference, PixieBrix transfer all mod variable state to the sandbox. That's inefficient when working with large mod variable states.
To reduce the data transmitted, use the "Get shared page state" brick to take a snapshot of a subset of mod variables, and assign them to a local variable:
Selectively assigning mod variables to a local variable
#### Toggle off non-event data for Trigger input for rapid triggers and/or heavy-weight pages
{% hint style="info" %}
Toggling off non-event data for Triggers requires Page Editor in browser extension version 2.3.3 or greater, but can be run in all versions of PixieBrix.
{% endhint %}
By default, PixieBrix includes element data in the `@input` variable for bricks. This includes data about the target element, e.g., which for Page Load and similar triggers is the entire document. For heavy pages, that can be a lot of data/information.
Therefore, for rapid triggers and/or triggers that might run on heavy-weight pages, toggle of the default input data in the Trigger configuration:
Toggling off non-event data for Trigger input
If you need the URL or other page metadata that's generally provided in the `@input`, add the `Context reader` brick.
#### Avoid inefficient button location and Trigger selectors
PixieBrix supports [jQuery extensions](https://api.jquery.com/category/selectors/jquery-selector-extensions/) for ease of automation. However, the jQuery selector extensions not supported by native web APIs, e.g., [the MutationObserver API](https://developer.mozilla.org/en-US/docs/Web/API/MutationObserver). The PixieBrix Page Editor will warn you when using a non-native selector for a button location or trigger, for example: `:contains` , that will prevent native web APIs from being used.
Follow [best practices for writing performant CSS3 selectors](https://blogs.windows.com/msedgedev/2023/01/17/the-truth-about-css-selector-performance/)
{% hint style="warning" %}
**Common Misconception:** it's a common misconception that adding ancestors to a CSS selector speed up selector evaluation. CSS is [evaluated from right to left](https://stackoverflow.com/questions/5797014/why-do-browsers-match-css-selectors-from-right-to-left). Including ancestors can make the rule more specific, but generally decreases performance.
{% endhint %}
# Customizing Existing Mods
If you found a mod you like, but want to change something, there's no need to build from scratch— you can easily copy the existing mod and customize the copied version as you see fit.
{% hint style="info" %}
Copying an existing mod is useful when you want most of the functionality of a mod, but you want to add (or remove) some bricks. You might also copy a mod and customize it to learn more about how it's built and become a stronger PixieBrix developer 💪.
{% endhint %}
Before customizing a mod, you'll need to copy it. This is easy to do from the Page Editor.
### Copying a mod
1. Select the mod you want to copy from the Mods Panel.
2. Click the three-dot menu and choose "Make a copy"
3. You'll be prompted to set an alias (like a username) if you haven't already.
4. Optional: Edit the `Mod ID`, `Name`, and `Description` fields in the modal that appears\
5. Click **Create**.
### Tips for customizing
You’re free to explore and edit any of the bricks in the copied mod, and you can remove the original mod by clicking the three-dot menu and selecting **Remove** when you're done with it.
**Make one change at a time**
Making multiple changes before running your mod can make it difficult to tell what exactly broke if your mod stops working as desired. It's better to make one change at a time and run the mod to confirm it has the desired behaviour and expected outputs.
**Keep the original mod**
While customizing, it can be helpful to keep the original mod so you can compare what's changed in case anything breaks. Of course, you can remove it whenever you'd like and reactivate later if you need to. If you do keep the original, make sure to change the name of the newly copied mod and change any text for triggers, such as Quick Bar Action name or Context Menu text to distinguish between the original version and your copy.
# Sharing Mods
Most of the time you'll be building a mod for you or others on your team to use. The beauty of PixieBrix is that you can build something once and share with others so they can simply activate and start using the functionality.
Even better... you can actually [deploy mods](/deploying-mods) so your team doesn't even have to activate them.
Anytime you want someone else to use a mod, or you want to be able to access it on another machine or browser profile, you'll need to package the mod.
Read how to [package a mod](https://docs.pixiebrix.com/developing-mods/sharing-mods/packaging-a-mod).
# Saving a Mod
You'll need to save a mod before closing the Page Editor if you want to use the mod on other pages, or share with a team.
### Click the Save button at the top right of the Page Editor toolbar
{% hint style="info" %}
If it's your first time saving a mod, you'll be prompted to create a username.
{% endhint %}
### Review Save Fields
When packaging a mod, PixieBrix prompts you for the following information
* ID: a unique identification for the mod. It must start with your author scope or an author scope of a team where you have a Developer role.
* ***Note that if you want to deploy a mod to your team or you want your team to have the ability to edit a mod, you’ll want to select the team alias (the @ field at the start of the mod ID, before the /).***
* Name: a human-readable name for the mod
* Version: a version number, in the format `major.minor.patch`. For example 1.0.0
* Description: a helpful description that describes what the mod is for
{% hint style="info" %}
**Pro-Tip:** Add a “collection” part to the mod id to help organize your mods. For example `@username/slack/send-slack-message` instead of `@username/send-slack-message`
{% endhint %}
# Exposing Activation-Time Mod Options
You may want to allow users to configure specific items when activating a mod, without requiring them to build the whole mod from scratch.
For instance, you may do this if you created a mod for creating a new card on a Trello board. You might want to allow them to pick the boardId in the configuration so they can specify which board it goes to.
### Integration Configurations
If you’ve added bricks requiring integrations to the mod, those integrations will automatically show up in the Mod Activation Wizard.
### Custom Options
If you have non-integration onboarding options you want to add, you can add them by selecting the mod in the Page Editor and selecting the **Input Form** tab.
Similar to the Form Builder, you can add any number of options fields:
* Name: the field name for referencing the configured value in the mod. For example,
* Label: the human-readable label to display in the Mod Activation Wizard
To add a new field. Click the **Add new field** button.
To switch between fields, click the field in the Preview in the Data Panel on the right side of the Page Editor.
### Referencing the options items.
You'll use `@options.{name}`
If the name is `fieldName`, the field would be available in the mod as `@options.fieldName`
# Sharing a Mod With Your Team
If you’d like to share a mod with a specific group of people, you’ll need to create a team in PixieBrix and add the appropriate members.
Once you’ve done that, go to the Mods page on Extension Console and click the three dots at the end of the row of the mod you’d like to share.
Select the Share with Teams option.
Choose the team you want to share with from the dropdown options.
If you accidentally choose one, click the red X button at the end of the row.
Copy the Link to share at the bottom of the modal, then click the purple **Save and Close** button. Share the link with anyone who is a member of those teams, and they’ll be able to access the mod.
# Updating Published Mods
It's possible to make changes to mods so that your team can access those updated features as well.
### Incrementing the Version Number
When updating a published mod, it’s best practice to increment the version number to indicate the kind of change made:
For example:
* Increment Patch version (for bug fixes): 1.2.3 → 1.2.4
* Increment Minor version (for new features): 1.2.3 → 1.3.0
* Increment Major version (for backward incompatible changes): 1.2.3 → 2.0.0
Incrementing the version number conveys two primary benefits:
* PixieBrix and users know it’s a new version
* You can track changes made across versions, and/or revert to a previous version
### Staging Mod Updates
When making major changes to a mod, it can be helpful to make a separate mod so you don’t break anything on the copy users currently have.
You can then copy changes from the updated mod to the live mod in the Workshop. Just make sure to change the version number and mod id!
# Troubleshooting
For troubleshooting development issues, check out our [Troubleshooting](/how-to/troubleshooting) How To section.
# Mod Development Best Practices
Mod development best practices, style guide, and refactoring tips
## Variables
### Name output variables
Using the generic default name of `@output`, `@output2`, etc. makes it hard to understand what the variable holds where it's used.
### Remove unused brick output variables
If the output of a brick is not used in the mod component, remove the output variable. That makes the brick outline easier to read
See related rule [#eliminate-dead-code](#eliminate-dead-code "mention")
### Avoid shadowing variable names
{% hint style="info" %}
The Page Editor will warn you if you use a reserved variable name, e.g., `@input` or `@options`
{% endhint %}
Avoid using the same output variable name for two bricks in the same scope in the mod. Reusing variable names makes it more difficult to understand where the value came from.
It's OK to reuse names on different branches, e.g., the branches of an `If-Else`or `Try-Except`brick because the bricks are not in the same scope.
## Control Flow
### Eliminate dead code
Eliminate dead code (unused code) to make easier to read what will happen during mod execution:
* Unused output variables
* Conditions that always evaluate to false
* Commented out code in the Javascript brick
## Panel Layout
### Avoid negative margin
Applying negative margin is a code smell that indicates the a container's padding is incorrect. Negative margin might improve alignment, but is often insufficient to make elements perfectly aligned
Instead of applying negative margin, use stylesheets to control the base theme's spacing:
* [Custom Themes/CSS](/developing-mods/developer-concepts/building-interfaces/custom-themes-css)
* [Remove padding from embedded form fields](https://docs.pixiebrix.com/developing-mods/developer-concepts/building-interfaces/custom-themes-css#how-do-i-remove-the-padding-from-embedded-form-elements-in-the-document-builder)
## Mod Variables / State Management
### Don't unnecessarily store values in mod variables
[Encapsulation](https://en.wikipedia.org/wiki/Encapsulation_\(computer_programming\)) makes it easier to reason about code. When you introduce a mod variable, the reader must consider how other mod components might use/modify the value.
### Don't store derived state in mod variables
Values that can be derived from one or more mod variables should be computed in a mod component instead of storing the derived value as a mod variable.
Storing the derived value complicates the mod state, and is error-prone for ensuring the mod variable invariants hold.
For example, suppose you have variables `@mod.x` , `@mod.y` , `@mod.z`. If logic needs to know if their sum is greater than 100, calculate the sum locally instead of creating a mod variable `@mod.isSumGreaterThan100` . Otherwise, every location that updates any of the 3 variables must also update the derived value.
### Refactor multiple boolean flag mod variables into a single variable encoding state
Tracking multiple boolean flags, e.g., `isRecording` and `isSummarizing` is error-prone because the invariants between the variables must be maintained at each update.
Instead, introduce a single string mod variable to track the state. The principle is to "Make Invalid States Unrepresentable". For example: introduce a variable `state` with values: `recording`, `summarizing`, `done` .
### Store mod variable values in a local variable to perform calculations involving multiple bricks
Bricks in PixieBrix run asynchronously. Therefore, the value of `@mod.x` and `@mod.y` can change between brick calls if another mod component run updates the variable.
If a mod component need a consistent view of multiple values at a point in time, use the Identity Brick to store the values in a local variable.
## JavaScript
When possible, use a single JavaScript brick to perform multiple functions instead of separating across multiple JavaScript bricks. You can use code comments inline to clarify which each function in the brick does.
# Advanced: Workshop
{% hint style="info" %}
In some cases, you'll need to build or change mods in the Workshop, which can be found in the [Extension Console](/platform-overview/extension-console). This section shows you how to configure basic YAML files in the Workshop.
{% endhint %}
## YAML
PixieBrix uses YAML, a human-friendly markup language, for defining bricks. To learn the basics of using YAML, view one of the following tutorials:
* [Learn YAML in five minutes!](https://www.codeproject.com/Articles/1214409/Learn-YAML-in-five-minutes)
* [Quoting - Learn YAML](https://www.yaml.info/learn/quote.html)
### Dictionaries/Records
```yaml
exampleProperty:
hello: 42
world: "this is a string!"
```
### Lists/Arrays
To create a list, use `-` below the parent entry:
```yaml
exampleProperty:
- hello
- world
```
You can also create a list of dictionaries. *Note the indentation!*
```yaml
exampleProperty:
- propA: hello
propB: world
- propA: hello
propB: world
```
### String Quoting Gotchas
There are several situations where you must surround a value with double quotes (`"`) to ensure it’s interpreted as a string.
#### Namespaced Brick Ids
PixieBrix supports `@user` and `@organization` to namespace bricks. When using a namespaced brick id, you must surround the id in double quotes because `@` is a reserved character in YAML
```yaml
# quotes are required
id: "@pixiebrix/get"
# quotes are not required, because it does not start with an @
id: rapidapi/api
```
#### JQuery Selectors
Certain JQuery selectors must be enclosed in quotes so that they’re interpreted as strings:
* `"#id-selector"`: the id selector `#` is interpreted as starting a comment if not surrounded by quotes
* `"[name='submit']"`: the attribute selector `[` is interpreted as a list if not surrounded by quotes
#### Templates
Templates are described in more detail below. Because they begin with a `{` if you don’t surround them in quotes they’re interpreted as a mapping
* `"{{ myVariable }}"`
The exception is when writing multi-line strings using `|` you do not have to enclose them in quotes:
```yaml
field: !nunjucks |
{{ myVariable }} {{ anotherVariable }}
```
#### Variable references
In PixieBrix, variables and integration configurations referred to using a `@` before their name. Because they start with a “@” you must enclose them in quotes.
```yaml
service: !var "@nytimes"
prop: !var "@myOutputKey"
```
## Runtime API Version
The `apiVersion` directive controls how PixieBrix's runtime interprets the brick.
Whenever backward incompatible changes are introduced, we increment the apiVersion. If you do not specify the apiVersion, it defaults to v1
```yaml
apiVersion: "v3"
```
* `v1`: our initial release
* `v2`: made data flow between bricks explicit. Bricks had to reference data from previous bricks using the `@outputKey` for that brick
* `v3` (*supported in the runtime, but not yet supported in the Page Editor*). Uses explicit tags for `!var`, `!mustache`, and `!nunjucks`
## Variables
```yaml
prop1: !var "@variable"
listOfVariables:
- !var "@variable1"
- !var "@variable2"
```
You can provide a path, which also supports [optional chaining](https://developer.mozilla.org/en-US/docs/Web/JavaScript/Reference/Operators/Optional_chaining):
```yaml
# if optionalChild doesn't exist on variable, returns undefined
prop: !var "@variable.optionalChild?.childProp.grandchildProp"
```
Arrays are indexed using a numeric property:
```yaml
# get itemProp from the first element in the array
prop: !var "@myArray.0.itemProp"
```
## Templating
PixieBrix supports a number of templating engines for wiring together bricks.
### Nunjucks / jinja2
[Nunjucks](https://mozilla.github.io/nunjucks/) is a Javascript port of [jinja2](https://jinja.palletsprojects.com/en/2.11.x/) supports logic including conditionals and mathematical expressions.
```yaml
- id: "@pixiebrix/html"
templateEngine: nunjucks
config:
html: !nunjucks "{% if person %} {{ person.name }} {% else %}"
```
## Brick Directives
Use the following brick directive when creating components and mods
```yaml
# The id of the brick. Must surround in quotes if the id starts with a @
id: "@pixiebrix/foo"
# (Optional) controls which tab the brick is run in
# - self: the tab where the foundation is located
# - origin: the tab that opened this tab
# - target: the last tab that this tab opened
# - broadcast: runs the brick in all the available tabs, returning the result as
# an array
window: self
# (Optional) a property name to store the result of the variable in.
# Can be accessed as @propertyName in subsequent bricks
outputKey: propertyName
# (Optional) condition expression written in template language
# for deciding if the step should be run. If not
# provided, the step is run unconditionally
#
# Truthy: true, "true", "t", "yes", "y", "on", "1", non-zero numbers
# Falsy: values that aren't truthy
if: !nunjucks "{{ myCondition }}"
# (Optional) root JQuery selector for reader. If not provided,
# the default is used. The default is the document
root:
# (Optional)
# - inherit (default): inherit the root from the foundation. For triggers/context
# menus, this is the eventTarget
# - document: use the document as the root for the element
rootMode:
# The configuration to pass to the block. Required. For blank configurations
# pass an empty dictionary {}
config: {}
```
## Package Browser Extension Range
To set a minimum browser extension version, or allowed range, set the `extensionVersion` directive in the package metadata.
The `extensionVersion` directive supports a [semantic version (SemVer) range](https://docs.npmjs.com/cli/v6/using-npm/semver#ranges):
```
metadata:
id: "@docs/my-modern-mod"
name: Mod with minimum version number
description: Blueprint exported from PixieBrix
extensionVersion: ">=2.2.1"
```
When used with Mod Deployments, if the user's browser version does not meet the extension range, PixieBrix will prompt the user to update their extension. See [Deploying Mods](/deploying-mods)
### Setting autofocus for inputs
If you want a form field to be autofocused so a user can start typing immediately, you'll need to add the `ui:autofocus: true` attribute to the field properties for the uiScehma in the workshop.
Example:
```
uiSchema:
userMessage:
ui:widget: textarea
ui:options:
rows: 1
submitOnEnter: true
submitToolbar:
icon:
id: >-
https://stylesheets.pixiebrix.com/foundever/icons/arrow-up-circle-fill.svg
size: 16
library: url
show: true
# Add the line below to set the field to autofocus when the form is rendered.
ui:autofocus: true
ui:placeholder: !nunjucks Ask a question...
ui:submitButtonOptions:
norender: true
submitCaption: Submit
```
# Mod Configuration Options
Mod Configuration Options let developers define customizable settings that can be configured by:
* **Mod users**, when [activating a mod](/activating-mods)
* **Team administrators**, when [deploying a mod](/deploying-mods) to their organization
These settings are ideal for things like:
* Setting a default language
* Choosing which database to reference
* Enabling or disabling specific features (feature flags)
Once set, the values are passed into the mod at runtime and can be accessed in your mod using `@options.variableName`.
### Defining a Configuration Option
Each option includes:
| Field | Description |
| --------------------- | ---------------------------------------------------------------------------------- |
| **Name** | The variable name used in `@options.variableName` |
| **Label** | Displayed in the form |
| **Field Description** | Optional text to provide with instructions for setting the text. Accepts markdown. |
| **Type** | Input type (text, dropdown, checkbox, databse selector, Google Sheet, etc.) |
| **Default** | Optional starting value |
| **Placeholder** | Hint displayed before entering text |
| **Required** | Optional flag to require thjis field for activation or deployment. |
#### Example
Then use `@options.user` anywhere in your mod.
***
### Best Practices
* Use clear, human-friendly labels.
* Use dropdowns or checkboxes to guide user input and provide consistency in options.
* Set default values to reduce friction.
* Group related options together when possible.
* Do not use for storing sensitive information, like API keys or secrets.
***
### FAQs
**What’s the difference between `@options` and `@input`?**\
`@options` refers to configuration values set when the mod is activated or deployed. `@input` is used to collect information about the current page each time a mod runs.
**Can I hide options or values from users?**\
No. All configuration options are visible when the mod is activated or deployed. For this reason, displaying secrets is not advised. Use an Integration to store and process API keys and tokens safely.
**Can I update options after deploying a mod?**\
Yes. Users or team admins can update the deployment options at any time.
**Do configuration values persist across sessions?**\
Yes. Once set, configuration values persist until updated in the deployment or the mod is reactivated.
# Platform Overview
This section provides an overview of the user-facing components of the PixieBrix platform:
* [Page Editor](/platform-overview/page-editor): low-code editor for creating and editing mods
* [Extension Console](/platform-overview/extension-console): local console to activate/deactivate mods and share mods with your team
* [Admin Console](/platform-overview/admin-console): web application where you configure team settings (e.g., team members, integrations, and deployments)
# Page Editor
## Page Editor Overview
The Page Editor is a point-and-click interface to add actions and enhancements to any website without writing code. The Page Editor is included with the PixieBrix Browser Extension.
Learning to use the Page Editor enables you to automate your work, and customize the tools you use most.
Start by learning how to [Open The Page Editor](/platform-overview/page-editor/open-the-page-editor).
# Open the Page Editor
The Page Editor used to develop and customize mods.
### Open from the Floating Action Button
To access the Page Editor, you can click the Bricks icon that appear when you hover over the Floating Action Button that appears on any page:
{% hint style="info" %}
Don't see the PixieBrix Floating Action Button? You may have disabled it on a current page. You can head to your [Extension Settings](/platform-overview/extension-console) to re-enable it.
{% endhint %}
### Open from the Quick Bar
Alternatively, you can open the Page Editor from the PixieBrix Quick Bar by pressing CMD/Ctrl + M and choose the **Open Page Editor** action.
### Open from the Sidebar
Click the PixieBrix icon from the Chrome Extension menu to open the Sidebar. At the bottom of the main tab, choose the **Open Page Editor** link.
Excellent work! Now you’re ready to dive into the [Page Editor Components](/platform-overview/page-editor/page-editor-components).
### Troubleshooting
If you can't find the Page Editor, try these troubleshooting tips.
#### Check for hidden tabs
If you've opened the Chrome Dev Tools ([*how?*](https://developer.chrome.com/docs/devtools/open)) and don't see the PixieBrix tab, you might need to click the **>>** icon at the end of the tabs.
Still don't see it? Keep reading!
#### Make sure you've got the Extension installed.
Head to [app.pixiebrix.com](https://app.pixiebrix.com/) and confirm that you see a button that says **Open Extension Console**.
✅ Extension has been installed if you see this:
If it says **Install from Chrome Web Store,** you need to install the Chrome Extension. Click the button from the Admin Console to install.
#### Go to an extension-accessible page
You cannot access the Page Editor from a blank new tab page or certain pages, like the [Extension Console](/platform-overview/extension-console).
To see if you're on a page that PixieBrix can't access, click the PixieBrix icon in the Chrome Extension section of your URL bar.
✅ If the sidebar opens, you're on a page that PixieBrix can access!
🛑 If you see a modal that says PixieBrix mods cannot run on this page, then you'll need to go to another page to access the Page Editor.
Try visiting another page, like [Linkedin](https://www.linkedin.com/), [GitHub](https://github.com/), [Wikipedia](https://www.wikipedia.org/), or even [the PixieBrix website](https://www.pixiebrix.com/).
#### Still having issues?
Pick one of the following ways to get support:
* Join the [PixieBrix Slack Community](https://slack.pixiebrix.com/) and post in the #learning channel
* Send an email to
# Page Editor Components
The Page Editor consists of 4 panels:
* [**Mod Listing Panel**](/platform-overview/page-editor/page-editor-components/mod-listing-panel)**:** a list of activated mods
* [**Brick Actions Panel**](/platform-overview/page-editor/page-editor-components/brick-actions-panel)**:** the outline of the bricks in the currently selected mod/starter brick
* [**Brick Configuration Panel**](/platform-overview/page-editor/page-editor-components/brick-configuration-panel)**:** the configuration for the brick currently selected in the Brick Actions Panel.
* [**Data Panel**](/platform-overview/page-editor/page-editor-components/data-panel)**:** shows multiple tabs with the data available to the selected brick and produced by the brick\
Keep reading to learn about the panels and their purposes.
# Mod Listing Panel
The first panel in the Page Editor lists your available mods. This is called the **Mod Panel.**
### What is a Mod?
A mod is a grouping of one or more actions and enhancements that can run on a web page. Mods are created by combining any number of mix-and-match steps called **✨ Bricks ✨.**
### Mods Panel Layout
At the top of the Mods Panel, there are three buttons:
1. The home icon takes you to a view where you can discover templates
2. The "New Mod" button is where you start building a new mod
3. The << button collapses the panel.
* **Home Button:** clicking the home button takes you to the Page Editor welcome message, showing helpful links and resources
* **New Mod Button**: This is where it all begins! Clicking Add shows the starter bricks you can select for [Types of Mods](/developing-mods/developer-concepts/types-of-mods).
* **Collapse/Expand Button:** click to collapse the Mods Panel. You can re-expand the panel by clicking the button again.
Each mod listed has the following information and actions:
* **Icon:** indicates the type of starter brick
* **Name:** the name of the mod or mod package
* **Save Indicator/Button:** click the button to save changes. The button will only be enabled if there are unsaved changes
* **Action Menu** (three dots menu): a dropdown menu with the following actions:
* Reset: resets any unsaved changes
* Remove: remove a mod from your device. The mod will still be available from your PixieBrix account
* Add to Mod: add the action/enhancement to a new or existing mod
* Remove from Mod: remove an action/enhancement from a mod
* Make a Copy: create a copy of the mod
### Search For a Mod
Mods are sorted alphabetically in the mod panel. Use the search bar below the Add button to search for the name of a mod instead of scrolling through your list.
{% hint style="info" %}
If you want a mod to always appear at the top of the list, start the mod name with `A` or a symbol like `[`.
{% endhint %}
# Brick Actions Panel
Select a mod from the [Mod Panel](/platform-overview/page-editor/page-editor-components/mod-listing-panel) and you'll see a new panel appear directly to the right. This panel is called the Brick Actions Pipeline, and it displays the bricks that are associated with a mod.
{% hint style="info" %}
You can think of the Brick Actions Pipeline as a step-by-step workflow showing what happens when a mod runs.
{% endhint %}
The toolbar at the top includes two action buttons that apply to the selected brick below it.
* **Copy (Copy Icon)**: copies the selected brick. You can paste the brick into the same mod or another mod.
* **Delete (Trashcan)**: deletes the selected brick.
{% hint style="info" %}
The first item in the outline is always one of the Starter Bricks. Learn more about Starter Bricks in [Types of Mods](/developing-mods/developer-concepts/types-of-mods).
{% endhint %}
Below the starter brick, you'll find a list of bricks in the mod that will be run when the mod is initiated.
### Brick Summary Information
Each brick displays a summary of it’s information:
* Icon: indicates the type of brick
* Label: the brick name, or custom label set in [Brick Configuration Panel](/platform-overview/page-editor/page-editor-components/brick-configuration-panel)
* Output Variable Name: the variable name of the brick output (also set in the [Brick Configuration Panel](/platform-overview/page-editor/page-editor-components/brick-configuration-panel)
* **Brick Status Indicator**: the status from the mod’s latest run. This is useful for [Troubleshooting](/developing-mods/troubleshooting) if your mod isn't working
### Brick Actions
#### ➕ Adding a Brick
To add a brick, click the **+** icon in the location to add the brick.
#### 🛠️ Configuring a Brick
To configure a brick, select the brick, and options appear in the [Brick configuration panel](/platform-overview/page-editor/page-editor-components/brick-configuration-panel) in the center of the Page Editor.
#### 🔄 Moving a Brick
To move a brick, click the up or down arrow for that brick.
Next, learn about [adjusting the settings](/platform-overview/page-editor/page-editor-components/brick-configuration-panel) of a selected brick.
# Brick Configuration Panel
When you select a specific brick in the [Brick Actions Pipeline](/platform-overview/page-editor/page-editor-components/brick-actions-panel), you'll see a panel appear to the right that has options for configuring specific information about that brick.
The Brick Configuration Panel is the heart of the Page Editor. This is where you will configure the nuts and bolts of your bricks.
### Brick Configuration Panel Layout
The Brick Configuration Panel showing the configuration for the Window Alert Brick
#### Step Name
A custom step name to display in the Mod Outline Panel and in error telemetry. If you do not provide a name, it defaults to the name of the Brick
#### Output Key
The output variable name. The field will appears as disabled if the brick does not produce an output. For example, the Window Alert brick in the screenshot above does not produce an output.
{% hint style="info" %}
Output Key Tips:
* If you enter `name`, it will be available to other bricks as `@name` . (The field adds the `@` prefix for you automatically.
* Two bricks can have the same output key. The second brick’s output will replace the output of the first brick. For readability, the best practice is to use unique output keys. The exception is when the bricks are configured to conditionally run (See Advanced Option: Condition)
{% endhint %}
### Brick Input Section
The Input section contains the primary brick-specific configuration for the brick. The configuration options vary by brick.
#### Brick Documentation Link
If the brick is from the [PixieBrix Marketplace](https://www.pixiebrix.com/marketplace/), you can view its documentation by clicking the View Documentation link at the top of the card.
#### Input Entry Modes
To the right of each input field, there’s a dropdown for controlling the input entry mode for the field. You can learn more about these entry types in the [Brick Data Types](/developing-mods/developer-concepts/using-bricks/brick-input-data-types) documentation.
### Advanced Options Section
As the name implies, the Advance Options section includes advanced controls that may not be necessary for most uses but can be helpful for specific actions.
#### Condition Field
If you provide a condition, the brick will only run if the condition evaluates to a truthy value. For convenience, PixieBrix considers some text as truthy: `true`, `yes`, `y`, `on`, and `1 .`Learn more about how to set logic and control the [Conditional Field on Bricks](/developing-mods/developer-concepts/control-flow/conditional-field-on-bricks).
#### Target Field
The Target Field controls *where* the brick executes. The most frequently used targets are:
* Current Tab: the current tab/frame (default)
* Opener: the tab that opened this tab
* Target: the most recent tab that *this tab* opened. For example, when using the [Open a Tab brick](https://www.pixiebrix.com/marketplace/08e548bb-a7b5-4377-8a11-f3040a634b66/open-a-tab/)
{% hint style="info" %}
💡 **Example of using Target: Target Tab to automate form fill**
\
If you want to open a tab and fill out a form on the tab
1. Add the [Open a Tab brick](https://www.pixiebrix.com/marketplace/08e548bb-a7b5-4377-8a11-f3040a634b66/open-a-tab/) with Target: Current Tab (self)
2. Add the [Form Fill brick](https://www.pixiebrix.com/marketplace/f5664004-d57c-4ca3-9526-da7f0087730b/form-fill/) with Target: Target Tab
{% endhint %}
#### Root Field
Some bricks are “root-aware”. They operate using the context of an element on the page. For example, when creating a Trigger that runs on an element, the bricks attached to the trigger run in the context of the element that caused the trigger to run.
Root-aware bricks use the element to base selector evaluation on (to find a sub-element), or to determine which data to return about an element.
The Root Field has two options:
* Inherit: use the current root element
* Document: force using the document as the root element
There's one more panel to explore in the page editor. Explore the [Data Panel](/platform-overview/page-editor/page-editor-components/data-panel) to view your brick's output.
# Data Panel
The data panel shows the input/output for specific bricks.
The right-most panel in the Page Editor is the Data Panel. As the name suggests, the Data Panel displays information about a brick's inputs and output data.
The Render Tab of the data panel displaying inputs passed to the Window Alert Brick
The Data Panel has 4 tabs:
* **Context**: the input context available to this brick. All of the variables available to the brick from the previous bricks and mod options
* **Rendered**: the values that were passed into the brick on the last run.
* Here, “Rendered” refers to filling the context into text templates
* **Output**: the output of the brick on the last run
* **Preview**:
* General: shows a preview of the bricks output, using the input context from the last run, and the current configuration. PixieBrix updates this tab in real time as you update the brick configuration
**ℹ️ Pro-tip: the preview panel is extremely valuable when using the Regex and JQ bricks to transform data**
* When configuring the [Show a modal or sidebar form brick](https://www.pixiebrix.com/marketplace/78fe8f15-dd68-40d1-bc5f-e5b992820bf1/show-a-modal-or-sidebar-form/), the preview displays the form outline
* When configuring the [Render Document brick](https://www.pixiebrix.com/marketplace/49b356c6-5461-46b7-8089-0f84d03c3744/render-document/), the preview displays the document preview
Now that you know all about the Page Editor, it's time to learn how to connect and manage your team in the [Admin Console](/platform-overview/admin-console).
# Admin Console
{% hint style="info" %}
If you're a team member you probably won't be spending much time here. Check out the [Extension Console](/platform-overview/extension-console) instead.
{% endhint %}
You might have noticed as you completed activation and account signup that you found yourself in a portal that looked a bit like this.
This is the Admin Console and you can think of it as your home for setting up anything with your team for PixieBrix.
### What is the Admin Console?
The Admin Console is a web app for creating and managing PixieBrix teams, viewing user telemetry, troubleshooting errors, and more. You can access the Admin Console at .
The Admin Console has multiple sections, some of which may be hidden depending on your role.
### 📖 Campaigns
A Campaign is a reporting entity to track engagement for a set of team members.
* [**🌐 Click here to learn how to create a Campaign**](/platform-overview/admin-console/campaigns)
### 👩💻Groups
Groups are sets of team members that have access (read or edit) to any number of bricks, databases, and shared Cloud Integration configurations. Additionally, an Admin can associate a Deployment with one or more Groups to have PixieBrix automatically deploy a Mod to those team members.
* [**🌐 Click here to learn more about Groups**](/managing-teams/access-control/groups)
### 📤 Deployments
Deployments enable an Admin to automatically provision PixieBrix mods to groups of team members.
* [**🌐 Click here to learn more about Deployments**](/deploying-mods)
### 💽 Databases
Team Databases enable a mod to store data across runs, installs, and team members.
A Team Database is a key-value store. Each record is referenced by a unique key, and stores a JSON object.\*\*\*\*
* [**🌐 Click here to learn more about Team Databases**](/storing-data-with-team-databases)
### 🤖 **Service Accounts**
Service Accounts are API-only accounts. Like their human counterparts, Service Accounts have a Role and can be added to a Group(s). Unlike human team members, Service Accounts do not count toward your Organization's subscription utilization.
* [**🌐 Click here to learn more about how to use Service Accounts**](/developer-api/service-accounts)
### 📈 **Telemetry**
Telemetry provides engagement and errors information to help you detect, diagnose, and debug problems with mods.
If you want to enable email notifications when a new member joins your team or when a new error occurs in a deployment, click the **Contacts** tab and specify a new contact:
At the bottom of the Admin Console you’ll find your teams’ **Settings**, which enable an Admin to configure:
* Your team’s **name**
* Your team’s **scope** (the identifier after the @ sign that provides a unique namespace for brick and mods your team creates)
* Your team’s **default** role: the role automatically assigned to any new team member associated via email domain or Group membership (Enterprise-only)
Learn more about [Telemetry](/platform-overview/admin-console/telemetry).
# Campaigns
#### Creating a Campaign
To create a Campaign, click the Create Campaign button.
Provide a unique Campaign name, and click to upload CSV file containing the list of members in the campaign. The upload CSV file must have the following columns:
* *Email*: the members email address
You can optionally provide additional custom columns for reporting. For example:
* *Office*: the site/location of the team member
* *Organization Unit*: the business unit of the team member
### Updating a Campaign
{% hint style="danger" %}
The uploaded list of members *replaces* the current members of the campaign
{% endhint %}
To update the members associated with the campaign, click the “Edit Campaign” button on the Campaign Detail page:
The upload CSV format has the same structure for campaign creations.
In order to facilitate re-upload of a member list generated via “Export” (see Campaign Details below), the following columns in the upload file are ignored:
* Status
* Date Joined
* Extension Version
* Last Seen
\
----------------------------------------------------------------------------------------------------
# Telemetry
From the Admin Console, you can view Telemetry to provide information for any errors that may be occuring across your deployed mods.
### How to find telemetry
Go to the [Admin Console](https://docs.pixiebrix.com/) and select Telemetry from the left side of the page.
On the Overview Page, you'll see a list of your deployments in a tbale, with their stauts, engagement, number of errors, and when the last error was seen.
{% hint style="info" %}
This view is help for general monitoring and flagging any mods that have increased or recent errors.
{% endhint %}
Click the **Error Feed** tab to view a table of specific errors.
Each row provides helpful information about the scope of the errors, and details about where the error is happening.
{% hint style="info" %}
Clicking the number in the Users column opens a modal with a list of users who have experienced the error.
{% endhint %}
### Debugging specific errors
Use the Deployments and Mod/Step columns to determine where the error is happening. Scroll to the end of the row for more information about the specific error message, PixieBrix version, Platform (Browser Extension vs Web App), and a Request URL if relevant.
{% hint style="success" %}
Use the Find feature in the data panel to search a brick name across a mod.
{% endhint %}
Once you've identified the brick it's happening in, it's helpful to activate the mod locally and follow [General Mod Troubleshooting](/how-to/troubleshooting/general-mod-troubleshooting) practices to debug the error.
### Types of errors reported to telemetry
When a user encounters an error in the mod, it will be reported to mod telemetry.
Errors that are handled via Try/Catch will not be reported, unless you explicity use Raise Business Error brick.
# Extension Console
The Extension Console is a portal for activating and deactivating mods, discovering new ones, making edits to mods and bricks in the workshop, setting up personal integrations and databases, as well as updating other settings.
There’s a lot going on there, so if you feel overwhelmed, don’t worry—this guide walks you through it!
### Access the Extension Console
There are a couple of ways you can get to the Extension Console.
* Click the settings gear at the top of the PixieBrix Sidebar\

* Click **Open Extension Console** from the [Admin Console](/platform-overview/admin-console)\

### Mods Page
When you first arrive in the Extension Console, you'll land on the Mods Page, which shows your mods.
The filter menu to the left gives you options for filtering results or searching for a specific mod. You can search by a mod name or id.
### Workshop
{% hint style="info" %}
The workshop is an advanced section and not required for most uses of PixieBrix.
{% endhint %}
At the core, each PixieBrix mod (and brick) is really a YAML file that details a mod's composition. In the workshop, you can view a mod's YAML file and edit as you see fit.
Search for the mod, brick, or integration you want to edit.
Select the desired mod by clicking on it. Inside, you'll see the YAML file detailing the composition of the mod, brick, or integration.
### Integrations
PixieBrix integrates with many tools, such as Automation Anywhere, Google Drive, Trello, Airtable, and more. You can set local integrations via the Integrations menu in the Extensions Console.
These integrations will never access the PixieBrix server and will only be accessible on your device.
Learn more about [Integrations](/integrations).
### Settings
You'll use the Settings section to make changes to the browser extension.
Use these settings when you need to:
* Set or clear local logs
* Enable beta features
* Recover databases
* Reset PixieBrix
* Clear tokens
* Check for updates
# Managing Teams
Many PixieBrix developers create mods for their entire team to use. This section of the docs explains how to share mods with others and interact with your team in PixieBrix.
# Creating a Team
{% hint style="info" %}
When you create a Team, you are automatically added as an Admin for that team.
{% endhint %}
If you've never created a team, you'll be prompted to click **Create Team** at the top of the Admin Console, enter a team name, and click **Create Free Team Account**.
If you already have a team and want to create a new one, click the **Team Selector** in the top nav bar.
Then, click the **Create Team** button at the bottom of the dropdown:
# Inviting Members
### Select Members from the Admin Console
You can access the [Admin Console](/platform-overview/admin-console) at app.pixiebrix.com. Make sure the desired team is selected at the top.
Click Members on the left side nav.
### Invite and assign a role
Click the **Invite** button in the top right, then input the new teammate's email addresses, assign roles, and click **Invite Team Members**.
{% hint style="info" %}
You can change a member's role later if needed. Learn more about [Roles](/managing-teams/access-control/roles).
{% endhint %}
### Add more or click Invite Team Members
You can add more by clicking the **Add Invite** button below the input fields.
Once you've added as many members as you'd like click the Invite Team Members Button.
### Automatic Team Enrollment / Domain Capture
{% hint style="info" %}
Domain capture is only available on the Enterprise plan.
{% endhint %}
PixieBrix can be configured to automatically associate users with a given email domain(s) with your team. Team members can automatically added with one of two roles:
* Member
* Restricted
To enable automatic enrollment for your organization, contact
# Access Control
Learn more about [Roles](/managing-teams/access-control/roles) and [Groups](/managing-teams/access-control/groups).
# Roles
### Types of Roles
A team member can have one of five roles:
* Admin: can manage the team, its members, and deployments
* Manager: can perform non-destructive admin actions
* Developer: can create/edit/delete bricks and mods in the team's private scope
* Member: a full member can use mods and integration configurations within the team scope
* Restricted (default): must be added to a permissions group to access team mods and other resources
For enterprise teams, most team members should be "Restricted".
#### Role Permissions Matrix
The following table lists the base permissions for each role.
Resource/Role
Admin
Manager
Developer
Member
Restricted
Team Members
View, Invite,
Edit, Delete
View, Invite
No
No
No
Groups
View, Edit, Delete
View, Edit
No
No
No
Mods/Packages
View, Edit, Delete
View, Edit, Delete
View, Edit, Delete
View
No
Integration Configurations
View, Edit, Delete
View, Call No Access to Secrets
View, Call No Access to Secrets
View, Call No Access to Secrets
No
Mod Deployments
View, Edit, Delete
View, Edit, Pause/Unpause
No
No
No
Campaigns
View, Edit
View, Edit
No
No
No
Databases
View, Edit, Delete
View, Edit
No
No
No
#### Granting Additional Permissions
* Use permission groups to authorize read/edit access to specific resources (see [Groups](/managing-teams/access-control/groups)). When deploying a mod to a Group, PixieBrix will automatically prompt you to grant the required authorization for the mod.
* Admins/Managers can assign Deployment Manager groups to receive manager access to a Deployment and its related resources (see [Deploying Mods](/deploying-mods))
### Changing a Team Member's Role
If you decide to change a current team member’s role, you can do so by clicking on their name in the team list on the ***Members*** screen.
On the Member Detail screen, you can edit the member's role by clicking on the Role row. PixieBrix will show a dropdown allowing you to select a new role for the member. PixieBrix will automatically save and apply the new role.
### Applying User Interface Restrictions for Restricted Team Members
{% hint style="info" %}
User interface restrictions for restricted users are only available on Enterprise plans
{% endhint %}
To enable interface restrictions for Restricted team members, you can just contact . Interface restrictions include:
* Hiding references to the PixieBrix Marketplace
* Disabling the ability to deactivate deployments
* Disabling the Page Editor
# Groups
Groups are sets of users that have access (read or edit) to any number of bricks and shared integration configurations. Additionally, an Admin can associate a Deployment with one or more groups to have PixieBrix automatically deploy those deployments out to those users.
### Creating a Group
To create a Group, select the “Groups” menu item in the side nav, and then click Create Group:

### Adding Group Members
To add Group Members, click the “Add Members” button, and select one or more registered accounts. To add unregistered team members to the group by email, see “Uploading Group Member Emails” below.
### Uploading Group Member Emails
To upload a list of group members, click the “Upload” button on the Group Detail page. In the dialog, upload a CSV file with a “Email” column.
⚠️When uploading emails, current group members who are not in the upload file will be removed from the group
When you select a file, PixieBrix will show a summary of the membership changes:
Unlike when using the “Add Members” dialog, you can provide email addresses that aren’t currently registered with PixieBrix. When an individual with that email address registers with PixieBrix, they will automatically be added to the group (and your organization).
# Managing Team Integrations
## Cloud Integrations
Cloud Integrations enable Admins to share access to APIs and 3rd-party services across your PixieBrix installs and team members.
Alternatively, team members can configure Personal Integrations in the Extension Console. Credentials for Personal Integrations are stored locally in the web browser.
* [**🌐 Click here to learn more about Cloud Integrations**](/integrations)
# Assigning Mods
Learn more about enabling your team to use mods with the following docs:
* Deploying mods to your organization: [Deploying Mods](/deploying-mods)
* Self serve management: [Sharing Mods](/developing-mods/sharing-mods)
# Billing
### Subscription Utilization
To view your organization's seat utilization under your billing plan, click on the "Subscriptions" on the Team Card:
PixieBrix will display the number of Daily Active Users (measured by unique email addresses) and the contribution toward your billing plan utilization:
# Advanced: Isolating Development, Test, and Production Environments
Information on logically isolating development, testing, and production PixieBrix environments
For enterprises with complex deployment scenarios or strong compliance requirements, PixieBrix's Team [Access Control](/managing-teams/access-control) can be too permissive/restrictive.
We recommend isolating development, test, and/or production environments using PixieBrix's Teams in these scenarios. PixieBrix teams are logically isolated and roles/authorization can be assigned per-team.
## Architecture Overview
* Environments: Create a PixieBrix Team for each environment (see [Creating a Team](/managing-teams/creating-a-team)): Development, Test, and Production
* PixieBrix Teams are logically isolated
* Team Membership
* Production: User Principals are automatically assigned to the Production Team via SSO/SAML or domain capture.
* Development/Test: Admin invites users to the team(s) by email address
* Authorization: Production is restricted by default, Development/Test environments are more permissive depending on requirements
* Mods: are developed under the Development team and then *copied* to the Test/Production team(s) via the Page Editor or Workshop. *Shared team mods can only be deployed by the team that owns the mod.*
* Package Definitions (e.g., bricks, integration definitions):
* Developed under the Development team and then copied to the Test/Production team(s) via the Workshop
* Production Package Definitions are *shared* with the Development/Test teams to be used in Mods
* Integration Configurations: integrations are configured separately for each team and selected when configuring the deployment
## Team Configuration
### Production Team Configuration
The Production Team should have production authentication/authorization rules configured:
* Authentication: [Authentication](/enterprise-it-setup/authentication)
* User Provisioning: [Setting Up SAML/SSO](/enterprise-it-setup/authentication/setting-up-saml-sso) and/or domain capture
* Authorization: Default Role: Restricted (see [Access Control](/managing-teams/access-control))
* Package Scope: `@myorg`
* Integration Configurations: production API environment/credentials
### Development/Test Team Configuration
* Authentication: authenticate using the identity provider for the Production Team
* User Provisioning: an Admin/Manager invites users to the team by email address
* Authorization: Default Role: see [Access Control](/managing-teams/access-control)
* Test: Restricted (or Member)
* Dev: Developer (or Member/Restricted)
* Package Scope: you can choose any scope, but it's common to suffix the production team scope with the environment short name: `@myorg-dev`, `@myorg-test`
## Mod Deployment Lifecycle Example
Here's an example of developing, testing, and deploying a Mod with a custom enterprise integration:
### Integration/Mod Development in the Development Environment
1. In the Workshop, define the custom integration definition under the Development Team scope, e.g., `@myorg-dev/integrations/custom`
1. Define an `origin` input on the integration, and provide that input as the `baseURL`. See [Advanced: Custom Integrations](/integrations/advanced-custom-integrations) for an example
2. In the Admin Console for the Development Team, configure a Team Integration Configuration on the Development Team, e.g., "My Custom Integration - Dev" and provide the development origin for the API, e.g., `https://dev.my-enterprise-api.com/api/`
3. In the Page Editor, build the Mod under the Development Team Scope, using the Development Team Configuration. Save the mod under the Development Team Scope, e.g., `@myorg-dev/mods/example`
### Promoting the Integration Definition to Production
{% hint style="info" %}
This section refers to promoting the integration *definition* to production for sharing across environments. The definition tells PixieBrix: 1) what information is required for the integration, 2) how to authenticate requests given that information\
\
The integration *configuration*s (providing hostnames, API keys, and secrets) will be configured per-environment
{% endhint %}
*In this example, we'll promote the Integration Definition package directly to Production.*
1. In the Workshop, open the custom integration definition and copy the YAML
2. In the Workshop, create a new package:
1. Paste the YAML from the development integration definition
2. Change the scope to the production scope: `@myorg/integrations/custom`
3. On the Sharing tab, share the brick with the Development and Test Teams
4. Click "Save" to create/share the brick
### Promoting a Mod to Testing
{% hint style="info" %}
A Mod Promotion interface is available in early access to Enterprise Customers. Contact your account representative or [support@pixiebrix ](mailto:support@pixiebrix.com)to enable for your team
{% endhint %}
1. In the Admin Console for the Testing Team, configure a Team Integration Configuration on the Test Team for the Integration Definition, e.g., "My Custom Integration - Test" and provide the testing origin for the API, e.g., `https://test.my-enterprise-api.com/api`
2. In the Workshop, open the mod definition and copy the YAML
3. In the Workshop, create a new mod package:
1. Paste the YAML from the mod definition
2. Change the scope to the testing scope: `@myorg-test/mods/example`
3. Find & replace the development integration definition use (e.g., `@myorg-dev/mods/example`) with the production package id `@myorg/integrations/custom`
4. Activate/Deploy the mod to test it. During activation, be sure to select your test configuration (e.g., My Custom Integration - Test)
### Promoting a Mod to Production
{% hint style="info" %}
A Mod Promotion interface is available in early access to Enterprise Customers. Contact your account representative or [support@pixiebrix](mailto:support@pixiebrix.com) to enable for your team
{% endhint %}
Follow the same instructions as for testing, but use the Production Team's scope. For example, the mod id will be: `@myorg/mods/example`
## Frequently Asked Questions
### Do multiple environments cost extra?
Separating environments does not cost additional money on an Enterprise plan. All teams fall under the same billing plan.
### How can I call an API in different environments without rewriting mods?
Define a Custom Integration, and expose the base API URL as an option in the definition. The base URL can then be configured at activation/deployment time. For detailed information, see:[Advanced: Custom Integrations](/integrations/advanced-custom-integrations).
### Can I deploy a mod from shared from another team/environment?
No, currently you can only deploy mods that are either 1) public, or 2) owned by the team deploying the mod. The restriction ensures changes in a Dev/Test environment don't break Production mods.
See [Deploying Mods](/deploying-mods) for more information on deploying mods
# Deploying Mods
In PixieBrix, Deployments are the way to automatically provision Mods to Groups of users on your team.
*For more information on creating/managing groups, see* [Access Control](/managing-teams/access-control).
### Create a Deployment
{% hint style="info" %}
For a Mod to be available for deployment, it must be either: 1. Defined under your team’s `@scope`, or 2. A public Marketplace Mod \
\
See [Saving a Mod](/developing-mods/sharing-mods/saving-a-mod) for information setting your team’s scope.
{% endhint %}
1. From the [Admin Console](https://app.pixiebrix.com/), click Deployments in the left side nav:
2. On the Deployments Listing page, click Create Deployment
3. In the Create Deployment modal, give your Deployment a Name\
*⚠️The deployment name will be visible to team members that receive the deployment*
4. Select a Mod by searching or scrolling the available options.
5. Select the Version (the latest version will default, but you can use the dropdown to select an older version if desired).
6. If required for the mod: provide activation options
7. If required for the mod: select an integration configuration for each integration, such as Google Drive.
### Assign a Deployment to a Group(s)
#### Create a Group with Members
If the Group does not already exist, Create a Group. See[Access Control](/managing-teams/access-control) for information on how to create and manage groups.
#### Assign the Group to the Deployment
1. On the [Admin Console](https://app.pixiebrix.com/) Team page, click Deployments in the left side nav:
2. Click on the Deployment in the list,
3. On the Deployment detail screen, click on the Groups tab\
4. At the top of the table, click the “Add Group"\
5. If the Group does not already have access to the mod, integration configurations, and databases used by the deployment, PixieBrix will prompt you to grant permissions to the group.
### Team Member Deployment Activation
⏱️ The PixieBrix Browser Extension checks every 5 min. for new/updated Deployments. Team members can also manually open the Extension Console to activate available deployments
Refer to [Broken mention](broken://pages/ZWnk2AuXunHbnFvVCQTs) instructions for activating deployments.
### Deactivating Deployments
{% hint style="danger" %}
Deleting a Deployment will also delete its configuration and audit history. To temporarily deactivate a deployment, follow the steps below to pause or remove groups from the deployment.
{% endhint %}
There are two ways to temporarily deactivate a deployment:
* Pause the deployment
* De-provision groups from the deployment
#### Pausing a Deployment
1. On the [Admin Console](https://app.pixiebrix.com/) Team page, click Deployments to go to the Deployments Listing page
2. Select the Deployment you want to deactivate
3. To temporarily pause a deployment, toggle the "Active" state on the deployment detail page
Deployment Pause Toggle
### De-provisioning groups from the deployment
1. On the [Admin Console](https://app.pixiebrix.com/) Team page, click Deployments to go to the Deployments Listing page
2. Select the Deployment you want to deactivate
3. Click on Groups to view the Groups the Deployment is assigned to:
4. Click Remove next to the Groups that you want to deactivate the deployment for.
5. To re-activate a Deployment, follow the "[Assign the Group to the Deployment](#block-dc84cb6f169b4c7fa0ae52ce2f154103)" instructions above
#### **OPTIONAL: revoke the group's access to the mod and its resources**
1. Click on on Groups in the left nav to open the Groups listing
2. Locate the group and click the group's name to open the Group detail screen
3. Click "Bricks"
4. Locate the row for the mod package id
5. Click the "x" in the Remove column
To revoke access to any integration configurations or databases, use the "Integrations" and "Databases" tab, respectively.
For more information on Group Based Access Control, see [Groups](/managing-teams/access-control/groups)
### Extension Console: End-User Deployment Deactivation
{% hint style="danger" %}
Restricted members of organizations cannot uninstall deployments. PixieBrix can be configured to send email alerts when an individual team member de-activates a Deployment. To configure this, contact
{% endhint %}
Individual Team Members can de-activate a deployment from the Active Mods screen in the Extension Console
1. Find the Deployment in the Active section
2. Click the 3-dot menu to open the mod actions
3. Click "Deactivate"
4. To re-activate the Deployment, click "Activate" in the banner
The deployment activation banner
### Frequently Asked Questions
#### Under what conditions will PixieBrix automatically open the Extension Console to prompt the user to activate deployed mods?
PixieBrix checks for deployment updates in the background every 5 minutes. If any deployment updates cannot be automatically applied, PixieBrix will open the Extension Console and show the deployment activation banner.
Currently, there are three reasons that PixieBrix would not be able to activate a deployed Mod automatically:
* The deployed Mod requires permissions that are forbidden due to the Enterprise IT administrator's configured installation policy (See [Browser Extension Installation Policy](/enterprise-it-setup/browser-extension-installation-and-configuration/browser-extension-installation-policy)).
* The deployed Mod declares a minimum browser extension version that is not satisfied
* The deployed Mod has an unbound OAuth2 PKCE integration, and the user does not have exactly one local configuration for that integration
#### I removed a group from a deployment. Why is the mod still visible to the group members in the Extension Console?
Deployments control which mods are automatically activated for members of the group. Group Permissions control which mods and packages are available to members of the group.
For instructions on revoking a group's access to a mod, see [#optional-revoke-the-groups-access-to-the-mod-and-its-resources](#optional-revoke-the-groups-access-to-the-mod-and-its-resources "mention")
---
[Next Page](/llms-full.txt/1)


